![How to FIX: Windows 10 Slow Boot Issue [Complete Guide] How to FIX: Windows 10 Slow Boot Issue [Complete Guide]](https://wpcontent.freedriverupdater.com/freedriverupdater/wp-content/uploads/2021/06/28213752/How-to-FIX_Windows-10-slow-boot-issue-Complete-Guide.jpg)
A precise and easy troubleshooting guide on how to fix Windows 10 slow boot issue.
However, Windows 10 was designed to enhance the overall PC speed and hardware performance. And, most of the users are happy with their PC’s performance on Windows 10. But, not all Windows 10 users have the same experience.
Unfortunately, there are a lot of Windows 10 users who have reported slow boot problems. In addition to this, majorly the issue occurs after upgrading Windows 10 version. There could be many reasons for this problem including outdated graphics drivers, background running applications, hardware or software issues, and many more. Well, whatever the reason is, you can fix this inconvenience with the solutions mentioned below.
Permanent Solution to Fix Windows 10 Slow Boot Issue (Highly-Recommended)
Mainly, outdated graphics drivers are responsible for the slow boot issue in Windows 10. Hence, you have to ensure that graphics drivers are always up-to-date. To do so with much ease, you can seek help from Bit Driver Updater. It is a complete automatic driver updater utility that can update all the faulty or broken drivers in one click. Click on the download button shared below to get Bit Driver Updater for Free.
Easy & Quick Solutions to Fix Slow Boot Issue on Windows 10
In this section, we have put together numerous possible tactics to deal with this problem. However, you do not have to try them all, just work your way down until you find the best solution. Now, without further ado, let’s get started!
Solution 1: Turn Off Fast Startup
The first thing you can do to fix slow boot problems is to disable the fast startup feature. This feature comes enabled by default in Windows 10. The feature is supposed to decrease the start-up time by pre-loading some information regarding the boot before the computer shuts down. The feature works similarly as Hibernation does. However, many users claimed that enabled fast startup features cause issues. Hence, disabling the feature could work to fix Windows 10 slow boot issue. Below are the steps you need to follow to turn off fast startup.
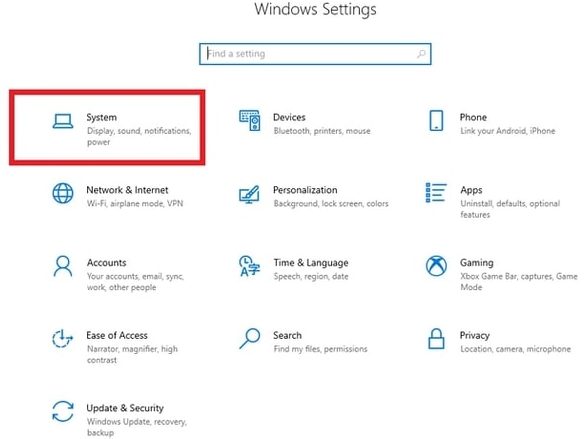
Step 1: Firstly, press Windows Logo + I keys simultaneously to open Windows Settings.
Step 2: Then, make a click on System from the available options.
Step 3: Next, choose Power & Sleep from the left pane menu.
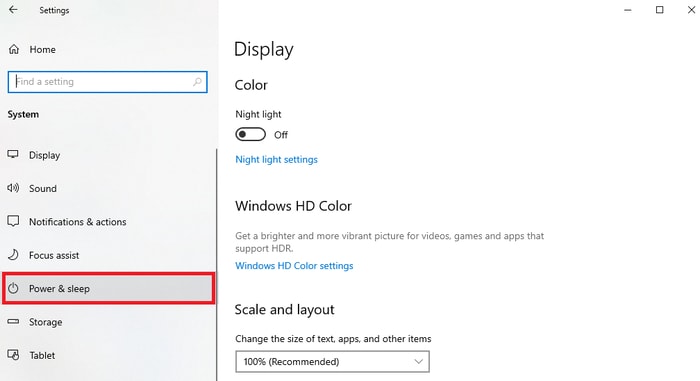
Step 4: Now, from the right side, scroll down to Additional Power Settings and click on it to launch the Power Options menu in the Control Panel.
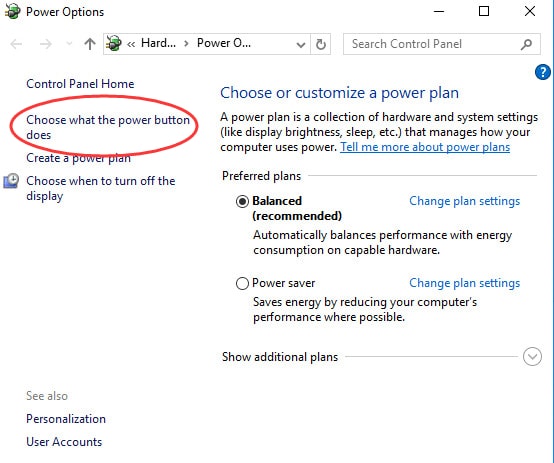
Step 5: Thereafter, on the left side of the screen, select Choose What Power Buttons Do.
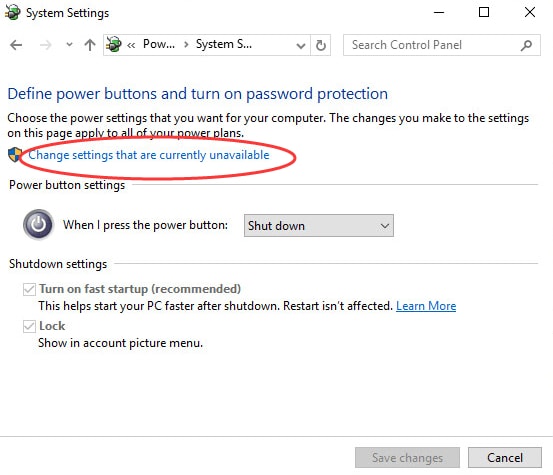
Step 6: To modify the settings on this page, you will need to give the admin permissions. So, for this make a click on the Change Settings that are Currently Unavailable.
Step 7: Now, unmark the box presented before the Turn on Fast Startup (recommended) option.
Step 8: Lastly, click on Save Changes.
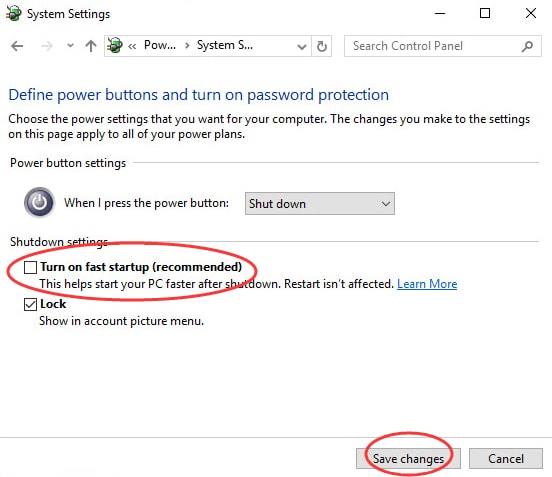
Now, after disabling the fast startup feature, restart your PC and check to see if Windows 10 slow boot is fixed. If not, then move on to the next solution.
Also Read: How to Fix Inaccessible Boot Device Error on Windows 10
Solution 2: Run Windows Troubleshooter
Another easy and quick way to get rid of slow boot issues in Windows 10 is using Windows Troubleshooter. Windows comes with an in-built troubleshooter program that has the ability to detect the corrupted files and automatically fix those corrupted files too. Here is how to run Windows Troubleshooter with simple steps:
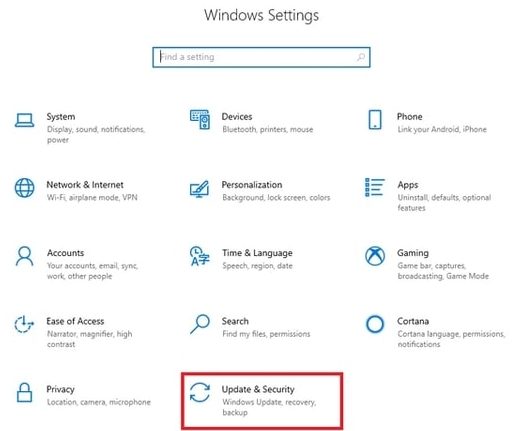
Step 1: Invoke Windows Settings by pressing the Windows logo + I keyboard buttons at a time.
Step 2: Next, choose the Update & Security option.
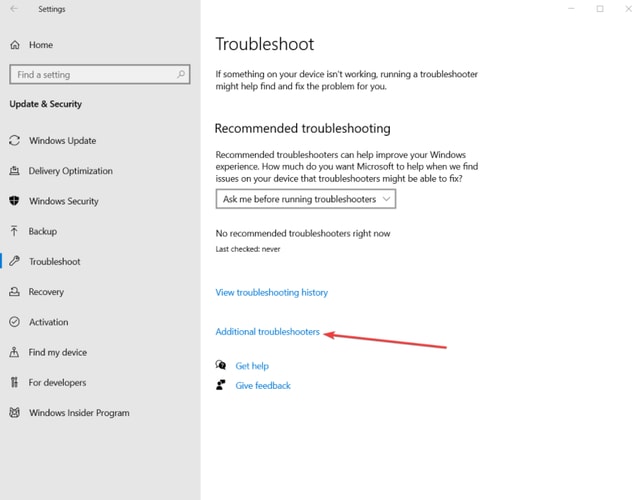
Step 3: After this, select Troubleshoot from the left pane and then Additional Troubleshooters from the right side of the screen.
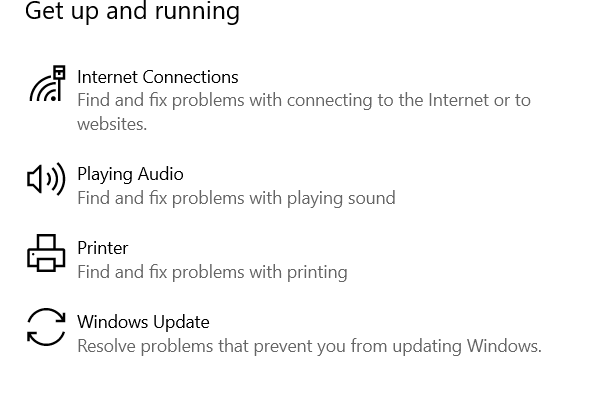
Step 4: In the next window, make a click on Run the Troubleshooter under Windows Update.
This fix worked for many Windows 10 users and could work for you too. Try this solution and check to see whether the Windows 10 slow boot issue is fixed or not.
Also Read: How to Fix Common Driver Problems in Windows 10, 8, 7
Solution 3: Eradicate All the files from WDI Directory
Windows 10 slow startup can be fixed by deleting all the files from the WDI directory. Here is a quick tutorial to do so, follow the steps below:
Step 1: Launch File Explorer on your system.
Step 2: And then, locate the following directory:
C :/Windows/System32/
Step 3: After this, head to the WDI directory.
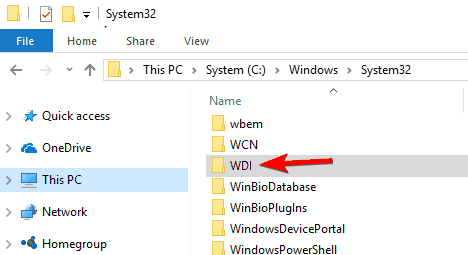
Note: If a prompt asking for permission to access the folder, then click on Continue to proceed further.
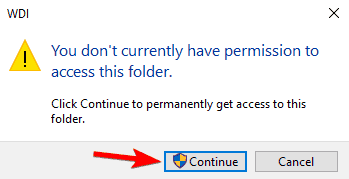
Step 4: Now, use CTRL + A keyboard shortcuts to select all the files in the WDI directory.
Step 5: Next, click right on them and choose Delete from the context menu list.
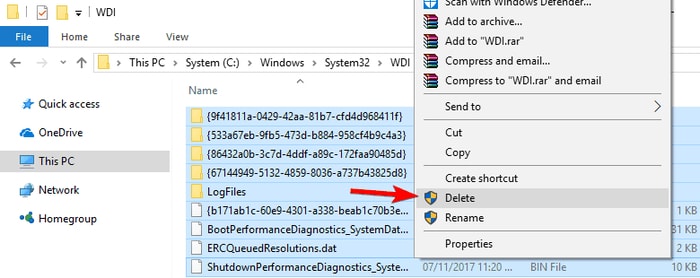
After deleting the files from the WDI directory the slow boot issues in Windows 10 will be fixed.
Also Read: How to Fix Blue Screen of Death Error on Windows 10
Solution 4: Update your BIOS
Many users have claimed that the slow boot issue has been fixed after updating the BIOS, so you can try that too. But, do keep in mind that BIOS update is a high-level and advanced process, so do it at your own risk. And, if in case, you already have the latest BIOS version, then you need to install it again.
After this, reboot the system and check whether the issue has been solved or not.
Solution 5: Update your Graphics Driver
If Windows 10 takes a long time to boot then this occurs due to outdated or faulty graphics drivers. Hence, you should keep your graphics drivers as well as the other Windows drivers too up-to-date. There are mainly two approaches to update drivers in Windows i.e., manually or automatically.
Manual Way: To update the graphics drivers manually you can visit the official website of the graphics card manufacturer. But, using this way, the user should have the proper technical knowledge, especially about the drivers.
Automatic Way: Getting the latest version of drivers installed manually is a bit tiring and daunting task. Hence, it is advisable to use the best driver updater tool to update Windows drivers automatically and quite easily. There are numerous driver updaters available in the market, but out of all Bit Driver Updater is currently trending in the marketplace. Bit Driver Updater is the globally renowned driver updater tool that has the capacity to fix all faulty and broken drivers with a single click of the mouse. Not only that, but with this driver updater, you can also fix the many Windows-related problems, like the black screen of death errors, regular system crashes, slow PC performance, and many more.
Step to update drivers via Bit Driver Updater
Step 1: First of all, you’ll have to download the Bit Driver Updater on your system. You can do so either from the official website of it or the button provided below.
Step 2: Next, double-click on the downloaded file to run it. And then, perform the on-screen instructions to get the software installed on your computer.
Step 3: After this, launch the Bit Driver Updater on your computer and let it scan your PC for outdated or broken drivers.
Note: By clicking on the Scan button you can search for compatible drivers manually.
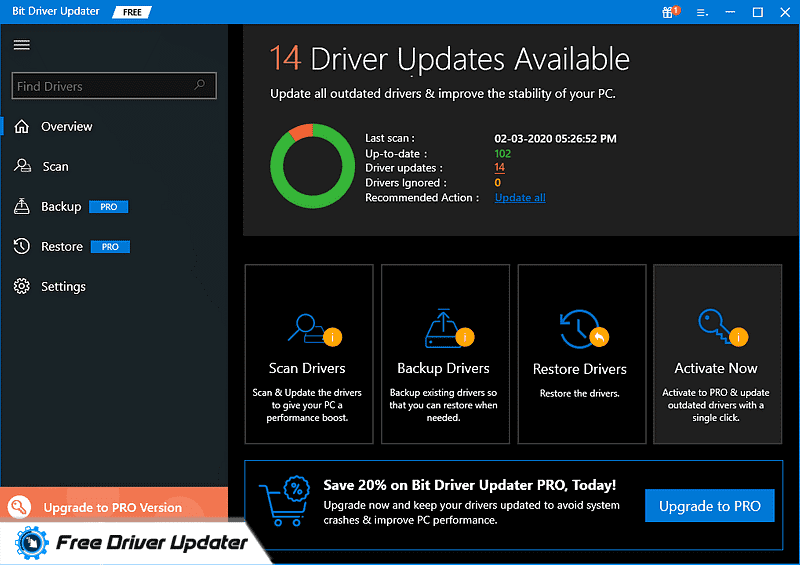
Step 4: Once the scanning is completed, then it displays a detailed list of outdated drivers. You need to review the entire list and find the problematic graphics drivers.
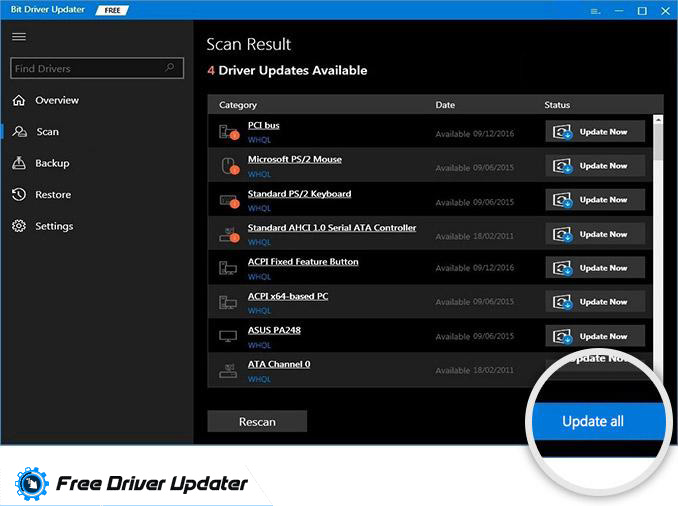
Step 5: Now, click on the Update Now button presented next to the driver.
Step 6: Furthermore, you can update all outdated drivers in one click, for this you need to click on the Update All button instead.
The most exciting thing about this driver updater is it comes with an in-built scan scheduler that lets you schedule the scan, and then, automatically start scanning on the set time. Apart from this, the software also has backup & restore support, so that if any mishappening occurs you can easily restore the older driver file. Though, all these amazing features are available only in the pro version of the software.
So, it is a wise move to rely on the pro version of it. Additionally, with the pro version, you also get a complete money-back guarantee within 60-days of the purchase period. Sadly, if your pockets don’t allow you to go for the pro version, then you can continue with the basic features of the free version.
Also Read: How to Fix Red Screen of Death in Windows 10 [Resolved]
Solution 6: Perform a Reset
If all the aforementioned solutions have failed to fix Windows 10 slow startup issue then you have to try to reset the PC. Before resetting your PC, you should back up your overall data. Here is how to reset the PC:
Step 1: Invoke Windows Settings by hitting Windows logo + I keys.
Step 2: Then, select Update & Security.

Step 3: Next, choose Recovery from the left pane and then click on Get Started under Reset This PC.
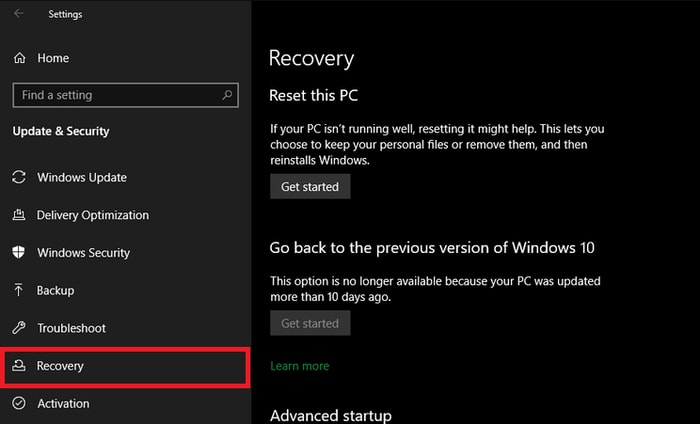
That is it, the above procedure will fix the slow boot issue in Windows 10.
Also Read: Driver Power State Failure on Windows 10: Solved
Windows 10 Slow Boot Issue: FIXED
Thus, you can easily fix the slow boot issue on Windows 10 PC. We hope the above-mentioned solutions work for you. Comment down your queries and further suggestions.
Lastly, do subscribe to our Newsletter for staying updated and informed. Also, follow us on Instagram, Facebook, Twitter, and Pinterest.


