A precise guide on how to fix Steam download slow issues, quickly & easily.
Nowadays, quite a lot of Steam users have reported slow downloading speed issues. They stated the platform takes a long while to download the games. Have you ever wondered why this happens? This inconvenience mainly occurs either by faulty network connection, or outdated network drivers. Well, whatever the reason is behind slow downloads, fortunately, this can be fixed.
If you are also running into the same issue, then don’t worry, after reading this troubleshooting guide, you will know exactly what you need to do in order to fix Steam download slow speed.
Most Workable Solution to Fix Steam Download Slow Issue For Windows PC
It takes hours and hours to find the issue and resolve it manually. Therefore, we advise you to use the Bit Driver Updater. This software keeps your network adapter drivers or other device drivers always up-to-date. Also, the software optimizes your overall PC and automatically clears the junk files, thus, leads to better and faster PC performance. One can try this amazing utility for Free from the download button shared below.
Easy Solutions to Fix Steam Download Slow for Windows PC
It can be troublesome to find the exact cause of slow download speed. This is why we suggest you try the solutions mentioned below to fix the issue directly. Now, without further hustle, check out the solutions below:
Solution 1: Delete your Download Cache
In order to fix Steam download slow issue, the very first thing you should consider is to delete your download cache. Follow the steps below to do so with ease:
Step 1: Launch your Steam Client and click on Steam, then Settings from the context menu list.

Step 2: Next, click on Downloads from the left pane, and then CLEAR DOWNLOAD CACHE.
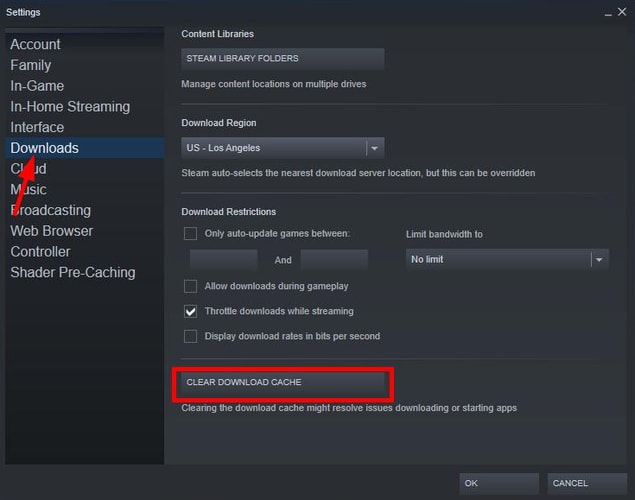
Step 3: After this, click on OK to affirm your actions.

Step 4: Now, log in to your Steam Client, and check to see if the Steam download slow speed issue is fixed.
Unfortunately, if the above fix does not work for you, then, don’t worry just try the next solution.
Also Read: How to Access Steam Screenshot Folder on Windows 10 PC
Solution 2: Re-Set the Download Server Location
Possibly, your Steam download speed may be run slower than usual because the download server you are currently using is not functioning well. If that’s your case, then rely on another server location. Steps you need to take into consideration are shared below:
Step 1: Launch Steam Client and then click on Steam.
Step 2: Next, click on Settings from the context menu list.

Step 3: After this, click on Downloads from the left menu pane, then choose the different region from the drop-down menu of Download Region.
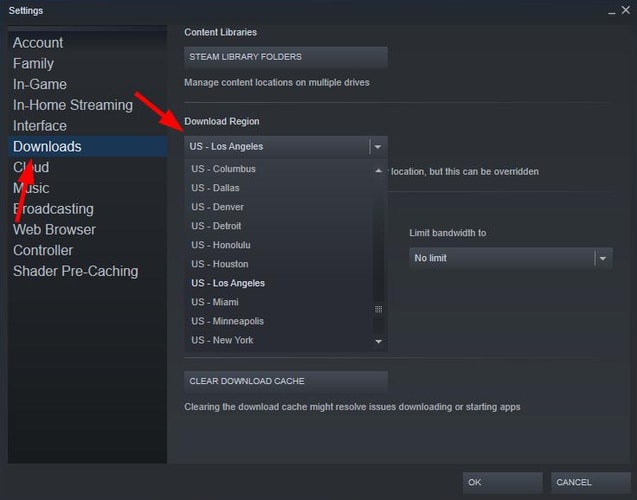
Step 4: Then, make a click on OK.

Step 5: Now, start downloading your game just to check whether this solution works or not.
If in case, still, you are having a Steam download slow issue, then move on to the next resolutions.
Also Read: Easiest Way to Fix Steam Disk Write Error on Windows 10
Solution 3: Network Connection Status
Maybe, your network connection is not working suitably which eventually slows down the Steam download speed. Hence, you should check your network connection. Here is how to fix steam download slow:
Step 1: Just be sure your PC is correctly connected to the Internet. If in case, you are using a wired network connection, then make sure that your network cable is connected properly.
Step 2: Try to reboot your network devices like router/modem and PC.
Now, check if this fixes the Steam Download Slow issue for you. If the issue persists, then contact your Internet Service Provider for suggestions.
Solution 4: Update your Network Driver
When your network drivers get out-of-date or missing you may experience slow downloads. So, if that is the case, then you should update your network driver. If you have no time, as well as required technical skills to do so manually. Then, you can try third-party software like Bit Driver Updater.
Bit Driver Updater is one of the best driver updater software which automatically recognizes your system and finds the most correct driver for you. With this driver updater software, you can also fix numerous Windows-related issues like BSOD errors, frequent system failures, etc.
Here is how to increase Steam download speed via updating the network drivers:
Step 1: Try Bit Driver Updater for Free from the download button mentioned below.
Step 2: Run the setup file and go with the onscreen instructions to finish software installation.
Step 3: After this, trigger the Bit Driver Updater on your PC and wait for a few minutes until the software scans your complete machine for broken, faulty, or missing drivers.
Step 4: Go through the scan results and locate the network driver. Then, click on the Update Now button alongside the network driver.
In addition to this, with the help of the pro version of Bit Driver Updater, you can update other outdated drivers as well along with network drivers. To do so, just click on the Update All button.
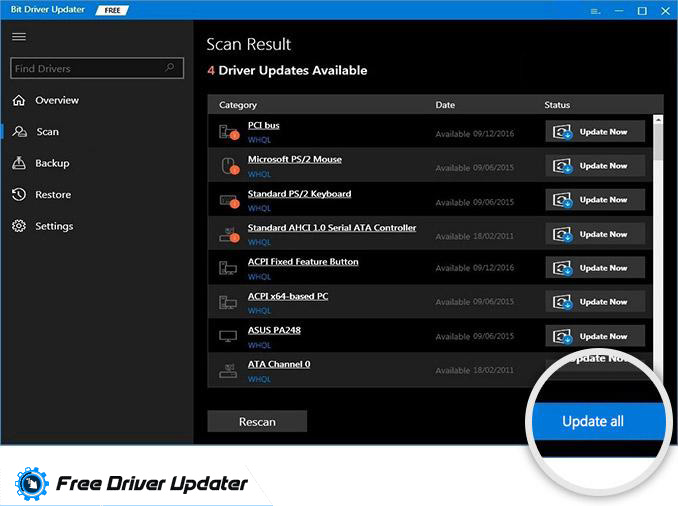
That’s all you need to do in order to update all faulty drivers hassle-free using Bit Driver Updater.
A point to remember: The pro version of Bit Driver Updater comes with a default backup & restore tool. Also, offers 24/7 technical support and 60 days complete money-back guarantee.
Also Read: Ways to Fix “Could Not Connect to the Steam Network” Error
Solution 5: Reinstalling Steam
Unfortunately, in some rare cases, if none of the above-mentioned solutions worked, then as a final bet you have only one option i.e., uninstall and reinstall Steam. Follow the steps below to uninstall and then reinstall Steam:
Step 1: On your keyboard, press Windows + R keys at the same time.
Step 2: This will launch the Run dialog box on your system. Wherein, you need to type Control in the void box and hit the Enter key or you can also click on the Ok option.
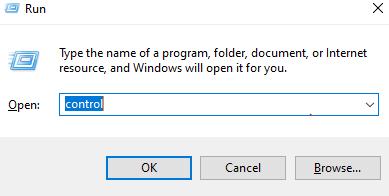
Step 3: After this, the Control Panel window appears on your screen.
Step 4: Then, click on Uninstall a Program under Programs.
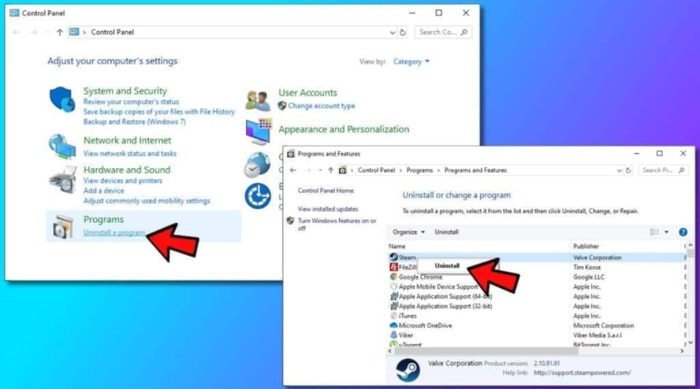
Step 5: Now, a list of installed programs appeared, locate Steam and click right on it to select Uninstall.
Step 6: Go with the uninstaller instructions.
Once the program is uninstalled completely, then reboot your computer, and visit the official website of Steam to install a program again. After reinstalling the Steam program, the slow download speed should be fixed.
Also Read: Why Do my Games Keeps Crashing in Windows 10 – Here is How to FIX
Steam Download Slow Windows 10, 8, 7: FIXED
Now, the Steam download slow speed won’t bother you anymore. Through this write-up, we have tried our best to educate you on how to speed up slow downloads. We hope the aforementioned strategies will guide you in the right direction.
If you have any suggestions or further doubts then please feel free to tell us through the comments box below. Also, let us know in the comments which solution has worked for you.
Lastly, if you are satisfied with the information shared above and want to read more troubleshooting guides just like this one, then do subscribe to our Newsletter. For more quick responses, you can join us on Instagram, Facebook, Twitter & Pinterest.


