

Microsoft regularly releases security patches to address some common issues via its Windows Update feature. However, several users have recently reported on various online forums that they are not being able to install security updates, released by Windows itself.
This article is going to teach you how to address one such problem related to Windows Updates which is known as the “Windows 10 version 1903 failed to install.”
The “April 2019 Update version 1903” or the “Cumulative Update for Windows 10 version 1903,” was the last major update of Windows 10. What was seen is that many users failed to download and install it for various reasons.
Therefore, let us look at the various complications that users faced with the “Windows 10 version 1903 failed to install” error and what are the best workarounds to fix the “Windows update 1903 failed” error.
Problems Faced When Installing the “Windows Update v1903”:
- Error code 0x8007000E appears.
- It freezes during installation.
- It gets stuck on “Pending Download.”
- It fails to install throwing an error code 0x80242016.
- Installation fails at the SECOND_BOOT phase with an error message “BOOT operation with error 0xC1900101 – 0x40017.”
Also Know: Fix: “Failed To Enumerate Objects in the Container Access is Denied” Windows 10 Error
Ways to Fix “Windows Update 1903 Failed to Install” Error:
Below are the solutions to fix the “Windows Update 1903 stuck” error.
Fix 1: Check the Following:
We have given a few ways to troubleshoot the problem of “Windows 10 version 1903 failed to install” error before trying the advanced methods. You need to make sure that the following glitches are taken care of before installing the update.
Step 1: Ensure that there is adequate disk space before installing the Windows 10 Update v1903.
Step 2: Disconnect external storage devices like USB devices.
Step 3: If there is any third-party tool installed on your system like antivirus, then disable it temporarily or uninstall it.
Step 4: Disable the Windows Developer Mode (if you had enabled it earlier).
Step 5: Install the latest Servicing Stack Update for your Windows 10 system.
Step 6: Disable drive encryption on your Windows 10 system.
Fix 2: Run the Windows Update Troubleshooter
You can run the Windows Update troubleshooter to fix Windows update 1903 failed error.
Step 1: Go to the Windows 10 Settings application and then click on the Update & Security section.
Step 2: From the side panel, click on Troubleshoot.
Step 3: Then, click on the Windows Update option.
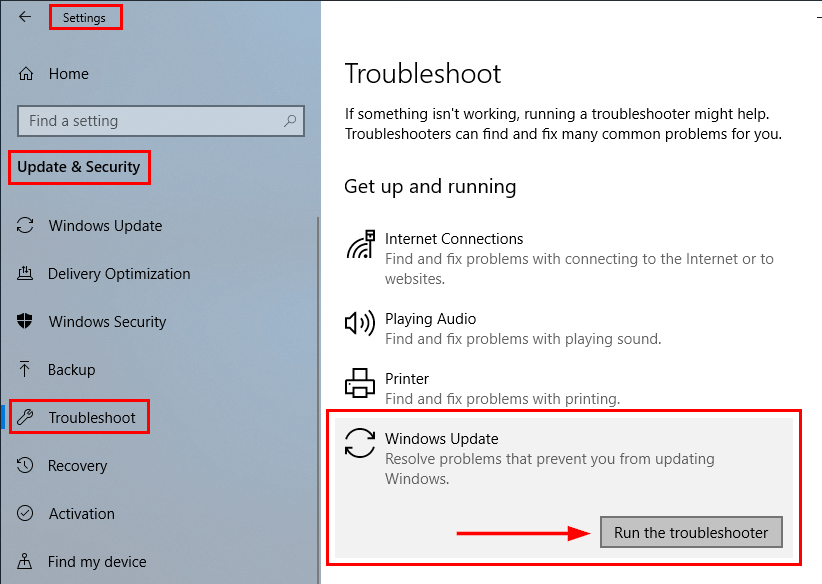
Step 4: Further, press the “Run the troubleshooter” button.
Step 5: Wait for the Troubleshooter to run and then let it fix any detected problem.
Also Read: How to Update Outdated Drivers on Windows 10, 8, 7
Fix 3: Install v1903 Window 10 Update with the Help of Upgrade Assistant
You can also fix the Windows Update 1903 failed error by taking the help of the Windows Update Assistant.
Step 1: You need to first delete the Windows Update Storage folder. To do this you can follow the below steps:
- Open the Services tab by typing the services.msc in the Run dialog box.
- Right-click on the “Windows Update” service and select the option of “Stop.”
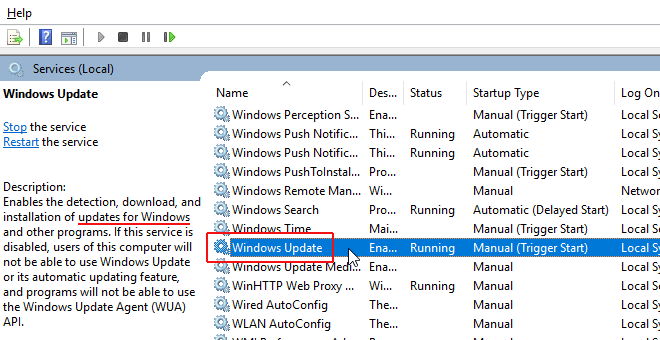
- Then, navigate to the C:\Windows folder.
- Find the SoftwareDistribution folder and then delete it.
- Reboot your computer further.
Step 2: After deleting the “SoftwareDistribution” folder, go to the Windows 10 download site and then press the Update now button.
Step 3: Further, Run the “Windows10Upgrade9252.exe” file to initiate its installation.
Step 4: Again press the Update now button on the next screen and follow the on-screen instructions to install the v1903 Update for Windows 10.
Fix 4: Force Download the Windows Update v1903 Version
You can use this method to force download the update to fix the Windows update 1903 failed error.
Step 1: Firstly, you have to delete the Software Distribution folder (as described in the above method-step 1) and then reboot your Windows 10 computer.
Step 2: Then, use the below path to download the v1903 update again.
Settings > Update & Security > Windows Update > Check for updates.
Also Know: How to Fix Windows Error Code 1 in Windows [Solved]
Fix 5: Troubleshoot Windows Corruption Error with the Command Prompt
This is another method to fix the “Windows 10 version 1903 failed to install” error.
Step 1: Launch the Command Prompt and choose to run the Command Prompt as administrator.
Step 2: Write the following command and press the Enter key:
Dism.exe /Online /Cleanup-Image /Restorehealth
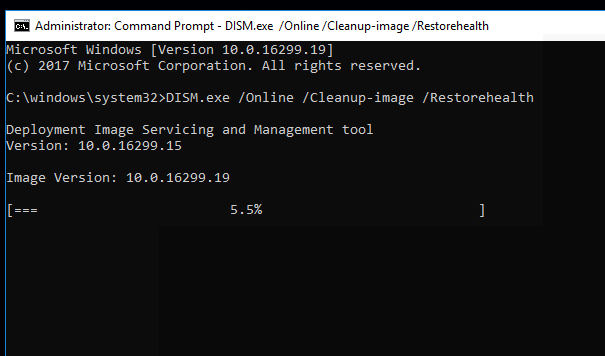
Step 3: Wait for sometime to let the DISM operation complete.
Step 4: Now type the following command and press Enter:
SFC/SCANNOW
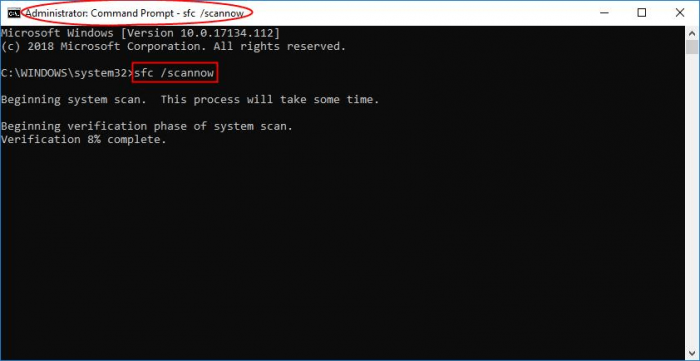
Step 5: Let the SFC scan complete and then reboot the system.
Step 6: After this, try to update your Windows 10 system again.
Conclusion:
“Windows 10 version 1903 failed to install” error can thus be rectified as per the above-mentioned methods.
Do let us know if you have any questions or suggestions by mentioning them in the comments box below.


