

When you experience the error of “audio service is not running,” then it means that the sound device is not responding correctly to the computer’s commands. Commonly seen by Windows 10 users, this error is generated by the Windows sound troubleshooter.
Usually, the Windows audio service not running error happens when the Windows version is upgraded via Windows Update.
In this blog, we will look at the few available workarounds to rectify the Windows audio service not enabled error.
All-in-one Solution to Fix The Audio Service is Not Running Issue
Update outdated sound drivers to deal with the numerous audio device errors. To do so automatically, you can seek help from Bit Driver Updater. It is the best driver updater tool for updating all faulty or broken drivers with just a single click of the mouse. Not only that, but this driver updater can fix the other Windows-related issues too. Get this driver updater utility for free from the download button below.

How to Enable Windows Audio Service in Windows 10 Computer?
Below we have listed down five effective methods to resolve the problem of “audio service is not running.”
Method 1: Restart the Audio-Related Services
Rectifying the status of Windows audio service can help users resolve the “audio service is not running error.” Here is how you can start the audio-related services settings:
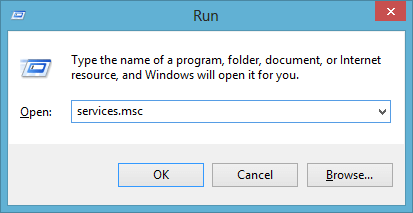
- On the Windows Run dialog box type “services.msc” and then hit the Enter key.
- On the Services window, find out the Windows Audio.
- Click on it and further click on Restart (appearing on the left side pane).
- Again right-click on the Windows Audio service and then choose the Properties option from the context menu.
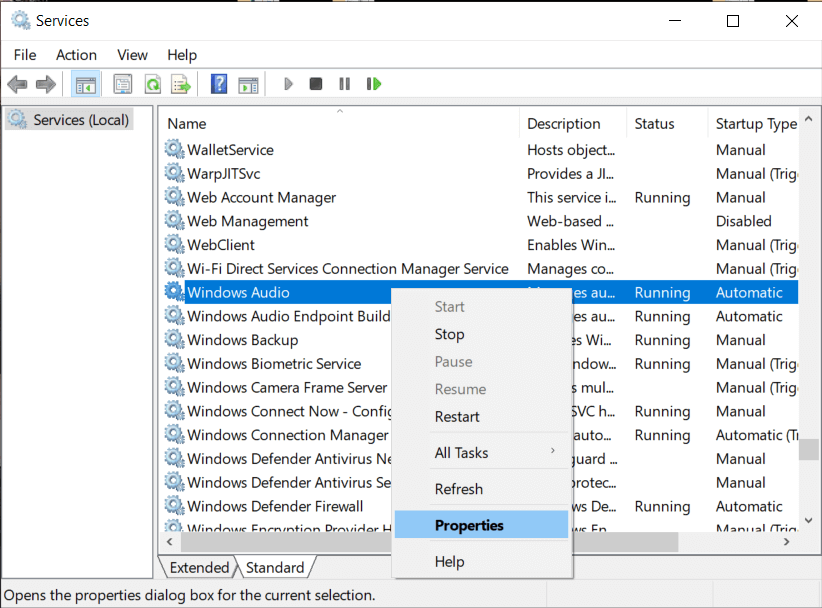
- In the General tab of the Properties window, change the Startup option to Automatic from the drop-down menu.
- Further, click Apply and then OK.
- Go back to the Services window and then Restart the following services and also set them to start as Automatic as described above for Windows Audio.
Windows Audio Endpoint Builder
Multimedia Class Scheduler
RPC Endpoint Mapper
Remote Procedure Call
DCOM Server Process Launcher
- Now check and see if the audio is functioning normally again. Otherwise, move to the next solution.
Also Know: How to Fix “No Audio Output Device is Installed” Issue in Windows 10
Method 2: Use Command Prompt
If restarting the audio components did not seem to be effective, then execute some commands with the help of the Command Prompt.
- Launch the Command Prompt and choose to run it as the administrator.
- Then, type the following commands and press Enter after each command to execute it one after the other.
net localgroup Administrators /add networkservice
net localgroup Administrators /add localservice
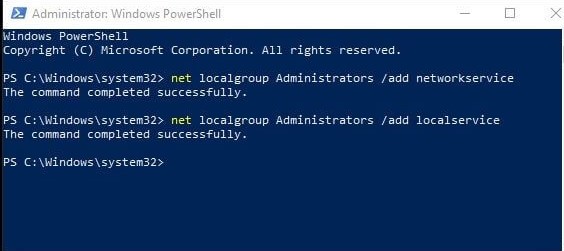
- After the above command execution process completes, then write “exit” and hit the Enter key.
- Reboot the Windows PC again.
Method 3: Modify Registry
If the problem is in your registry, then you can try to modify the registry in order to bypass the Audio service is not working error. But, be sure to edit the registry correctly, because it can cause serious problems if it has been done incorrectly. Follow the steps below to modify the registry:
- Open the Run Dialog box, and to open it press the Windows logo and R keys simultaneously.
- Then, type regedit in the box and press the Enter key. Or, you can click on the OK option.

- Now, locate HKEY_Local_Machine, System, CurrentControlSet, Services, AudioEndPointBuilder, Parameter, and expand all of them one-by-one.
- Next, choose Parameters.
- In the right-pane, detect ServiceDll and review the information under the Data.
- And, if the date value is not read %SystemRoot%\System32\AudioEndPointBuilder.Dll then you need to change it.

- After this, close the Registry window and reboot your system.

Now, check if the Audio service is not working issues resolved or persists.
Method 4: Check Audio Components
Before shifting towards a more technical tactic to fix this issue, try to check that all the audio components are working fine. If any of them isn’t working properly as it should then this may be the cause why you are encountering the Audio Service not working error. Hence, it is crucial to check the functioning of the audio components, because these services can cause disparities. To do so, follow the steps shared below:
- Invoke Run dialog box quickly by hitting the Windows + R Keys.
- Next, type services.msc inside the box and then hit the Enter key.

- Scroll down to locate the Windows audio Services.
- Click right on it and select properties.
- Now, switch to the tab named Dependencies.
- Expand “This service depends on the following system components” to see all the components.
- Ensure all the components are in the running state. If they are not, then click right on them to choose the Start option.
- Start the Windows Audio services again and restart your PC.
Try this solution and check to see whether enabling audio components can fix the error or not.
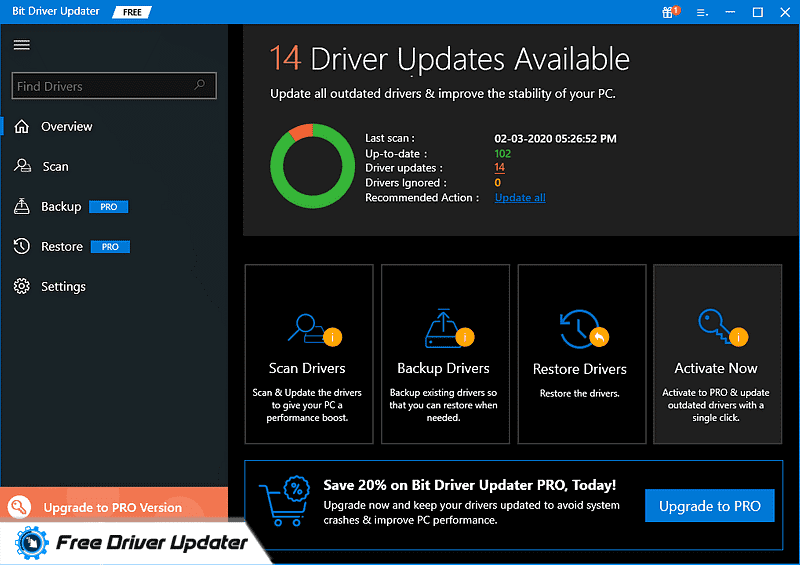
Method 5: Update the Sound Drivers with Bit Driver Updater
The best way to troubleshoot the “audio service is not running” error is by updating the audio drivers with the help of the best driver updater software – Bit Driver Updater.
Here’s What You can do with Bit Driver Updater:
- You can update all the device drivers including the audio drivers instantly and automatically.
- You can backup and restore device drivers easily with this tool.
- You can obtain genuine driver versions with this tool.
- You can save your time by skipping the manual process of updating system drivers.
- The tool can detect and replace corrupted and missing drivers efficiently as well.
Also Read: How to update NVIDIA High Definition (HD) Audio Driver for Windows 10
Steps to Update the Audio Drivers Using Bit Driver Updater:
- Download and install the Bit Driver Updater from the official website.
- Launch the tool and then click on the Scan button to initiate a system scan.
- When the list of affected drivers is displayed on the tool’s interface, then either you can choose to update all of them by clicking the “Update All” button or you can selectively click on the “Update” button beside the audio driver just to update the audio driver.
- The tool will download and uninstall the updated version of the sound driver.
- Reboot your system once and start enjoying the audio of your system again.
Solved: Audio Service Is Not Running Error
It can therefore be said that whenever you are coming across the error message, “audio service is not running,” you can always try to update the audio drivers if restarting the audio services and audio-related components did not seem to be of much help.
Do let us know if you were able to resolve the Windows audio service not running error with the aforementioned fixes in the comments section below.


