

Do you know what role sedlauncher.exe program plays in your Windows 10 PC? Are you facing sedlauncher.exe high disk CPU usage problems on your Windows 10 PC?
Windows 10 users frequently come across several errors time and again. When the sedlauncher.exe program consumes a high amount of RAM and CPU, then it can be pretty frustrating for users. This is because users can’t run other tasks and programs comfortably.
Therefore, in this blog, we will give you a detailed picture of sedlauncher.exe, what role it plays in your system and how to resolve the issue of sedlauncher.exe high disk usage to prevent several consequences occurring on your Windows 10 PC.
What is the sedlauncher.exe program in Windows 10 computers?
You must be aware of the Windows Update Service that is responsible for updating the OS and apps of your system to improve its function, performance, and also to fix the bugs and security holes easily. But sometimes the updates may lead to certain issues such as the one seen during the KB4023057 update patch.
When the KB4023057 update patch was released, it caused many systems to slow down. Upon investigation, it was found out that the issue was due to the sedlauncher.exe program which was consuming a huge amount of disk space.
Sedlauncher.exe program forms an integral part of the Windows 10 Update package ( KB4023057). Sedlauncher.exe belongs to the Windows Remediation Service that is supposed to run the Windows update process smoothly. This program is digitally signed and approved and there are certain variations to the program files such as the Sedlauncher.exe, Sedsvc.exe, WaasMedic.exe, and Rempl.exe.
The prime task of the Windows Update package is to enhance and optimize the speed of the Windows Update Service and thereby improve the overall performance of the Windows 10 computer, yet it has sometimes caused a significant lag in the system.
Now that we have a fair idea about the sedlauncher.exe program files and its functions, let us move towards the high disk usage issue and its relevant fixes.
Troubleshoot the sedlauncher.exe High Disk Usage Issue on Windows 10 PC:
Below you can take a look at the methods of fixing the sedlauncher.exe program issue on your Windows 10 systems.
Fix 1: Disable Windows Remediation Service Process
Disabling the Windows Remediation Service process can potentially solve the issue of sedlauncher.exe high disk CPU usage. Here’s how you can end the process:
Via Task Manager
- Open the Task Manager and find the Windows Remediation Service.
- Right-click on this and select the End Task option from the context menu.
Then, restart your system and verify from the Task Manager if the problem has ceased.
Via Service Utility
- Open the Service Utility window by typing “services.msc” in the Run dialog box and then hitting the Enter key.
- Find the Windows Remediation Service from the Services Utility window.
- Double-click on it to launch the Properties window.
- Under the General tab, you will see an option called Start type with a drop-down menu.
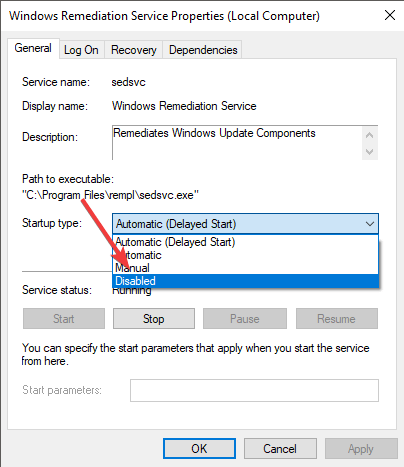
- Select the option of “Disabled” from the drop-down list.
- Finally, hit the Apply button followed by clicking the OK button to bring this into effect.
Verify if disabling the Windows Remediation Service fixed the issue, otherwise move onto the subsequent solutions.
Also Read: How to Fix Windows Modules Installer Worker High CPU in Windows 10
Fix 2: Use a Firewall to Block the Windows Remediation Service
If the problem of high disk usage by the sedlauncher.exe file lingers on your Windows system, then you can block the program with the help of your in-built Windows Defender Firewall software.
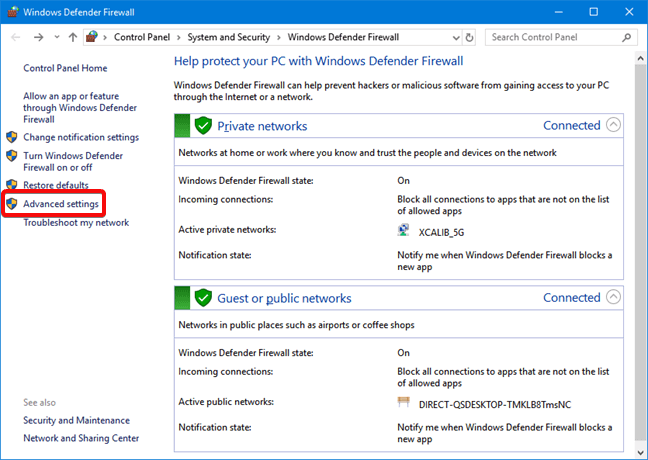
- Launch the Windows Defender Firewall program and then click on the “Advanced Settings“.
- Choose the option of “Outbound Rules.”
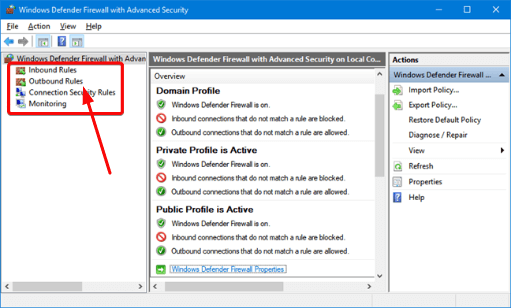
- Tap on the “New Rule” situated in the upper-right corner of the window.
- You will then see a pop-up window where you can choose “Program.”
- After selecting this, you can further tap on “Next.”
- Then, go to the below location (location of the Windows Remediation Service): C Drive -> Program Files -> rempl
- Post this, choose the ‘sedsvc.exe’ program file. Hit the “Next” button three times consecutively to end the current process.
- Now, rename the new rule and tap the “Finish” button.
If this did not resolve the issue, then move onto the next solution.
Fix 3: Uninstall Windows Setup Remediation
You can try uninstalling the Windows Setup Remediations by the following way to solve the problem of sedlauncher.exe high CPU usage issue in your Windows 10 computer.
- Go to the Windows 10 Settings app from the Start menu.
- Choose Apps in the Settings window.
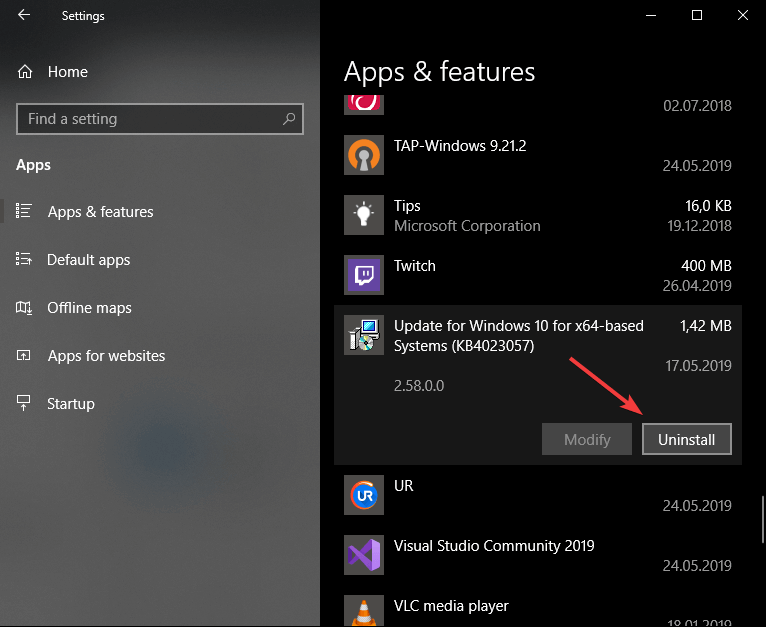
- Scroll down the Apps and Features list to find the Windows Setup Remediations (x64) (KB4023057) or “Update for Windows 10 for x64-based Systems (KB4023057).”
- Click upon the program followed by choosing the “Uninstall” option.
Wait for some time to let the uninstallation process complete and then see if you are still experiencing the high disk usage issue.
Also Know: Fix: USB Device Descriptor Request Failed Error in Windows 10
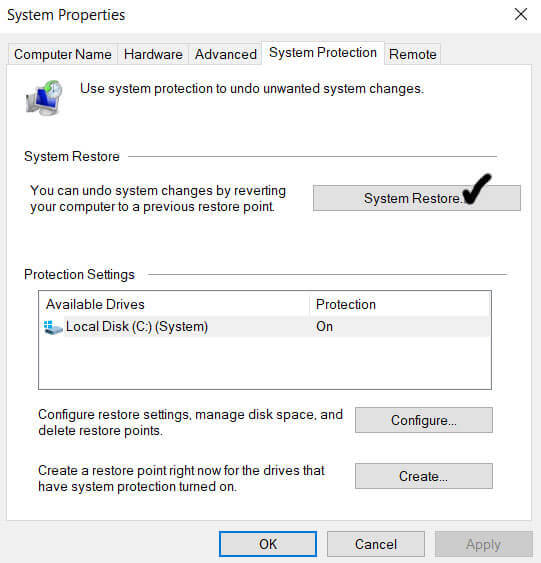
Fix 4: Perform a System Restore
Did you still not have any luck in dealing with the sedlauncher.exe high disk usage issue? If not, then you can restore the OS to a point when this issue was not prevalent with the help of the Windows System Restore feature.
- In the Windows Search box, type Restore and then hit Enter.
- Choose the option of “Create a Restore Point” from the appearing results.
- Hit the System Restore button now.
- Then, tap “Next” to initiate the process.
- You will be able to view the timestamps of the restore points. Here, you need to select a restore point when you were not facing this error.
- Finally, click on “Next” to let the system restore process begin and make your PC error-free again.
Note: You will not lose your personal files and data after your system is restored to a previous point because the system restore process only affects the system files.
Sedlauncher.exe Program High Disk Usage Issue: Solved
It can thus be summarized that the sedlauncher.exe program causing high disk CPU usage in Windows 10 systems can be easily resolved with the above-suggested methods.
Hopefully, you can solve this issue with one of the above methods and ensure that your PC runs smoothly and the Windows updates happen without any hassles.
If the above solutions have not yielded the desired results, then the ultimate solution would be to update the system drivers with the help of the best driver updater tool. It can effortlessly update the device drivers and ensure that your PC runs smoothly without any errors.


