

Try applying the solutions explained in this article when the DHCP is not enabled for WiFi issue occurs on your Windows operating system PC.
DHCP or Dynamic Host Configuration Protocol in a Windows operating system PC is responsible for automatically assigning and managing the IP address for the device. In simple terms, it is a network management protocol that is available to Windows users.
While accessing the internet on a PC many Windows users encounter an issue stating some errors on the screen. The errors displayed on the screen are:-
- DHCP is not enabled for WiFi
- DHCP not enabled for wireless network connection
- DHCP is not enabled for Local Area Connection
- DHCP not enabled for ethernet
If you also come across the same issue on your PC then you are at the right place. Here in this article, we have discussed some of the best solutions which are very helpful in resolving the issue of DHCP not enabled for WiFi in Windows 10 computer systems. The most recommended solution to fix DHCP is not enabled for WiFi on Windows is mentioned under the head below.
Update Network Adapter Drivers To Fix DHCP Is Not Enabled For WiFi Issue – Most Recommended
The solution which is most recommended for fixing the issue of DHCP not enabled for WiFi in Windows 10 PC is to update the network adapter drivers files installed on the PC. Users are advised to use the Bit Driver Updater software for this purpose. With the help of this software, users can easily install the latest version for all the device drivers on a Windows PC with one click. Download the software on your PC using the link button provided below.

What Is Dynamic Host Configuration Protocol (DHCP)?
The DHCP is a network management protocol on Windows PCs that is mainly responsible for the management and allocation of the IP addresses on the device. It also helps in reducing the probability of occurrence of configuration errors on a Windows PC.
We all are aware of the fact that every computer system requires a unique IP address for the purpose of accessing an internet connection. The Dynamic Host Configuration Protocol allots the IP address to the Device.
The DHCP is not enabled for WiFi issue refers to a situation when the wireless internet access point does not run as per the DHCP server of your Windows PC. There are quite a few reasons behind this problem, some of them are listed below:-
- Improper network adapter settings
- Issues with the DHCP client services
- Missing network adapter driver
- Outdated or faulty network adapter driver installed on the PC
Solutions to all these problems are explained in this article below. These solutions are very helpful in resolving the issue of DHCP not enabled for wireless network connection.
Also Read: There Might Be a Problem with the Driver for the WiFi Adapter (FIXED)
List of Solutions To Fix DHCP Is Not Enabled for WiFi Error on Windows PC
The problem of DHCP not enabled for ethernet on Windows operating system PCs can be perfectly solved with the help of solutions explained in the list below.
1. Make Some Changes To The Network Adapter Settings
Wrong network adapter settings are the main reasons why users face the DHCP not enabled for wireless network connection error on their PCs. Follow the steps below to fix this problem on your Windows PC.
- Click on the Windows search box from the left bottom of the screen.
- Type Network settings and select the best match searched by the operating system.

- Click on Change adapter settings under Related settings head.

- On the next page right-click on WiFi and choose the properties option from the box.

- Search for Internet Protocol Version 4 (TCP/IPv4) from the list and double-click on it.

- A new page will appear on the screen where you need to select the options that state Obtain an IP address automatically and Obtain DNS server address automatically.

- Click on the Ok button and close the window.
- Restart your computer device and try accessing the internet on your PC.
Changing the network adapter settings is very helpful in resolving the issue of DHCP not enabled for wireless network connection on Windows PC. But if the solution does not work on your device. Try applying other fixes mentioned below in the article.
Also Read: Download Realtek WiFi Driver for Windows 10, 8, 7 (32/64 bit)
2. Use The Proper DHCP Client Services
Every Windows PC is inbuilt with DHCP client services that aids in registering the IP address and updating the DNS record on the computer device. The steps to use the DHCP client services are as follows:-
- Launch the Windows run box by pressing the Window key and the R key on your keyboard.
- On the run box type services.msc and click on the Ok button.

- Locate the DHCP Client services and double click on it.
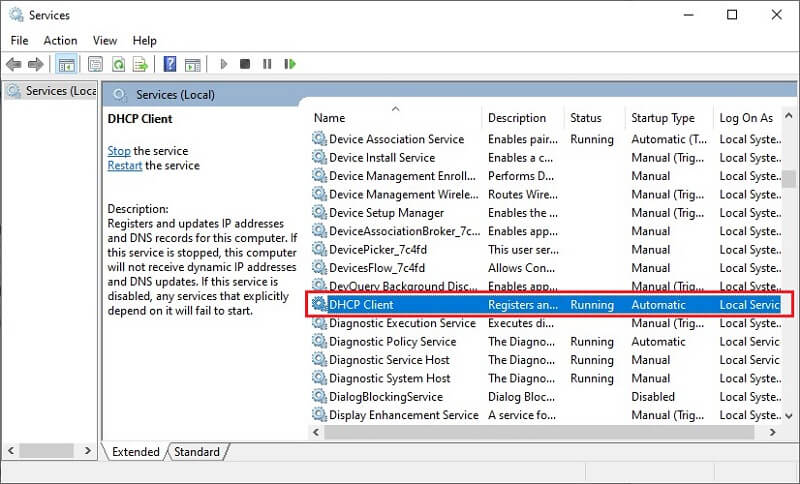
- In the Startup type select Automatic and click on the Apply button.

- Confirm your action by clicking on the Ok button.
- Lastly, restart the PC and check whether the DHCP not enabled for ethernet error is resolved or not.
The facility of DHCP client services is only available to Windows users and it is also very helpful in rectifying the problem of DHCP is not enabled for WiFi faced by many users.
Also Read: Tips to Download 802.11n WLAN Driver in Windows PC
3. Reinstall The Network Adapter Drivers Files on The PC
The network adapter driver files on a Windows PC are responsible for building a proper internet connection. If any of these files is missing from the computer system, it leads to the occurrence of DHCP not enabled for wireless network connection error on the PC.
Users are required to reinstall the network adapter drivers in order to resolve the issue of DHCP not enabled for WiFi in Windows 10 PC. Follow the steps below to reinstall these driver files:-
- Locate the Windows start button on your screen and right-click on it.
- The context menu will appear on the screen, select the Device Manager option for the menu.

- Expand the network adapter category by clicking on the arrow button on the left side.
- Right-click on the network adapter device on which you are facing the issue.
- Then click on the Uninstall option from the box that appears on the screen.
- Select the Uninstall option on the next page to confirm your action.

- Now download the latest driver files on some other device and transfer them to your device using a USB drive.
- Install the network adapter driver files and restart your computer system.
This solution to fix the problem of DHCP not enabled for wireless network connection involves deleting the driver files and reinstalling them on the computer system.
Another solution related to network driver files for solving the DHCP not enabled for ethernet issue is explained under the head below.
Also Read: [Fixed] Computer Keeps Disconnecting from WiFi on Windows 10
4. Update The Faulty and Outdated Network Adapter Drivers of The PC
Here is the most effective and recommended solution to fix the problem of DHCP is not enabled for WiFi on Windows operating system PCs. In this users are advised to update the faulty and outdated network adapter driver files on the PC.
There are two different ways to update the driver files. First is the manual way of updating the driver with the help of an inbuilt device manager application. As this particular way requires a lot of time and effort, that’s why most users avoid using this way to update the drivers.
The second way of updating the driver files which is also most recommended and preferred by many users is with the help of a driver updater tool. It is also termed as an automatic way because all the work related to downloading and updating the driver files is performed by the driver updater tool automatically.
Users are advised to use the Bit Driver Updater tool for this purpose. The instructions to install and use the Bit Driver Updater tool are as follows:-
- Click on the Download button below to get the Bit Driver Updater tool on your PC.
- Install and set up the tool on your device correctly.
- Launch the Bit Driver Updater tool.
- Let the tool perform a scan for the device drivers.

- A list of all the corrupt and faulty device drivers will appear on the screen.
- One can update the network adapter drivers by pressing the Update Now button.
- Also one can update all the faulty drivers searched by the Bit Driver Updater tool by pressing the Update all button.

- After performing all the above-mentioned steps, reboot your computer device, to make sure that the device works properly.
Updating the faulty and outdated driver files on Windows PC is the best solution for most problems that a user encounters on the PC. The Bit Driver Updater software permits users to update all the driver files with one single click.
Also Read: Fix: WiFi Doesn’t Have Valid IP Configuration Problem [Solved]
How To Fix DHCP Is Not enabled For Wi-Fi In Windows 10, 8, 7: DON
The best and most effective solutions to fix DHCP not enabled for WiFi in Windows 10 are explained in the above article. All the solutions that are mentioned above are well tested and tried before listing them in the article.
The problem of DHCP not enabled for wireless network connection is very common and is encountered by many users. The issue stops the users from accessing the internet connection on their devices and creates a lot of trouble for them. Users can use the solutions listed above to fix the DHCP is not enabled for WiFi error on Windows OS computer devices.
If you face any difficulties in applying any of the above-mentioned solutions. Let us know in the comments section below and we will try our best to solve all your issues.


