If you run into Blue Yeti drivers not detected or recognized on Windows PC, then this post shows you how to fix this issue. For complete information, go through the entire write-up!
Blue Yeti microphones are popular among users and YouTubers. It is a wonderful piece of hardware equipment for recording audio from podcasts to music. The prime reason behind its immense popularity is the price and quality ratio. Despite being one of the robust microphones, many users have experienced unstable connectivity issues or errors like the Blue Yeti mic not recognized.
This problem may be caused due to an unusual USB connection, outdated drivers, faulty system settings, or many more. Well, whatever the cause is, troubleshooting or fixing this inconvenience is quite easy. In this write-up, we are going to discuss some convenient and workable solutions to make your Blue Yeti microphone recognize.
100% Working Solutions to Fix Blue Yeti Drivers Not Recognized or Detected on Windows 10, 8, 7
In this section, we have put together 4 effective fixes that help you easily & quickly resolve Blue Yeti microphone problems.
Solution 1: Use Another Cable/USB Port
Before trying more complicated and advanced hacks, let’s start with the basics. The user can also try another USB port to ensure that the cable is firmly connected. After doing so, check to see if your Blue Yeti mic goes back to normal. Additionally, many users also report that switching from USB port 3.0 to 2.0 works.
If still your Blue Yeti mic not working on Windows PC, then try another USB cable is recommended. You can buy a replacement USB cable from Amazon. Unfortunately, if this doesn’t trick you, then try another solution.
Also Read: Download Blue Snowball Microphone Drivers for Windows 10, 8, 7 PC
Solution 2: Update your Blue Yeti Driver
If you are using outdated, faulty, or broken Blue Yeti drivers, then you may run into problems or errors like Blue Yeti drivers not detected and more. Hence, to ensure the proper working of an excellent microphone, one must check for driver updates regularly and if any update is available then download it immediately.
Keeping drivers updated not only ensures the stability of the hardware but also ensures that the PC runs at its peak performance. The user can either update Blue Yeti microphone drivers manually or automatically.
If you have good computer skills and enough time to update drivers manually then you can proceed with the steps below:
Step 1: To begin the process, just be sure that the Blue Yeti microphone is connected to your computer.
Step 2: Open the Run Dialog box by quickly hitting Windows + R keys at a time.
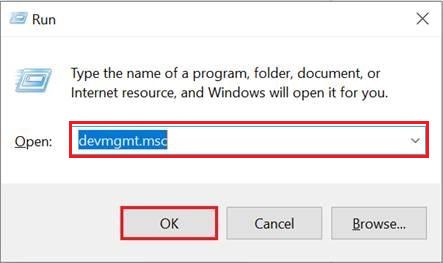
Step 3: In the run dialog box, type devmgmt.msc and hit the Enter key, else click on the Ok option.
Step 4: This will launch Device Manager on your screen, now locate and double click the option saying Sound, video, and game controllers. Now, check to see if your Blue Yeti device is mentioned in the list. If in case you don’t see your Blue Yeti microphone driver in the list of Sound, video, and game controllers, then, navigate to the Universal Serial Bus Controllers and expand the same.
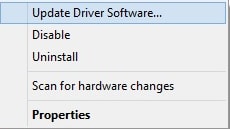
Step 5: Right-click on the extra USB Composite Device and choose Update Driver Software.
Step 6: From the next prompt, go with Search Automatically for Updated Driver Software.
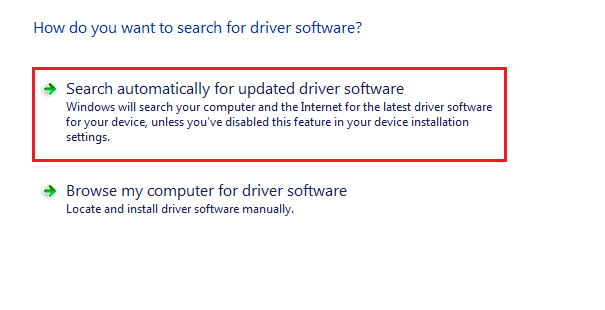
Now Windows searches for available driver updates and afterward installs them. Sometimes Blue Yeti not showing up in Device Manager and fails to provide you with the most suitable driver updates. In that case, we recommend you use any reliable driver updater software like Bit Driver Updater.
Bit Driver Updater is the software that automates the whole process of finding and installing the latest version of drivers on Windows PC. Not only that, but the software takes just a single click of the mouse to replace all faulty or missing drivers. It only installs authentic and WHQL tested drivers. Use this amazing driver updater utility to fix Blue Yeti drivers not detected issue:
Step 1: Download the Bit Driver Updater from the button provided below.
Step 2: Run the executable file and install the software by following the wizard.
Step 3: Launch the driver updater solution on your PC and click on the Scan button from the left.
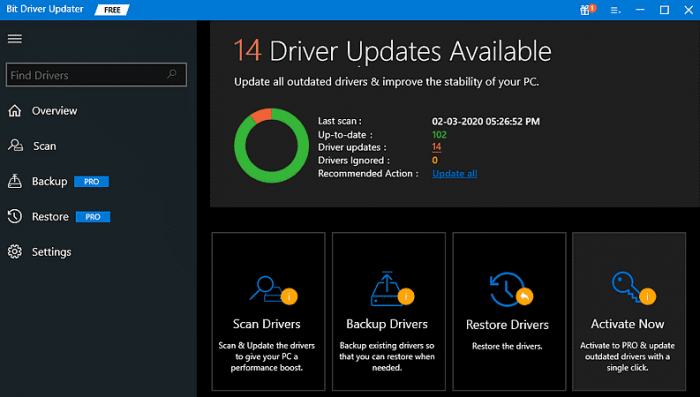
Step 4: Wait for the scanning to be completed. Check the results and click on the Update Now button shown beside the Blue Yeti driver.
Step 5: If you want to update all outdated drivers in one go, then click on the Update All button.
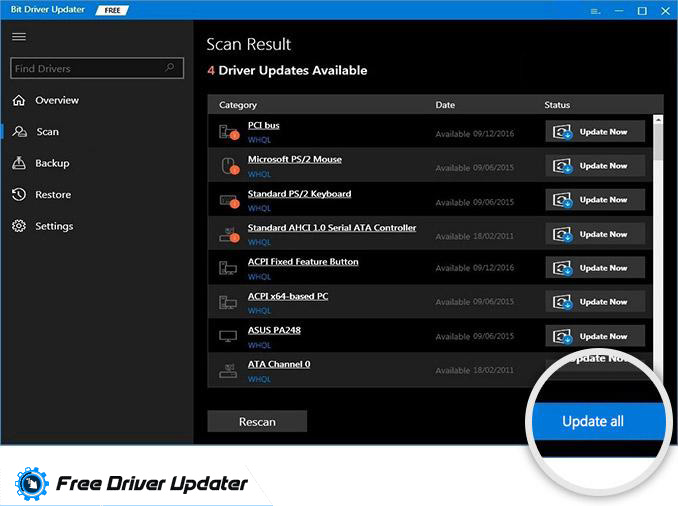
So, that’s how to fix Blue Yeti drivers not detected on PC by updating the respective drivers.
Also Read: Download, Install and Update Microphone Driver for Windows 10
Solution 3: Run Audio Troubleshooter
If Blue Yeti recognized but no sound is available after performing driver updates, consider running an audio troubleshooter. Windows comes with a default troubleshooter program that automatically scans for the issues and later on fixes them too. This might work for you. To use this tactic, one need to follow the steps shared below:
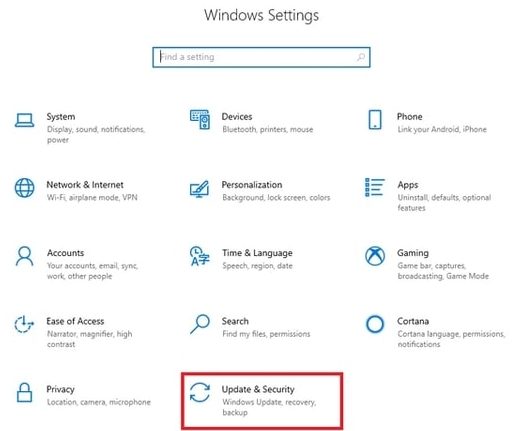
Step 1: To get started, you need to launch Windows Settings. Use Windows logo + I keyboard shortcut to quickly open Windows Settings.
Step 2: Choose Update & Security from the available options.
Step 3: From the left menu pane of the window, choose Troubleshoot.
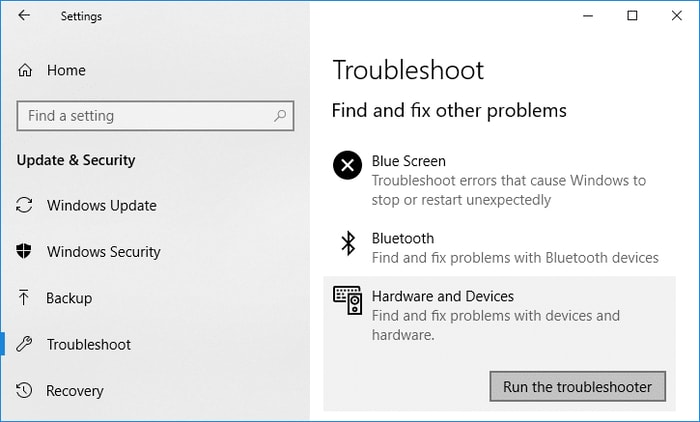
Step 4: After that, under the Get up and running from the right menu pane click Playing Audio.
Step 5: Now, click on the Run the Troubleshooter option.
Wait and let the process be finished. Once done, start your computer system again and check to see whether the issue is resolved or still persisting. We recommend trying another solution if this doesn’t work.
Solution 4: Set Blue Yeti As Default Playback Device
In order to fix Blue Yeti not showing up on Windows PC, you must check if the microphone is set as a default device. If it is not, then you should set the Blue Yeti microphone as a default playback device. To do so, follow the simple steps mentioned below:
Step 1: At the lower right corner of the system tray, find and click right on the Speaker icon.
Step 2: After that, make a click on Sounds.
Step 3: Next, switch to the Recording option.
Step 4: Here navigate to your Blue Yeti microphone and click right on it to choose Set as Default Device.
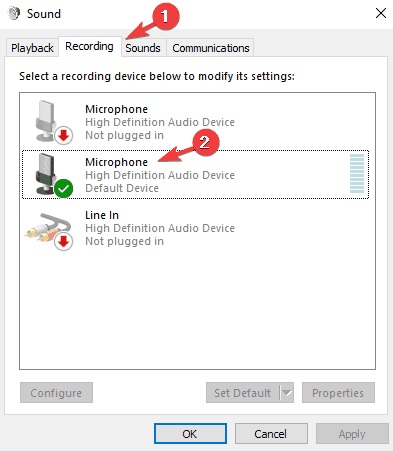
Step 5: Lastly, click on the Apply and OK option to save the recent changes.
Once done, restart your PC. Now, check to see if Blue Sherpa not detecting Yeti is resolved.
Also Read: How to Reinstall and Update Audio Sound Drivers on Windows 10, 8, 7
Blue Yeti Drivers Not Recognized or Detected on Windows: FIXED
So, that was all about how to make your Blue Yeti mic work again. In this write-up, we have above discussed some best ways to fix Blue Yeti drivers not detected or recognized on Windows PC.
Hopefully, the guide helps you to get rid of this issue. Drop your queries or further suggestions in the comments box below. Want to learn more about the technical issues, then do subscribe to our Newsletter for regular updates.
For further assistance, follow us on Facebook, Twitter, Instagram, and Pinterest.


