
Many users with wireless Logitech mouse reported issues of the error device driver software not being installed successfully. The error occurs as the users plugin the unifying receiver on their PC. If you are among the users facing the issue the following article can help you find workable solutions for your Windows PC.
The first thing to do before you try the solutions is to check that the drivers installed on your PC are up to date. The mouse drivers help in communicating with your operating system. Update the mouse drivers manually or by using an automatic driver updater tool. A free tool that can automatically download mouse and other outdated drivers with Bit Driver Updater. Use the direct download link to install Bit Driver Updater and update all the system drivers with a single click.

Refer to the next section of the blog to fix Logitech unifying receiver not detected issue on your PC.
How to Fix Logitech Unifying Receiver Not Detected Problem?
If after connecting the Logitech mouse the error Logitech unifying receiver not detected is displayed on your Windows 11, 10, or other devices here are the simple fixes to solve the issue. Go through the list in the order they are listed until the error is fixed.
FIX 1: Update Mouse & USB Drivers
Incompatible or outdated drivers can cause errors like device driver software was not successfully installed or receiver not detected. Therefore it is important to keep the mouse, USB, and all other system drivers updated.
To update drivers there are two possible methods: Manual and Automatic. The manual methods include downloading drivers from the official website which in our case is Logitech’s official website. Since the manual method requires all the technical specifications of your Windows to find compatible drivers, it might not be everybody’s choice.
An alternate solution for driver updates by using a free driver updater tool that can automatically update all the drivers of your device. Bit Driver Updater is one such tool that holds the capability to download all outdated drivers with one click. The features of backup, restore, quick scans, enhanced performance, and technical assistance come along with the basic feature of the tool to update drivers.
Download the Bit Driver Updater with the Download now option below and install it with the help of the instructions displayed upon your desktop.
Once the tool is installed refer to the steps below to use the Bit Driver Updater tool to update Mouse, USB and all other drivers for your Windows 11 device.
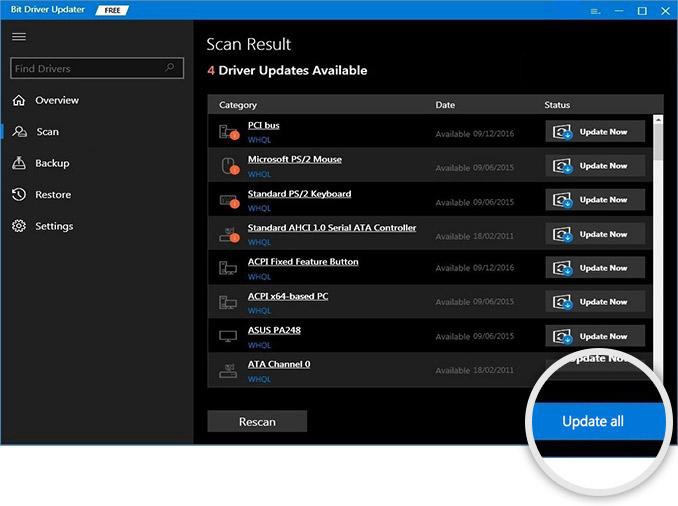
Step 1: Run the tool and click on Scan driver option to begin the scan for outdated drivers.

Step 2: Wait till the list of drivers is displayed that needs to be updated. Find the Mouse and USB drivers and use the Update Now option present next to them to download the latest version of drivers.
Step 3: In case you have upgraded to the Pro version of the Bit Driver Updater you can download all the drivers with an Update all option present at the bottom of the scanned driver list.
Step 4: Install the drivers once the download completes with on-screen instructions. Restart your Windows device to apply the updates.
Now check if the updated mouse and USB drivers could fix Logitech unifying receiver not detected issue. If the issue persists, move to the next method.
FIX 2: Copy Driver File From Another Device
If the updated driver file for mouse and USB couldn’t help you with how to fix Logitech unifying receiver not detected here is what you can do. Look for a well-functioning Windows device and copy the driver files compatible with your PC and install them on your PC. Refer to the steps mentioned below to perform the above actions.
Step 1: Open the C:\Windows\inf\ path and search for usb.inf and usb.PNF.

Step 2: In case you are unable to find these files on your device, copy and paste these two files from another computer to this folder.
Step 3: You can also look for these files through the C:\Windows\System32 path.
Step 4: Copy these files and paste them in the inf folder from the C:\Windows\inf\ path.
Check if this could fix Logitech unifying receiver not detected issue. If not, move on to the next method to fix the issue.
Also read: How to Download & Update MTP USB Device Driver for Windows 10,11
FIX 3: Run the Logitech Receiver as an Administrator
Step 1: Open the Device Manager on your device from the search bar. Expand the mouse and other pointing device option.
Step 2: Find a HID-compliant mouse and right-click on it. Click on the Disable option

Step 3: Download the Logitech Unifying Receiver and right-click on it to run as the administrator.

Step 4: Wait till the software is installed and run it as administrator from the start menu.

This will surely fix Logitech unifying receiver not detected issue on your Windows device.
FIX 4: Perform Hard Reset
Shut down your Windows device. Make sure you remove all the peripherals connected to your device, unplug the power adapter or remove the battery in case of a laptop. Hold the power button for 30 seconds to drain the capacitors. Reconnect the peripherals and from the startup menu, choose the start Windows normally option. Perform pending Windows Update if any.
Now connect the Logitech wireless mouse and check if the Logitech unifying receiver not detected issue is fixed.
Logitech Unifying Receiver Not Detected: FIXED
The above article will help you find the methods for how to fix Logitech unifying receiver not detected problem on your device. Use these methods to access your wireless Logitech mouse without any interruptions. Make sure you install the updated drivers automatically through Bit Driver Updater software.
If you found the content helpful or need any further assistance with it drop your feedback in the comments. Also, subscribe to our blog for more technical write-ups.
Snehil Masih is a professional technical writer. He is passionate about new & emerging technology and he keeps abreast with the latest technology trends. When not writing, Snehil is likely to be found listening to music, painting, traveling, or simply excavating into his favourite cuisines.


![How to Update and Reinstall Keyboard Drivers on Windows 10/11 [A Guide]](https://wpcontent.totheverge.com/totheverge/wp-content/uploads/2023/06/05062841/How-to-Update-and-Re-install-Keyyboard-Drivers-on-Windows-10.jpg)
