
The generic PnP monitor issue is one of the major problems with Windows 10 now.
There are some remarkably beautiful features of Windows 10, but there are some problems that have also cropped up alongside these features, those that we definitely cannot ignore.
One such problem that we are about to discuss with you here is the Generic PnP Monitor issue, that comes up as soon as you upgrade your system to Windows 10.
The problem may arise due to the outdated or corrupted generic PnP monitor driver. Therefore, it is recommended to keep the display or PnP monitor drivers always in up-to-date condition. You can use Bit Driver Updater to ensure automatic & frequent driver updates. It is one of the convenient ways to get the latest and genuine drivers without any hassle. It is an all-in-one utility tool that not only updates the outdated drivers but also maximizes the PC’s performance. To know how effortlessly it works, continue reading this article. Before that, hit the download button below to try it for Free.

What is Generic PnP Monitor Windows 10?
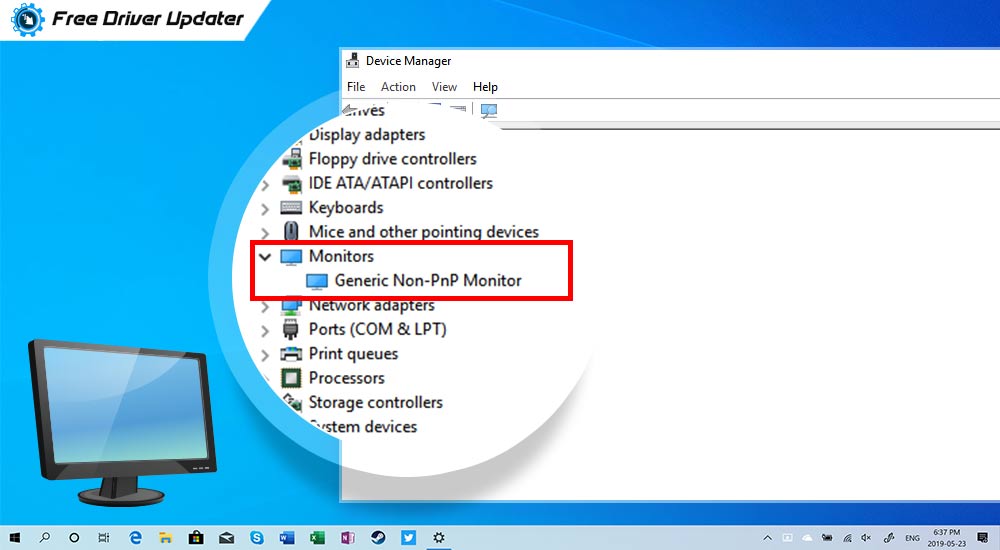
Your Windows 10 PC installs a Generic PnP Monitor when the drivers of your real monitor are either missing or corrupted.
It appears in the Device Manager with a yellow exclamation mark that indicates that the actual monitor is having some driver-related problems.
How Does the Generic PNP Monitor Appear?
Generic PnP/Non-PnP Monitor may appear in the Device Manager due to the following reasons:
- It may show up after you’ve upgraded your Windows 7 or 8 to Windows 10 PC.
- When you add a second monitor to your computer, one might show up as real one and other as Generic PnP monitor.
- Using HDMI or VGA cables and other hardware related issues might also be the major causes of displaying this non-branded monitor.
Now that you know what Generic PnP Monitor is and how it appears in Device Manager, let us check out the potential solutions to prevent this problem from happening.
Quick Fixes for the Generic PnP Monitor Problem:
Below you will find some of the easiest solutions for generic monitor PnP Windows 10 problems.
Solution 1: Verify the Connection to the Monitor
Follow the below steps, and if that helps resolve the problem.
Step 1: Switch off your computer and the monitor.
Step 2: The power cord of the monitor needs to be removed and try to wait for 10 minutes before reconnecting it back.
Step 3: Connect the CPU and the monitor to the power source.
Step 4: Restart again and check if this can solve the issue of the generic PnP monitor.
Also know: How to Fix No DP Signal From Your Device Dell Monitor
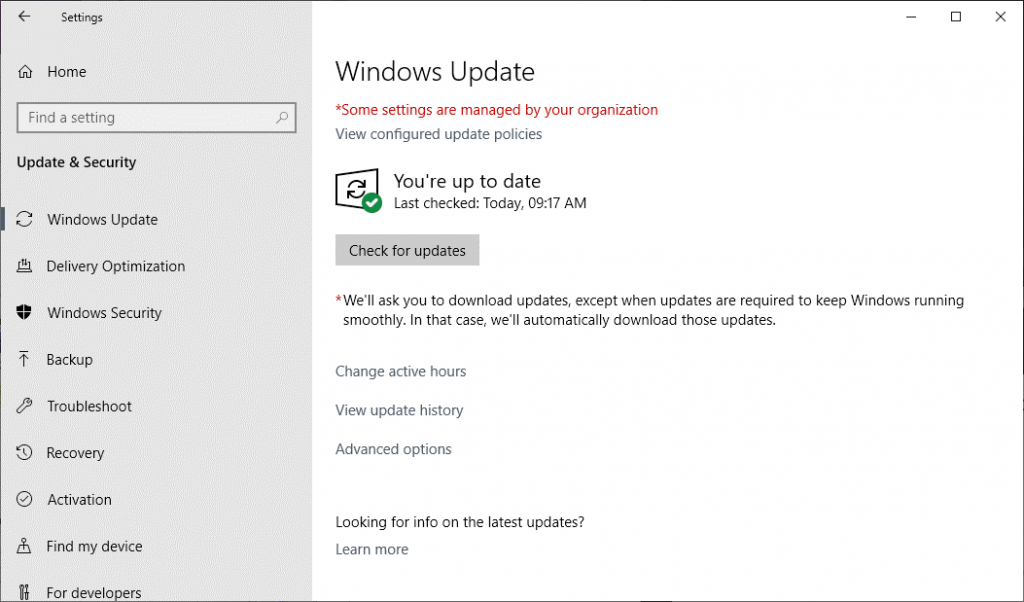
Solution 2: Install All the Windows Updates
From time to time, Windows sends updates for your system. Ensure you download the updates regularly to prevent the bugs and viruses from invading your system. You have to go to the settings option and then check for updates. Once you have updated and the system reboots, it might draw a closure to this problem of yours, for sure.
Solution 3: Check for Your Monitor Driver
What works best under such circumstances is a simple process. Update your generic PnP monitor drivers and that might solve your problem like it has solved the problem for many. If you’re wondering how to do that, follow the below steps in the same order.
Step 1: Go to the Start button and click on the Start Menu. From the Start Menu, choose Device Manager.
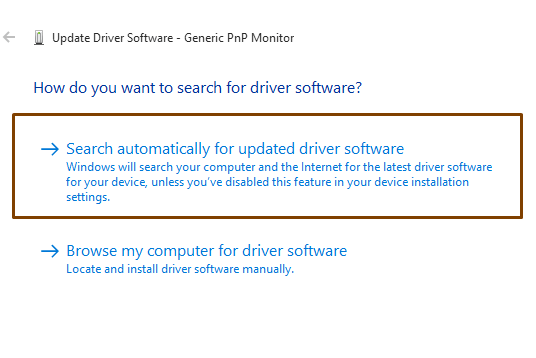
Step 2: In the Device Manager Window, locate the generic PnP monitors. Choose the update driver option from the dropdown that appears when you right click on the generic PnP monitor option.
Step 3: From the prompt, ensure you choose the first one that says- “Search automatically for updated driver software.”
Step 4: After the installation of the generic PnP monitor driver is complete you can start back the computer again.
Though this process is a bit time-consuming, it’s still capable of fixing up the issue for you. However, if the device is still giving you the same problem, make sure you follow the next steps and fixes mentioned below.
Also know: How To Fix Monitor Not Detecting HDMI in Windows 10
Solution 4: Problem Might be in the Display Card Driver
Many graphic card drivers can also be the cause behind your generic PnP monitor issue. If you have detected the problem in the display card driver, you would have to update it for sure.
Manual Method: Using Device Manager
Follow the below steps to update your graphics card driver for the generic PnP monitor driver.
- Go to the start menu and then search for the Device Manager.
- In the Device Manager window, click to view and expand the Display Adapters option.
- Select Intel HD Graphics Card option, and then right click over it.
- Select the update driver from the drop-down menu.
- Now, move on to select the “search automatically for updated driver software,” option.
- Once updated, reboot the computer again and it might have solved the issue.
- If you’re using an integrated graphic card, then repeat the process with your graphic card as well.
- If Windows is unable to locate the correct driver software over the web, try to move onto the manufacturer’s site or the graphic card’s manufacturer site and download your requirements from there directly.
Alternately you can use an automatic driver updater software program that can do the work smoothly for you.
Automatic Method: Using Bit Driver Updater Tool
The Bit Driver Updater tool is the best in the market and is a smart system optimizer that ensures smooth running of the system. A one-click driver updater completely saves your time by allowing an all round system scan and also ensures you have a back up before you fix it. Take a look at the below steps.
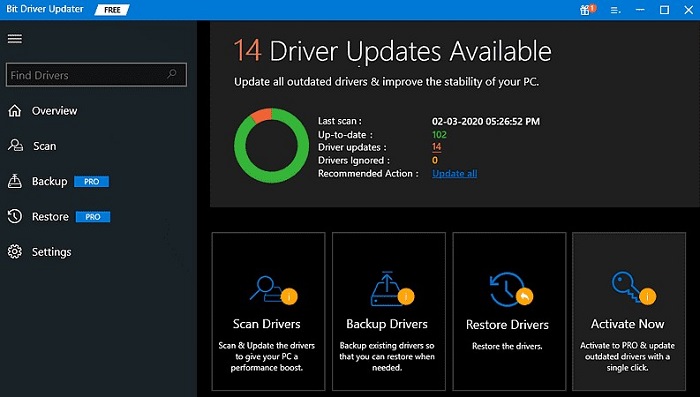
- Install the Bit Driver Updater into your system
- After the installation of the Bit Driver tool is complete, scan your system with this tool.
- The tool would be capable of recognizing the erroneous drivers.
- Once the scan is completed, the tool would display the faulty drivers’ list.
- Using the one-click update feature, you can then make the tool download and install the correct versions of the drivers.
- Restart the computer after the update is complete.
If your monitor driver and your display card driver are not the ones where the problem lies, you might want to explore the below fixes to find out where the real problem lies.
Solution 5: Attempt Uninstalling the Generic PnP Monitor Driver
You can uninstall the generic PnP monitor driver to fix the issue. If you are hesitating about what would happen next, let me tell you things would be fine, Windows has the capability to recognize it as new hardware and would auto-install the drivers. To uninstall the generic PnP monitor, make sure you follow the below steps.
Step 1: After going to the Start button, move on to the Device Manager.
Step 2: From the Device Manager, click to expand the Generic PnP monitors.
Step 3: After right-clicking on the generic PnP monitor, choose the uninstall option from the context menu.
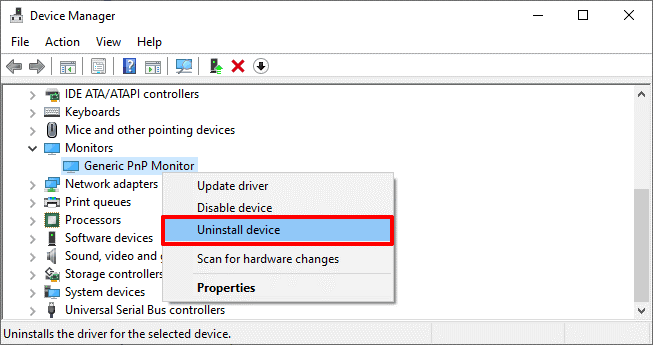
Step 4: Confirm uninstalling of the generic PnP monitors.
Step 5: Now, Windows would recognize and would re-install the monitor as the real-time monitor and not as the generic PnP monitor.
These should fix the problems in the device. Now there are few other fixes that you can try.
Also know: How to Fix Monitor Randomly Goes Black on Windows
Solution 6: System File Checker can Detect the Damaged Files
Scanning of the files is possible with the system file checker and this can automatically troubleshoot your broken or damaged files. Follow the below steps to run the system file checker.
Step 1: Go to the Start menu and search for the Command Prompt.
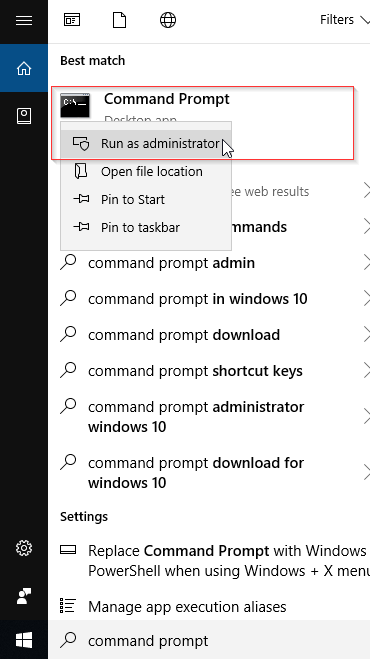
Step 2: From the prompt select Run as administrator option.
Step 3: Type “sfc/scannow” option and hit on the Enter button.
Step 4: The system file checker would scan the files and would begin fixing the problem of your generic PnP monitor..
This also should do the trick for you. Hopefully your system is up and running now?
Frequently Asked Questions:
Given below are the answers to some of the most frequently asked questions of users facing the Generic PNP monitor issues.
Q1. How to change Generic PNP Monitor?
Ans. Use the fixes mentioned in the article to change the Generic PNP Monitor issue on your device. Firstly, update your Display drivers automatically through the bit Driver Updater. As most issues associated with Generic PNP monitors are due to missing or corrupted drivers.
Q2. Why does my monitor show up as Generic PNP?
Ans. Although, for most cases, the Generic PNP issue is associated with faulty, incompatible, or missing drivers it can also be a hardware issue. However, the problem can be easily fixed with the Generic PNP monitor driver update. Apply the above-listed methods in the given order to fix Generic PNP monitor issue on your Windows device.
Ques. How to install Generic PNP Monitor Driver?
Ans. To download the Generic PNP monitor driver Windows 7, or later version devices pick any of the above-mentioned methods. However, it is advisable to use the Bit Driver Updater to update drivers automatically and with ease. Once the latest driver file is downloaded double click and follow the on-screen instructions to install the Generic PNP monitor driver update.
Generic PnP Monitor Problem Solved
To conclude this post after learning about the various fixes, out of which hopefully one will produce a result for your generic PnP monitor issue, a result that would bring back that big smile on your face and a reassurance that you will definitely be able to move on with your work now.
Snehil Masih is a professional technical writer. He is passionate about new & emerging technology and he keeps abreast with the latest technology trends. When not writing, Snehil is likely to be found listening to music, painting, traveling, or simply excavating into his favourite cuisines.


![How to Update and Reinstall Keyboard Drivers on Windows 10/11 [A Guide]](https://wpcontent.totheverge.com/totheverge/wp-content/uploads/2023/06/05062841/How-to-Update-and-Re-install-Keyyboard-Drivers-on-Windows-10.jpg)
