
Dell Laptops are undoubtedly one of the best choices to make. At a reasonable price, a wide range of Dell products is available. But some users have reported the issue of dell audio not working or speakers not working on their device. This can be irritating when in the middle of an important meeting or an online lecture. Not anymore, as we have listed the best methods to fix Dell audio not working issues on your device and restore sound driver on Windows 10.
However, it can be a difficult task to find out the exact reason behind the Dell speakers not working, but you can begin with updating audio drivers on your device. Manually update drivers through the download section of the manufacturer’s website or use a driver updater for Windows 10, 11, 8 or 7 to automatically update drivers. Follow the fixes mentioned below to address and resolve the Dell laptop audio not working issue.
How to Fix Dell Audio Not Working?
Go through the list of solutions below. You don’t need to apply all the methods to resolve Dell audio not working, Apply each fix one at a time until the no sound on Dell Laptop Windows 10, 11, 8 or 7 is resolved.
FIX 1: Check Problems in Hardware
To fix no sound on Dell laptop windows 10, 11, 8 or 7 error the first thing to be checked upon is the hardware devices. Follow the troubleshooting steps as listed below to resolve Dell speakers not working.
- Check if the speaker volume is turned on and not muted. Click on the volume icon on your taskbar and use the slider to increase or decrease the volume. Check if you are able to hear the audio after this.

- Check your headphone jack if you have connected it to your Dell device. Make sure there is no dust or lint on the jack that is stopping your headphone from working efficiently.
- Check the mic or headphone that is connected to your device. Disconnect and reconnect it again to check if this could fix audio on Dell computer or laptop.
If the Dell audio not working issue is not restricted to the hardware and is not fixed with the above steps, move to the following fixes.
Also Know: How To Screenshot On Dell Laptop Windows 11,10
FIX 2: Check Audio Settings
For some users, Dell laptop audio not working was fixed by updating audio settings. Below are the simple steps that can be followed to modify audio setting on your Dell device.
Step 1: Right click on the icon for Volume on your Taskbar and select the option playback devices.

Step 2: Right click on the empty space under Playback tab and click on the options Show Disabled Devices and Show Disconnected Devices.

Step 3: Again right-click on your audio device and click on Enable option.

Step 4: Click on the Set Default option and click on OK to apply the modifications in audio setting.
Check if this fixes the Dell audio not working on your device. If the issue persists, proceed with the further fixes to resolve Dell audio not working.
Also Know: AMD High Definition Audio Device Drivers Download for Windows 10, 8, 7
FIX 3: Update Audio Driver
If the driver software on your Dell device is corrupted or missing the issue of Dell audio not working can come up. Download the recent update for the audio driver manually or automatically to fix Dell laptop sound drivers.
To update the audio driver manually open the official website of the manufacturer and find the latest release for a compatible driver with your device. Download the version compatible with your operating system version and apply the instructions to install it.
This method can consume your skills, time, and energy. An easy solution to this is by using automatic driver updater software Bit Driver Updater. This requires no extra time and patience. You can easily download or schedule driver download by using this software. Restore and backup driver data and perform a quick scan through Bit Driver Updater.
With the Pro upgrade of Bit Driver Updater, you have the Update All option to download all the pending driver updates with a single click. Also, the 24* 7 tech support facility can be unlocked with the Bit Driver Updater pro. The pro version has a complete 60 day money back guarantee for users who are not satisfied with the working of the tool.
Here’s how you can use the tool to update audio or other system drivers automatically on your Dell device and resolve the Dell speakers not working issue.
Step 1: Download and install the Bit Driver Updater on your Dell device from the direct download link below.

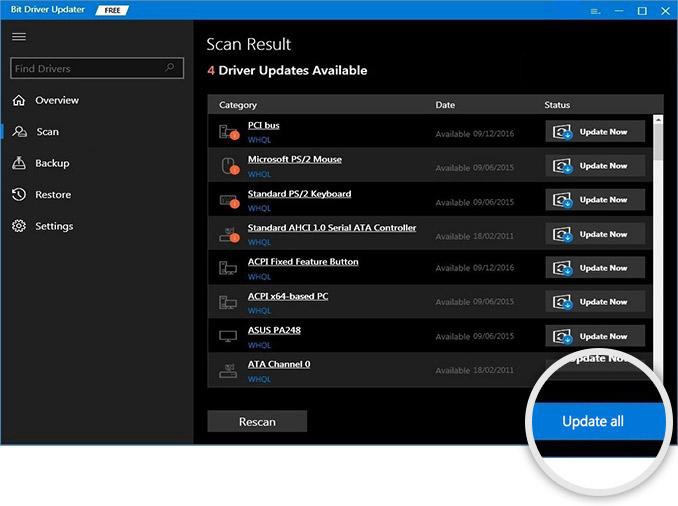
Step 2: Launch the software as the installation completes and begin the outdated driver scan by Scan Drivers option.

Step 3: locate audio drivers from the list and click on Update Now option next to it. You can update all the drivers at once by clicking on Update all (only if you have the Pro version of the tool) or manually update each driver.
Step 4: Install the downloaded driver file by following the instructions and Restart your Dell device to apply the updates.
Once the updated drivers are installed check if Dell audio not working is fixed. If the issue remains, move on to the next alternative solution.
Also Know: Realtek High Definition Audio Driver Download for Windows 11,10,8,7
FIX 4: Reinstall Audio Driver
Applied all the above fixes and nothing really worked to fix audio on Dell computer? The driver installed on your device might be corrupted. To resolve this uninstall the audio driver on your Dell device and reinstall it. This will fix the Dell laptop sound not working Windows 11, 10, or older version devices. Here are the simple steps to remove the existing driver on your device through Device Manager.
Step 1: Click on the Windows and R keys together on your keyboard. As the Run dialog box is invoked type the command devmgmt.msc and press Enter key.

Step 2: In the Device Manager window expand Sound, video, and game controllers category.

Step 3: Right click on your audio device driver and select Uninstall device option.
Step 4: Click on Uninstall button in the popup window to confirm the uninstallation for audio drivers. Make sure you check the checkbox in front of the option Delete driver software for this device before you click on the Uninstall option.

Step 5: Repeat the above steps for your speaker driver and Uninstall it.

Step 6: As these drivers are uninstalled restart your Dell laptop to automatically install the missing device drivers.
Check if reinstalling audio drivers fixes the Dell audio not working on your device.
Dell Audio Not Working: FIXED
That’s a wrap from our side on how to easily and quickly fix Dell audio not working issue. Apply the fixes one at a time until the issue is resolved. Download the latest updated audio drivers from the official website of the manufacturer or automatically download these drivers by using the Best driver updater software Bit Driver Updater.
For any queries feel free to reach out to us in the comments below. Make sure you subscribe to our blog for more informative and helpful technical content. Follow us on Facebook, Twitter, Instagram & Pinterest to never miss an update.
Snehil Masih is a professional technical writer. He is passionate about new & emerging technology and he keeps abreast with the latest technology trends. When not writing, Snehil is likely to be found listening to music, painting, traveling, or simply excavating into his favourite cuisines.


![How to Update and Reinstall Keyboard Drivers on Windows 10/11 [A Guide]](https://wpcontent.totheverge.com/totheverge/wp-content/uploads/2023/06/05062841/How-to-Update-and-Re-install-Keyyboard-Drivers-on-Windows-10.jpg)
