
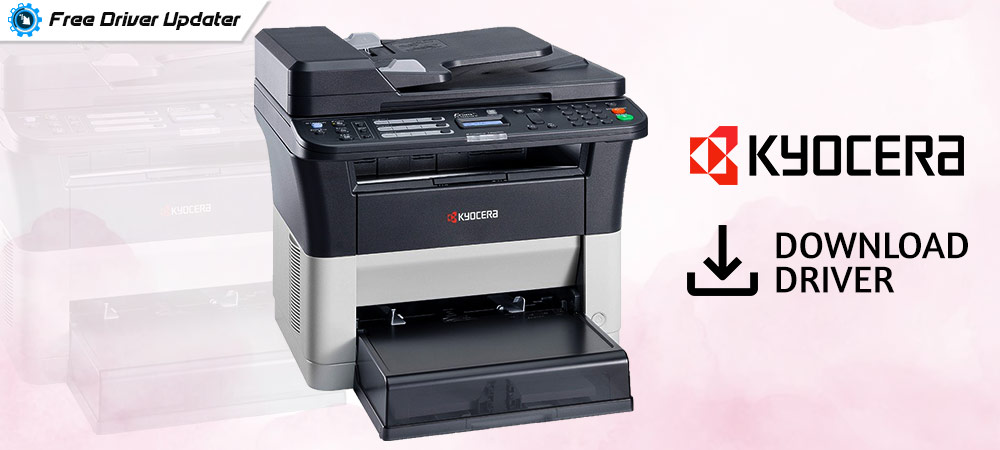
Read this article to download, update, and install the latest Kyocera printer driver for Windows 11, 10, 8, & 7 devices with the help of the different methods mentioned.
If you are using the Kyocera printer and you have recently updated your computer with the latest version of Windows OS, you might face problems with the printer devices. You can fix such problems by making sure that the Kyocera printer driver is up to date. It’s possible that the driver for your printer doesn’t work with the newer version of Windows.
You can download and install printer drivers both manually and automatically by matching your model and operating system. Today with the help of this article we will show you the best effective ways through which you can download, update, and install Kyocera print drivers easily.
Different Methods To Download Or Update Kyocera Printer Drivers Windows 10
Below we have shared three methods from which the first two are manual processes, and the last one is an automated process. The manual methods will require some technical knowledge and patience to download the Kyocera printer drivers properly. Whereas for the automatic process, you just need to have a driver updater software, and it will take care of the rest. So without wasting any more time, let’s jump right into it.
Method1: Kyocera Printer Driver Download From Manufacturer’s Website
Like every other printer manufacturer, Kyocera also uploads the latest drivers for its products on its official website. You can always visit their website and in the support section, you can search for your Kyocera print drivers. Before clicking on the download button, select the Windows OS version. Below are some steps that will walk you through the whole process.
- Below is a link that you can click on to visit Kyocera’s official website. Click Here
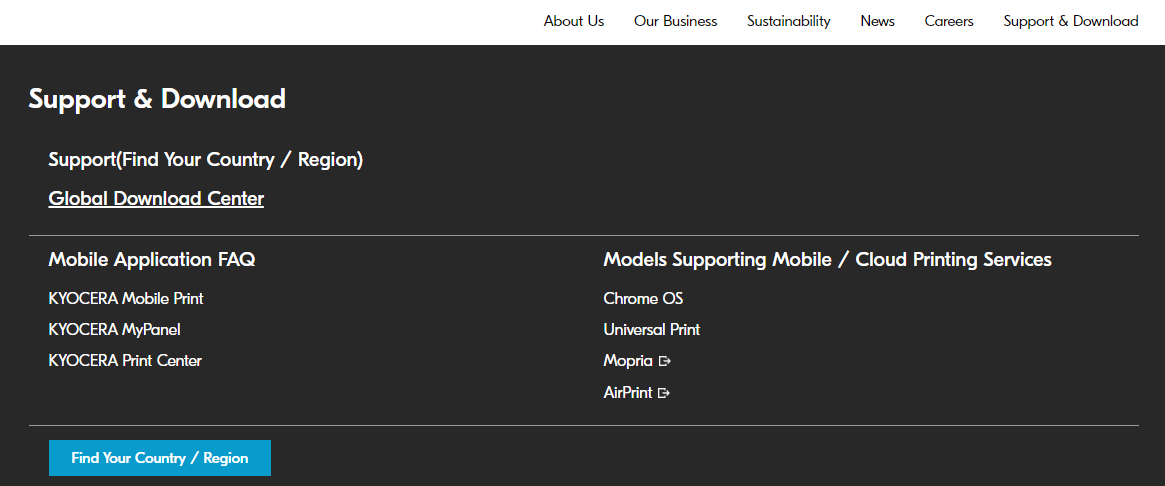
- On the website page, click on the Support & Download tab present at the top
- Select the “Global Download Center” option and it will redirect you to a different page
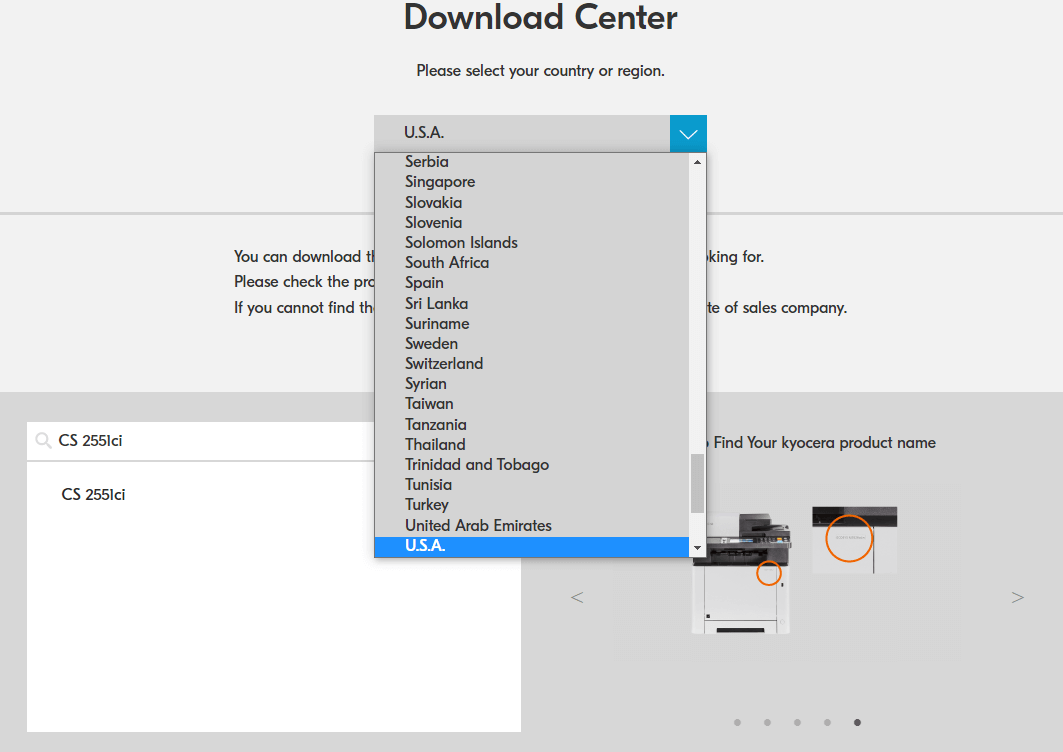
- Now, select your country or region from the dropdown menu. And then search your product’s name in the search bar.
- Then, select the Operating System you are using and the language.

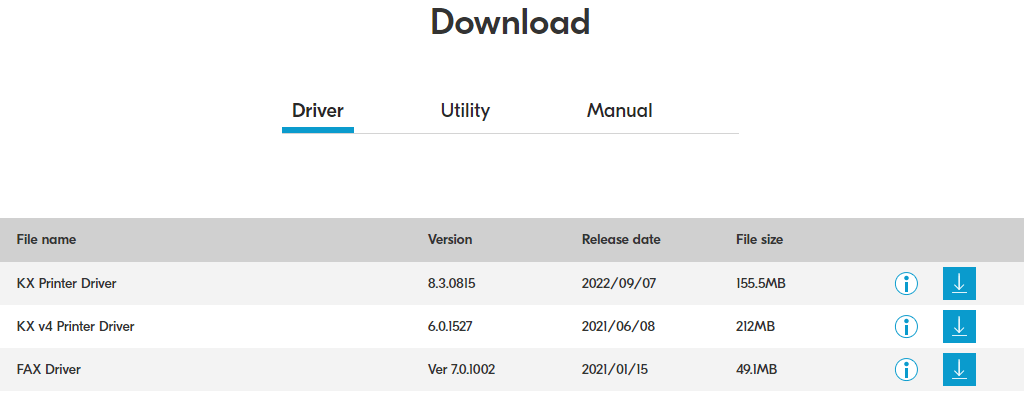
- Scroll down, under the Download heading, and select the Driver section
- Click on the Download icon present in front of your printer’s name.
- A pop-up window will appear asking you to agree to the License Agreement by clicking on the “Agree to contract and download” button. This will start the Kyocera print drivers downloading process.

- Once the driver is downloaded, search File Explorer in the taskbar and press the Enter key on your keyboard.
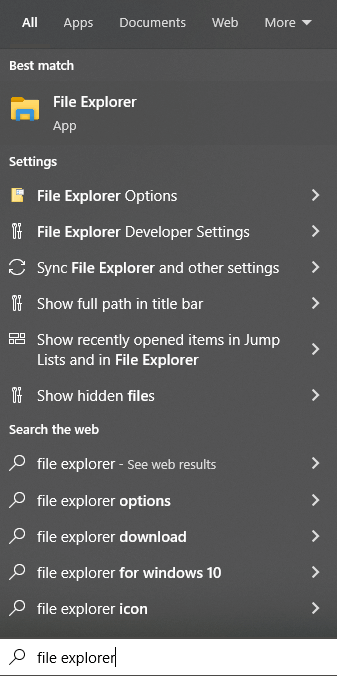
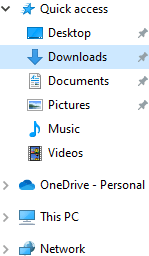
- On the File Explorer window, click on the Downloads folder from the left-side panel. Then, run the downloaded file and follow the on-screen instructions to install the printer driver Kyocera on your PC.
After installing the drivers, Restart your computer and it will automatically start using the new drivers.
Also read: How to Download Canon PIXMA TS3522 Printer Driver
Method2: Update Kyocera Printer Drivers Windows 10
Keeping your Windows drivers updated will help you boost your computer’s overall performance. Outdated drivers can be a reason behind many errors and issues like the printer not responding or the printer driver is unavailable.
Hence, it is recommended that you should keep your Kyocera printer drivers updated to avoid such problems. Below we have shared both manual and automatic methods which you can implement to update your printer drivers.
Update Printer Driver Kyocera Manually
Firstly, we are going to check out the manual method where you need to take help from a Windows-integrated tool. This tool is known as Device Manager and is one of the most important in-built tools. You can manage all your drivers including the Kyocera print drivers with the help of this tool. Check out the steps mentioned below in order to update the printer driver using the Device Manager tool.
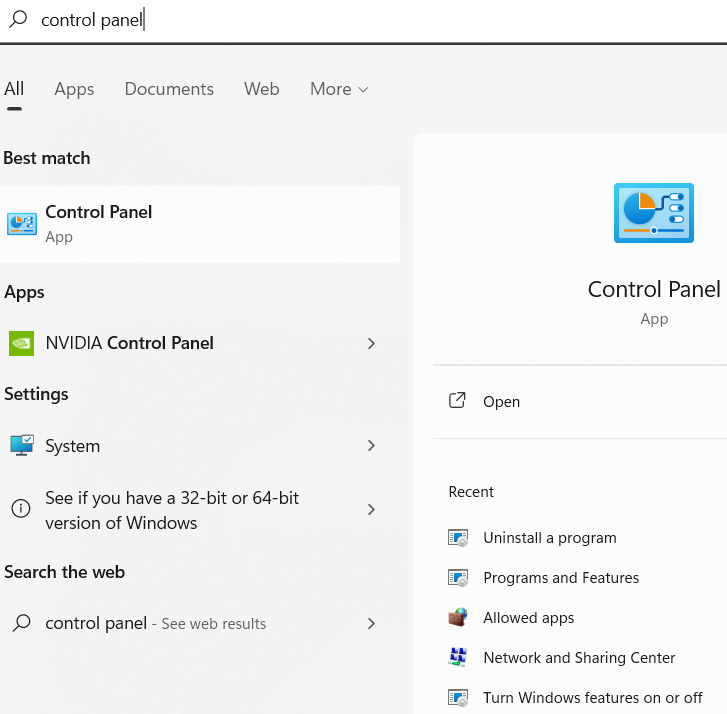
- Click on the Start menu present at the bottom-left corner of the screen. Then, search the Control Panel app in the search bar and press the Enter key on your keyboard.
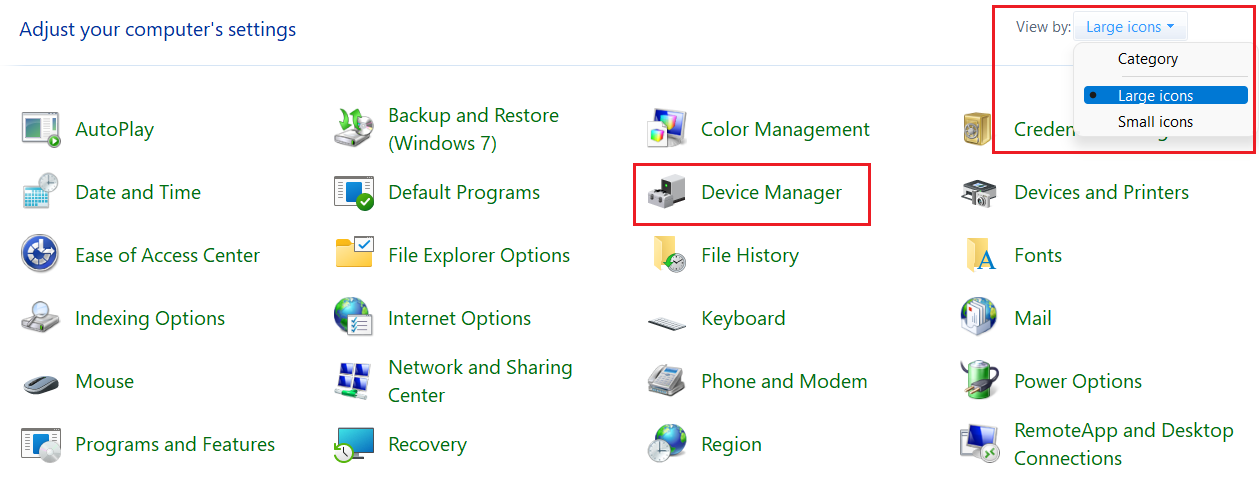
- On the Control Panel window, select the Large icons option from the “View by” dropdown menu. This will change the icon’s design and show you all the in-built tools.
- Choose the Device Manager tool by clicking on it. A new window will open showing all the drivers present on your computer.
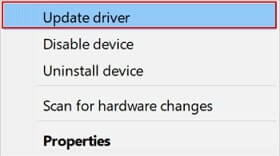
- Expand the Printer queue option by clicking on the arrow icon next to it. Then, right-click on the Printer driver Kyocera you are using and select the Update driver option from the context list.
- Now, a new pop-up window will appear, choose the “Search automatically for drivers” option
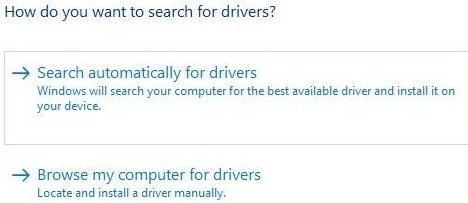
- Then, follow the on-screen instructions to install the new printer drivers on your Windows device
After completing the installation process, Restart the computer and it will automatically start using the new Kyocera drivers printer.
Update Printer Driver Kyocera Automatically
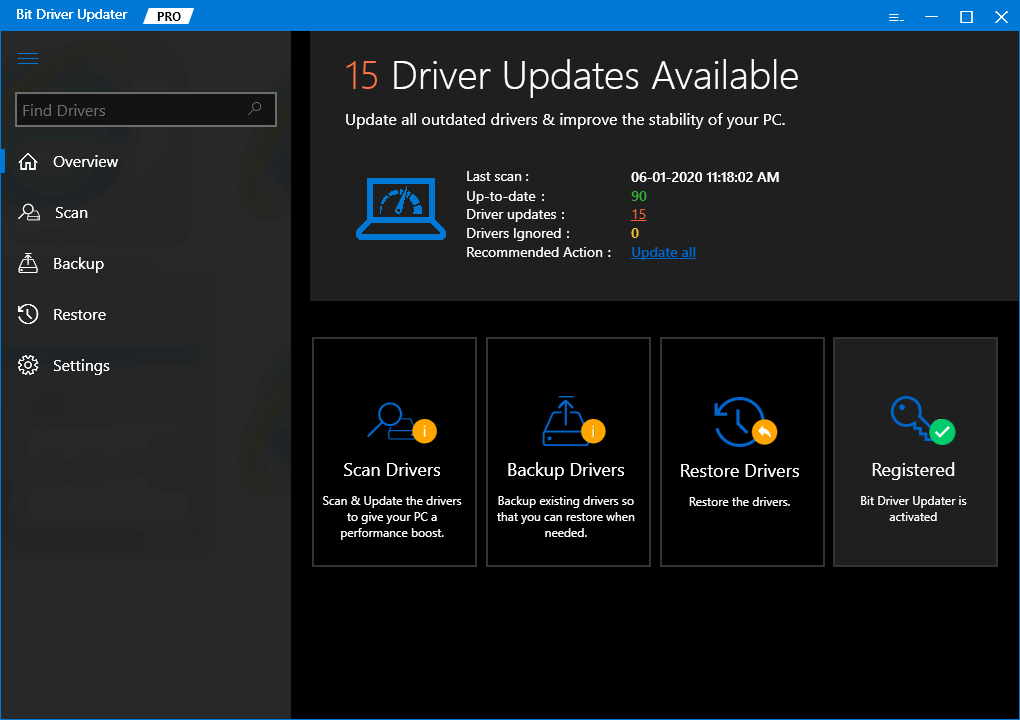
In this automated process, you need to download the best third-party app that will update your Windows drivers automatically, i.e. Bit Driver Updater app. This program is specially made for Windows computers and is trusted by tons of users. With the help of this application, you can easily update your Kyocera printer drivers as it is loaded with different features. Below we have mentioned some other advantages of having this program installed on your Windows device:
- Improves the processing speed of your PC
- It allows you to download and update all sorts of drivers
- Creates a backup of existing drivers
- Offers 24*7 customer support
- Completely scans your computer
Steps To Download And Use Bit Driver Updater App Now, it’s time to look at the steps that will help you use the Bit Driver Updater app in order to update Kyocera printer drivers.
- Click on the link given below and it will automatically start downloading the app on your PC:

- After downloading the Bit Driver Updater app on your PC, search the File Explorer app in the taskbar. Then, on the File Explorer window, open the Downloads folder, and click on the setup file. And follow the on-screen instructions to install the app properly.
- Now, Launch the app and click once on the Scan tab button present on the left-side panel. Or else click on the Scan Driver button. This will allow the app to search for outdated printer Kyocera print drivers.
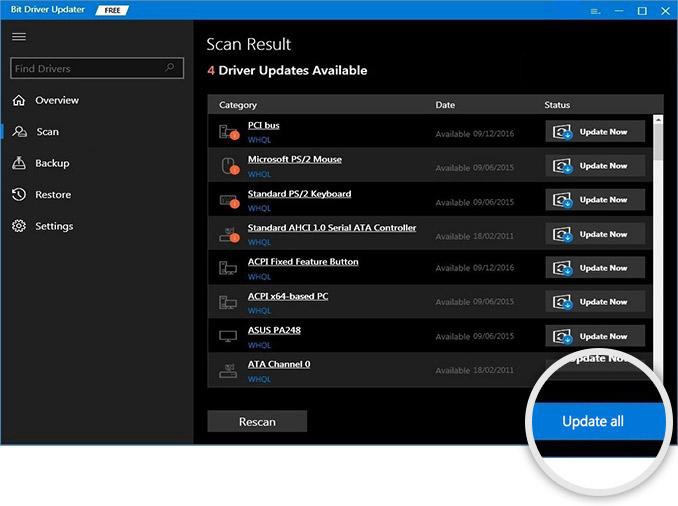
- Now a list of drivers will be shown that need to be updated. Click on the Update all button and it will update all your Windows drivers one by one. If you want to update only the printer driver Kyocera, then click on the Update Now button in front of the Printer driver option.
After updating the drivers, Reboot your system and it will automatically install the new Kyocera printer drivers on your computer. With the help of this process, you will easily boost your computer’s performance and compatibility as well.
Also know: Epson Printer Driver Download, Install, and Update on Windows 10, 11 and older version
Wrapping Up: Download Or Update Kyocera Printer Drivers Windows 10
We hope the above-mentioned methods have helped you with the Kyocera print drivers download and update process. If you are still facing some sort of difficulties in installing the new drivers, contact Windows Support for a professional opinion.
You can also drop a comment in the comments section below in order to share your thoughts or queries regarding this post. We would love to hear from you.
Snehil Masih is a professional technical writer. He is passionate about new & emerging technology and he keeps abreast with the latest technology trends. When not writing, Snehil is likely to be found listening to music, painting, traveling, or simply excavating into his favourite cuisines.


![How to Update and Reinstall Keyboard Drivers on Windows 10/11 [A Guide]](https://wpcontent.totheverge.com/totheverge/wp-content/uploads/2023/06/05062841/How-to-Update-and-Re-install-Keyyboard-Drivers-on-Windows-10.jpg)
