
Months after the release of Windows 11 many users still have complaints regarding Windows 11 keeps crashing. It is too soon to consider it as a replacement for the currently used Operating system but for now, the users are facing major issues of Windows 11 crashing constantly and other blue screen of death errors. If you are among the users facing frequent crashes you are at the right place.
Methods to Fix Windows 11 Keeps Crashing
It can be difficult to find the exact reason for Windows 11 crashing on startup or restarting. Therefore, the only method to identify and resolve Windows 11 keeps crashing issue is by applying the below-listed fixes until you find the one that works for your device.
Solution 1: Check if System Files are Corrupted
To manually check and restore the missing or corrupted system files you can follow the below-mentioned steps. This will fix the Windows 11 crashing constantly issue on your device.
Step 1: In the Command prompt run the first command sfc/scannow.
Step 2: The following alternatives can be the result of the above command
- No error
- Fixed few errors
- Could not fix all the errors
- Could not fix the errors at all
Step 3: If the command displays the error when executed run the commands given below to address the issue and resolve it for your device.
DISM/Online/Cleanup-image/CheckHealth
DISM/Online/Cleanup-image/ScanHealth
DISM/Online/Cleanup-image/RestoreHealth
Restart your Windows 11 device to apply the updates by the above scans in your system files. If the Windows 11 keeps crashing issue remains, try the next set of solutions to resolve the error.
Also Know: Windows 10 Taskbar Not Working? Here’s How To Fix It
Solution 2: Download Windows Updates
Microsoft releases regular updates for bug fixes and improvements to address and resolve Windows keeps crashing issues. Here are the steps to download the latest Windows updates on your Windows 11 device.
Step 1: Open Run command box by clicking on Windows and R keys together.
Step 2: In the Open tab enter control update and Select OK.

Step 3: Navigate to Windows security tab from the left panel. Click on check for updates and wait till the scan and download are complete.

Restart your Windows 11 device and check if the Windows 11 crashing constantly issue is fixed. If the problem persists, move to the next set of fixes.
Solution 3: Download Pending Driver Updates
Driver software are essential for having proper communication between the operating system and hardware device. Therefore, if drivers are outdated or incompatible this can also lead to windows 11 keeps crashing issues on your PC. It is recommended to keep drivers up to date to have an uninterrupted working. To update drivers manually you can visit the official website of manufacturer and download the compatible drivers for your Windows 11 device.
But to make it simple, you can download the Bit Driver Updater software that enables automatic driver downloads with just one click. It also allows you to schedule updates at your convenient time and resource availability. You can perform easy & quick scans, backup & restore driver data, and enjoy enhanced performance of your Windows.
Download the Bit Driver Updater tool from the link below. Install it with the help of instructions displayed on the screen.
Once the tool is installed use the following steps to update drivers and fix Windows 11 shutting down automatically.

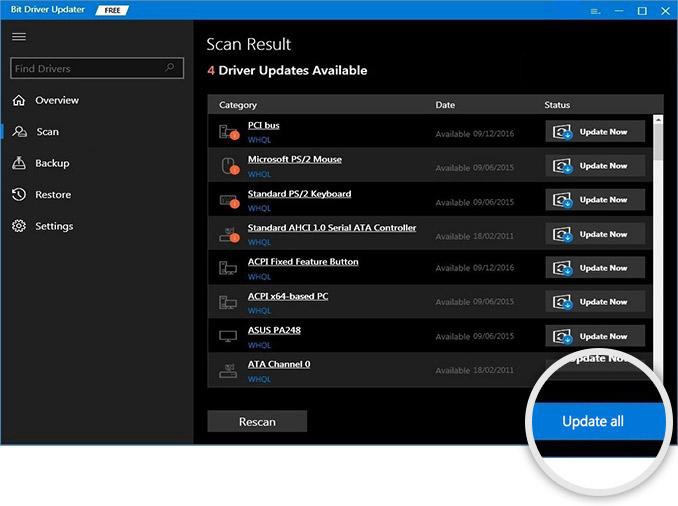
Step 1: Run the tool and click on Scan Drivers to begin outdated driver scan on your Windows 11 device.

Step 2: Wait till the scan completes and a list of drivers that have pending updates is displayed as this can take a while.
Step 3: Scroll to the bottom of the list and select Update all option to download all the drivers updates at once. However, the option for Update all is only available for Pro users. Users with the Free version of the tool can update drivers one by one using Update Now button next to each of them.
Step 4: Install the updated drivers by following the on-screen steps. Restart your Windows 11 device to add the updates.
As the PC restarts, check if the updated drivers could fix the Windows 11 keeps crashing issue. If still windows 11 crashing constantly move on to the further fixes.
Also Know: [FIXED] Adobe Premiere Pro Keeps Crashing in Windows 10
Solution 4: Clean Boot
For some users, Windows 11 keeps restarting or the crashing issue was fixed after they performed a clean boot on their device. Here is how you can do it on your device.
Step 1: Use Windows and R keys together to open Run dialog box and type msconfig and press the enter key or click on OK.

Step 2: Move to the Services tab and click on the checkbox at the bottom for Hide all Microsoft services.

Step 3: Now from the list uncheck the services other than the ones that belong to manufacturers of your hardware like Realtek, NVIDIA, Intel, etc. To apply the updates click on OK.
Step 4: Open Task Manager through the shortcut keys Ctrl + Shift + Esc and move to the tab Startup.
Step 5: Click on the programs one by one and use the disable button at the bottom right of the window to stop the program. Find all the programs or applications that might be interfering and disable them one at a time.

Restart your Windows 11 PC and check if the Clean boot helped in fixing Windows keeps crashing issue on your device. In case the problem remains, move to the next alternative.
Solution 5: Disable Overclocking on your PC
Overclocking enables users to get most of their hardware, but this can only be your preference once you have a stable system. In case you are overclocking by using software such as MSI Afterburner, AMD Ryzen Master, or only others, turn it off. Now restart your device and check if the Windows 11 keeps crashing issue is fixed by disabling overclocking on your device.
Even after you stop overclocking and Windows 11 keeps crashing on startup proceed with the further method.
Solution 6: Examine Crash Log
The best method to find out the issue behind Windows 11 keeps crashing issue by checking the windows 11 crash log. It is part of an in-built app event viewer that keeps track of your applications and programs running on your system.
Below are the steps to check your Windows 11 crash log and fix the crashing issue.
Step 1: In the Run Dialog box (Windows + R keys) enter eventvwr and click on OK.

Step 2: Click on Windows logo from the left pane to expand and then select System. Open the event depending upon the crash time. The entire details of crash will be displayed below.
![]()
Copy the error message and paste it on your browser, find the relevant solution and apply it to fix the windows 11 keeps crashing issue on your device.
Also Know: How to Fix Windows 11 Widgets Not Working on PC?
Windows 11 Keeps Crashing: FIXED
That’s it on our guide to resolve Windows 11 keeps crashing constantly. Apply the above fixes and resolve the Windows 11 crash log issue to have an uninterrupted PC or laptop. Start by downloading pending Windows and Driver updates. To stay updated with the latest drivers automatically download the Bit Driver Updater tool.
Found our content helpful? To get regular technical updates and more informative blogs subscribe to our newsletter. Write down your concerns and valuable feedback for us in the comments. Follow us on Facebook, Twitter, Instagram & Pinterest to never miss an update.
Snehil Masih is a professional technical writer. He is passionate about new & emerging technology and he keeps abreast with the latest technology trends. When not writing, Snehil is likely to be found listening to music, painting, traveling, or simply excavating into his favourite cuisines.


![How to Update and Reinstall Keyboard Drivers on Windows 10/11 [A Guide]](https://wpcontent.totheverge.com/totheverge/wp-content/uploads/2023/06/05062841/How-to-Update-and-Re-install-Keyyboard-Drivers-on-Windows-10.jpg)
