
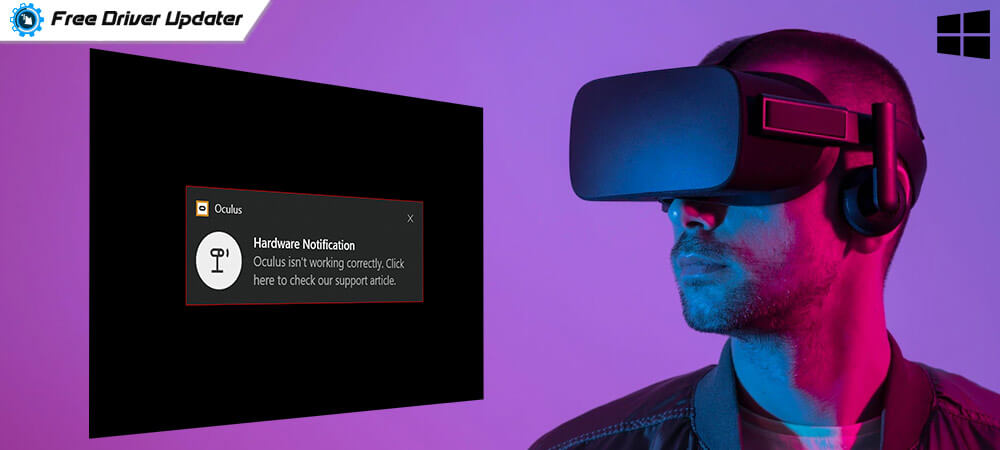
Many users complained about the error Oculus link not working or a black screen on their Windows device. If you are here with the same concern too, don’t worry you are not alone. However, users often struggle to find the accurate solutions we have listed in this tutorial.
The write-up below mentions simple and quick solutions for Oculus link desktop black screen problem. Apply the fixes to have a fully functional and working Oculus link on your device.
Before applying the fixes check if your system meets the minimum requirements of Oculus Link.
Minimum Requirements
Processor: Intel i5-4590, AMD Ryzen 5 1500X or above
Graphics Card: Nvidia GeForce GTX 1060 or higher, AMD 400 series or higher
Memory: 8GB RAM OS: Windows 10
USB Ports: 1x USB Port
Methods to Fix Oculus Link Not Working or Black Screen on Windows:
Go for the fixes below to resolve Oculus link black screen or not working issue on your Windows device. There’s no need to apply all the fixes, move down the list until the problem is fixed and the Oculus link works perfectly fine again.
Fix 1: Repair your System Files
If your Oculus Link malfunctions the first thing to be checked is your System Files. If the system files are corrupted or go missing from your device the Oculus link not working problem can occur. Perform a complete system scan through third-party software.
Download a reliable tool and perform the following steps:
Step 1: Open the tool and start your System scan.
Step 2: Wait till the scan completes and click on the Repair option to repair the corrupted or missing system files on your device. Once the system files are repaired, check if the Oculus link not working issue is fixed. If the system files couldn’t fix the issue, move on to the next solution.
Read Also: Oculus Controller Not Working? Here’s How to Fix It?
Fix 2: Update System Drivers
If your device drivers are corrupted or outdated the Oculus link desktop black screen error can come up. These drivers provide a communication channel between the hardware and operating system. Therefore, update system drivers to maintain smoother communication between them.
If you are skilled technically and have time to download drivers manually visit the official website of each outdated driver. Download and Install the latest driver update manually. But to ease down this entire process there exists an automatic method to update drivers.
An automatic driver updater tool i.e Bit Driver Updater performs system scans in no time and provides 100% reliable driver downloads. You can easily backup and restore the driver data from its database. In addition to this, there’s a possibility to schedule downloads for drivers at your convenience.
How to Automatically Update Driver with Bit Driver Updater?
Step 1: Download the Bit Driver updater tool. Apply the instructions on your screen to install the software.  Step 2: Click on the Scan Drivers option on the home screen to begin scanning your system for pending driver updates.
 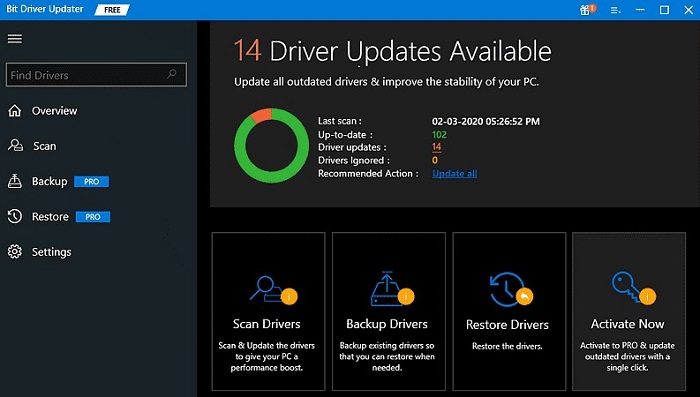 Step 3: As the scan completes, click on the Update All option at the end of the list to download all the driver updates at once.
  Note: Update All button comes with the Pro version of the tool. If you are using the Free version of the bit Driver Updater click on the Update Now option present next to each driver update.
Step 4: Install all the driver updates by following the on-screen instructions. Restart to apply the driver updates on your system.
The Pro update of Bit Driver Updater unlocks features like one-click download, 24*7 technical assistance, and many more. Also, the Pro version purchase offers a guarantee of complete money back for up to 60 days.
Now check if the Oculus Link not working or if the black screen in Windows is fixed. If the problem still remains, move on to further solutions.
Fix 3: Adjust Resolution
If the issue of the Oculus Link black screen occurs on your device it can be due to the higher demands of the rig. Therefore, to fix this lower down the settings of your device using the following steps
Step 1: unplug the Oculus from your system.
Step 2: Open the Folder for Oculus. The usual location for this is C:\Program Files\Oculus.
Step 3: Open the Support section and then expand Oculus diagnostics. Run the executable file OculusDebigTool.exe
Step 4: In the Service section update the Encode Resolution Width with the recommended value i.e 2784. 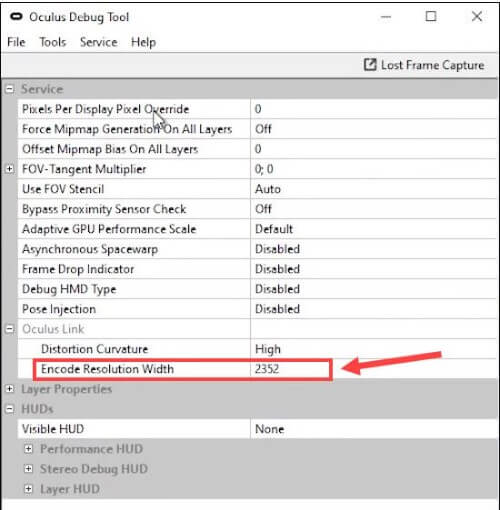 Step 5: Restart your device to apply the changes. Now Reboot Oculus and Plug it back on your PC.
Check if this resolves the Oculus link not working on your device. If the problem remains, try the next solution.
Read Also: How to Connect Oculus Quest 2 to PC Wireless
Fix 4: Disable Overlay within the Game
For many users, the issue of the Oculus app’s blank screen or not working issue was fixed as they disable the Overlay in the game. Here’s how you can do it too
Step 1: Launch GeForce and open the Settings through the Cogwheel icon.  Step 2: In the General Tab, turn off the In-game Overlay toggle.
 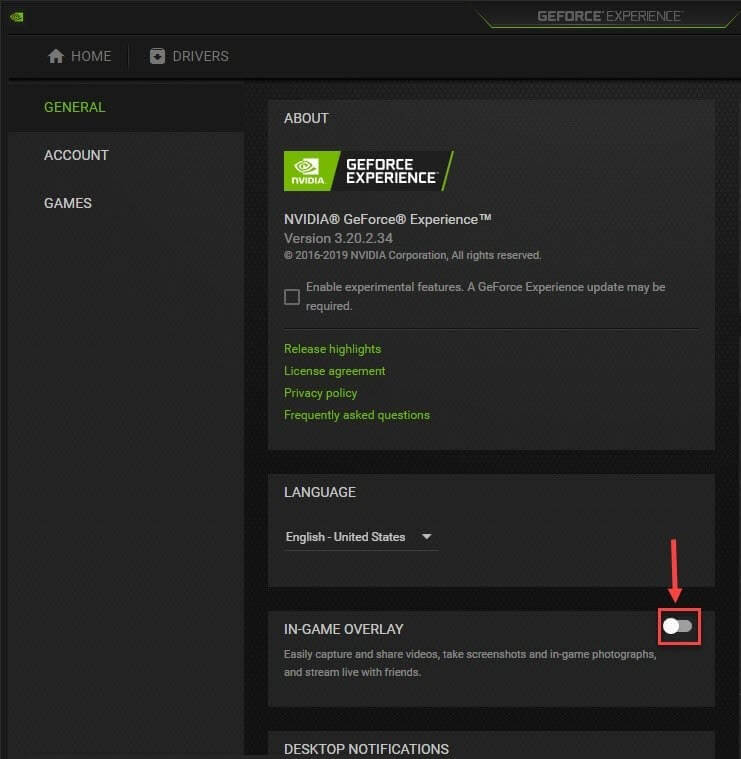 Now restart your Oculus link and other VR devices to check if the issue is gone. If the Oculus link keeps stopping go ahead with the next fix.
Fix 5: Opt-Out From Public Test Channel
If you have enrolled in the channel for the Public test the Oculus link keeps stopping. This is also explained by the official support of Oculus. In this case, you are using a Beta version of the software that is not reliable.
To opt out from the Public test, the panel applies the steps given below
Step 1: Launch your Oculus Link and open Settings from the Left Panel. Move to the tab Beta. 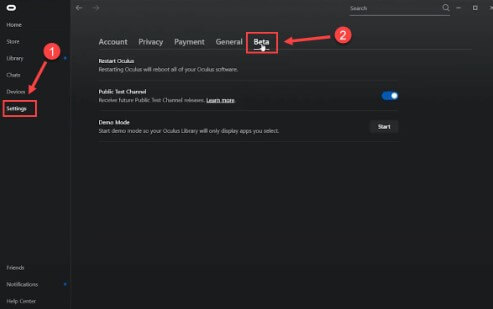 Step 2: Turn off the toggle for Public Test Channel and restart your Oculus Link.
 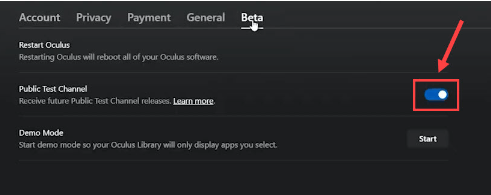 Now test and check if the Oculus link not working issue is fixed. If the issue is intact Don’t worry and move ahead with the further solution.
Read Also: How to Download, Update, and Install Oculus Driver
Fix 6: Use Dedicated Graphics Card
If your Oculus headset is not plugged in the specific Graphics card the issue of the Oculus link black screen or not working can occur. Here is how you can easily configure the NVIDIA Graphics card
Step 1: Right-click anywhere on your desktop and click on NVIDIA Control Panel.
Step 2: From the left panel in the Control Panel for NVIDIA click on 3D Settings to expand the section. Under this open Manage 3D settings section. 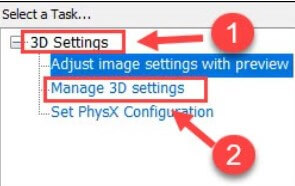 Step 3: Open the tab Program Settings and choose your application for Oculus from the drop-down list. Select High-performance NVIDIA Processor.
 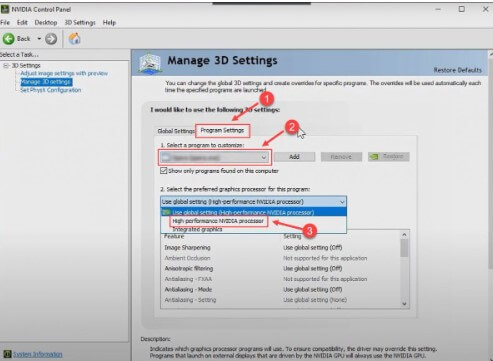 As the Settings are applied restart Oculus Link and check if the Oculus software black screen issue is fixed. Most probably your Oculus link will now work without any interruptions.
Oculus Link Not Working in Windows: FIXED
Hopefully, now your Oculus link not working problem is fixed. The solutions will help you retain a working Oculus link back on your system. Make sure the drivers on your device are up to date. To avoid manual work, use the Bit Driver Updater tool to download driver updates with a single click and in no time.
Have any more questions on Oculus software black screen error? Don’t hesitate and feel free to reach out to us in the section below. Moreover, you can drop your suggestions and valuable feedback in the comments. Also, if the article enlightened you with your concern, subscribe to our blog for similar tech-related guides and more. Follow us on Facebook, Twitter, Instagram, and Pinterest for the latest technology updates.
Snehil Masih is a professional technical writer. He is passionate about new & emerging technology and he keeps abreast with the latest technology trends. When not writing, Snehil is likely to be found listening to music, painting, traveling, or simply excavating into his favourite cuisines.


![How to Update and Reinstall Keyboard Drivers on Windows 10/11 [A Guide]](https://wpcontent.totheverge.com/totheverge/wp-content/uploads/2023/06/05062841/How-to-Update-and-Re-install-Keyyboard-Drivers-on-Windows-10.jpg)
