
Is your Logitech wireless mouse not working on your Windows 10/11 device? If yes, then this article will provide you with some solutions in order to get rid of this problem.
The mice have advanced a lot more from the day they were first introduced to us. There are many different kinds of mice, but the wireless mouse is one of the most interesting. Logitech is a renowned company that makes wireless mice and other PC accessories. But like any other device, the Logitech mouse can break down and give you errors like “Logitech wireless mouse not working on Windows 10 PC.”
If you are also facing the same problem with your wireless mouse, then read this article and you will see some of the most efficient ways to fix this issue. These solutions have helped a lot of users fix their Logitech mouse not working issue. You might not need to try them all. Just go from the top of the list to the bottom until you find the one that works for you.
Different Methods To Resolve The Logitech Mouse Not Working Problem On Windows PC
Here are the best 5 ways to get rid of the “my Logitech mouse is not working” problem.
Solution1: Replace Or Recharge The Battery To Solve The Logitech Wireless Mouse Not Working Issue
Sometimes all it takes for any wireless device to get back working is to check whether it has the battery to work or not. Every wireless device works on batteries, you can either charge them or replace them with new ones. Weak batteries might give indications that your mouse is working properly, but in reality, it is not.
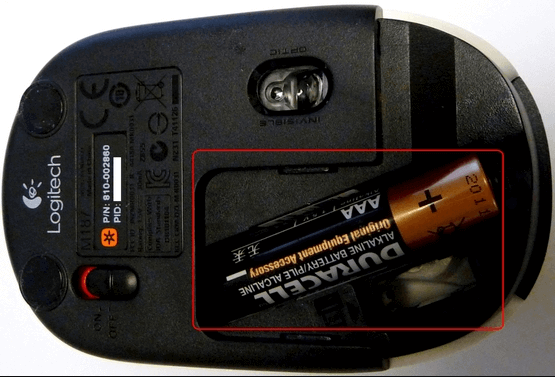
Replace or recharge the batteries but charge with the original charger or replace them with high-quality batteries. After you are done with the process, try connecting the mouse again to the computer. Hopefully, the Logitech mouse not working problem will be solved by performing this process. If not, try out the next solution mentioned below.
Solution2: Connect Your Mouse With A Different Device To Rule Out The Logitech Wireless Mouse Not Working Problem
Sometimes the problem is not with your mouse but it is with the computer. Hence, you need to connect your mouse to a different computer and check to see if the Logitech mouse not connecting or working issue is gone.
If in case, your mouse is not working on another computer as well, then either its drivers are outdated or there is hardware damage. To solve the hardware problem you should either take it to a repair shop or buy a new one. And to update your mouse drivers, check out the other Logitech wireless mouse not working solutions below.
Also know: Mouse Right Click Not Working Windows 10? Here’s How to Fix It
Solution3: Fix Logitech Mouse Not Working Issue By Updating Drivers Manually
Generally, the mouse can work automatically without manually installing the drivers. Your Windows OS will automatically install the mouse drivers once it is connected to your computer. However, the mouse driver can be outdated or corrupted without your knowledge and can be a reason behind the Logitech mouse not connecting issue.
Therefore, to fix the problem, you can try updating your mouse drivers with the help of the Windows in-built tool. This tool is known as the Device Manager tool. With the help of this tool, you can manage all your drivers and solve the Logitech mouse not working issue. However, you need to have some technical knowledge and patience to do so.
Steps To Update Mouse Driver Manually In Order To Fix Logitech Mouse Not Connecting Error
Below are some steps that will help you update the mouse driver and resolve the Logitech wireless mouse not working problem.
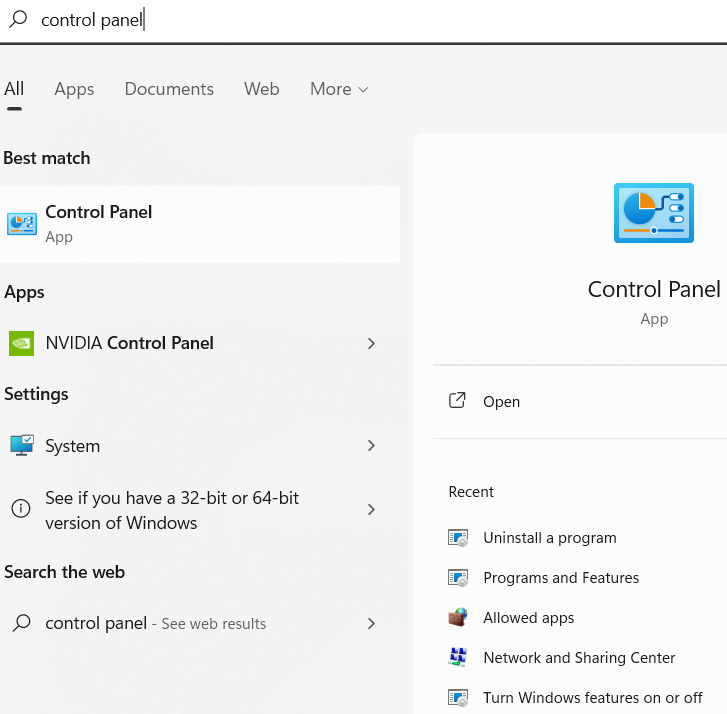
- Click once on the Windows icon present in the bottom-left corner of your screen. Then, type Control Panel in the search bar and press the Enter key on the keyboard.
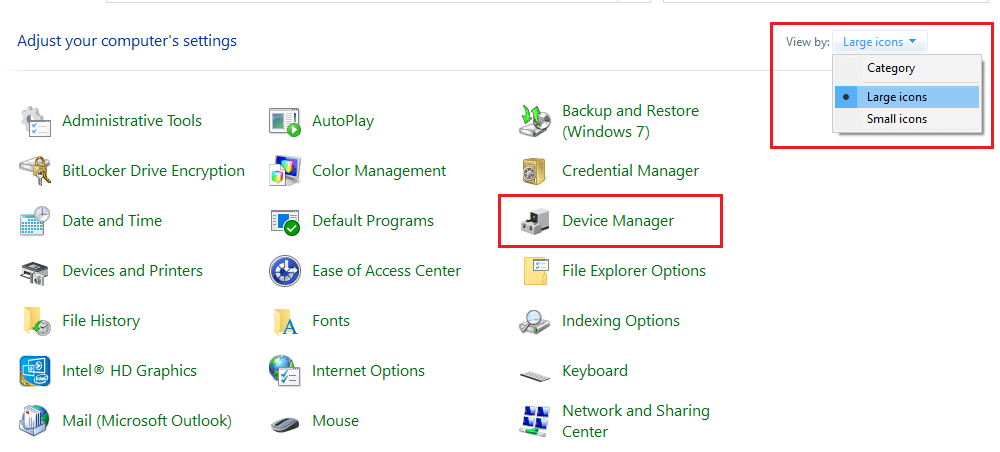
- Change the apps’ icons by clicking on the “View by” dropdown menu and selecting the Large icons option. Then, click on the Device Manager tool and it will open a new window showing all the device drivers.
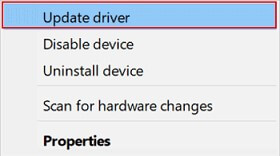
- On the Device Manager window, click twice on the “Mice and other pointing devices” option to expand it. Then, right-click on the Logitech mouse driver you are using and select the Update driver option from the list.
- Select the “Search automatically for drivers” option on the pop-up window.
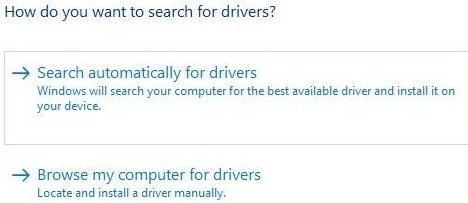
- Wait for some time and let your PC search for new mouse drivers. Then, follow the on-screen instructions to install those drivers onto your computer.
After installing the latest drivers, Reboot your system and it will replace the old drivers with the new ones. Now, check if you are still facing the same Logitech wireless mouse not working error or not. If you feel that this driver updating process is a bit too complicated for you, then check out the next automatic method below.
Solution4: Update Mouse Driver Automatically And Solve The Logitech Mouse Not Working Problem
In this automatic process, we have to take help from a third-party driver updater software. We would recommend you download and use the best software for the job like the Bit Driver Updater app. This is one of the most reliable and trusted programs that is specially made for Windows devices.
Using this app to update your Windows drivers will also help in fixing my Logitech mouse is not working problem. It will also boost your system’s overall performance and improve compatibility with the connected devices. Below we have shared some more advantages of having this app on your computer:
- Scans for broken, faulty, outdated, and missing drivers and update them with just one click.
- Keeps your drivers up to date for better performance
- Provides easy access to all the latest WHQL-certified drivers
- Backup old drivers before fixing them
- Provides satisfactory 24×7 customer service
Steps To Download And Use Bit Driver Updater In Order To Solve The Logitech Wireless Mouse Not Working Problem
The instructions given below will provide you with a download link as well as some directory steps to install and use the app and fix the Logitech mouse not working issue.
- To download the Bit Driver Updater software, click on the link below:

- Once the application has been downloaded, go to the Download folder and run the setup file. Follow the instructions shown on your screen to install it.
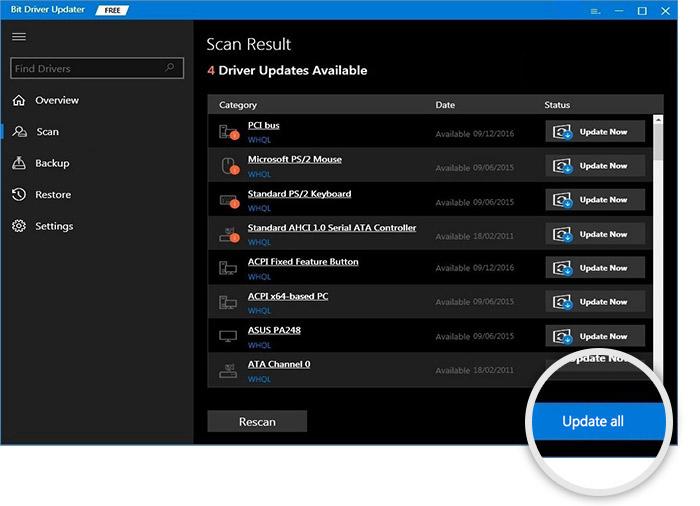
- Run the Bit Driver Updater and then click on the Scan Drivers button present in the middle of the page. This will allow the app to search for outdated drivers.
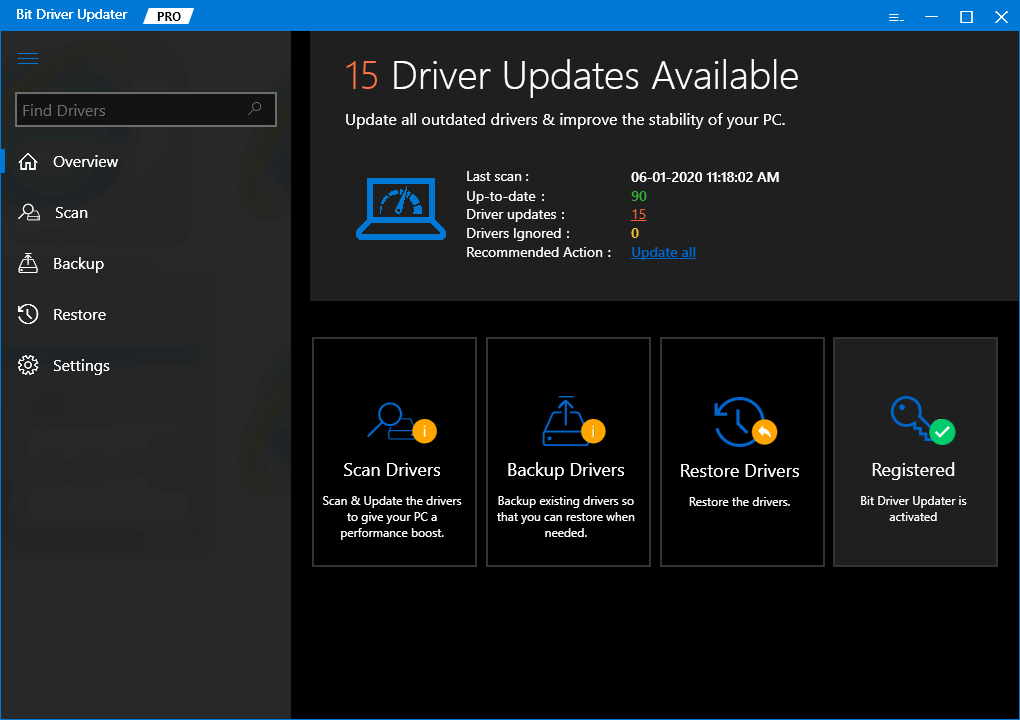
- Now, you can either click on the Update All button and it will update all the drivers at the same time, or else click on the Update Now button next to the Mouse driver.
After updating the mouse driver, Reboot your computer and it will automatically install the new driver and fix the Logitech mouse not working issue. You can also try using the Windows troubleshooter to find and fix the problem. Let’s know more about the same below.
Solution5: Run The Windows Troubleshooter To Fix The Logitech Mouse Not Connecting Issue
Windows troubleshooter is an in-built tool that is very useful to find and fix most of the problems or errors including the Logitech mouse not working. This tool fixes problems with your mouse, Windows store apps, printer, keyboard, Bluetooth, etc. Windows has had troubleshooters for a long time, and you can easily access it from your Windows Settings. Here are some steps that will show you how to use this tool to get rid of the Logitech mouse stopped working error.
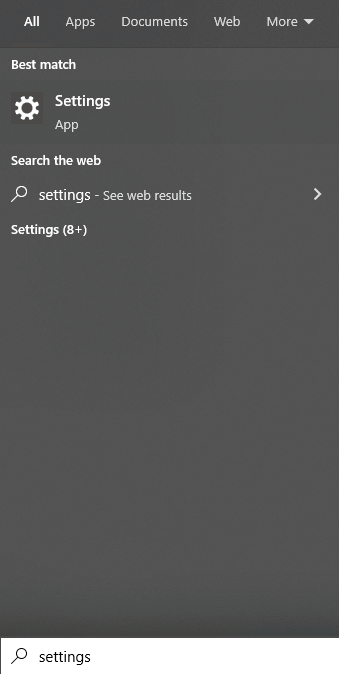
- Type Settings in the taskbar’s search bar and then press the Enter key
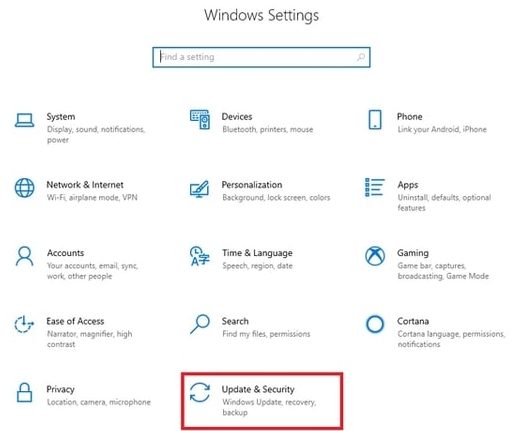
- On the settings window, select the Update & Security option
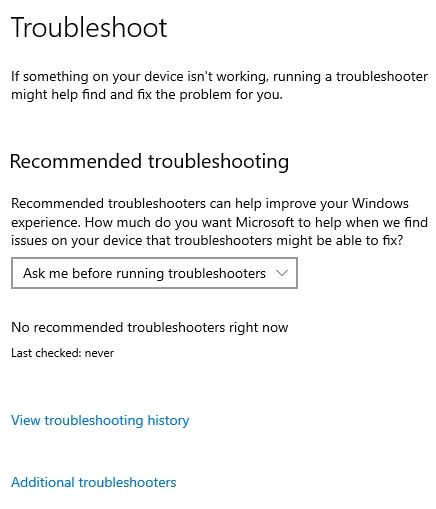
- Now, select the Troubleshoot tab from the left-side panel. And then, click on the Additional troubleshooter’s button on the right-side panel.
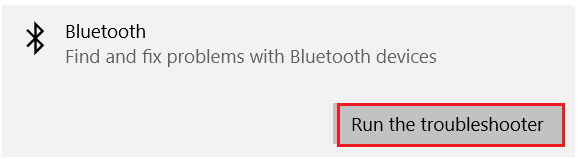
- Under the “Find and fix other problems” heading, expand the Bluetooth section by clicking on it. Then, click on the Run the troubleshooter button and this will start the troubleshooting process.
- Wait for a few moments and let your computer search for the cause, then follow the on-screen instructions to fix the Logitech mouse not working issue. After fixing the problem, Restart your computer and you are good to go.
Also read: Mouse Scroll Wheel Not Working on Windows 10? Here’s How To Fix It!
Fixed: Logitech Mouse Not Working Error On Windows 10/11 PC
We hope the solutions shared above have helped you fix the Logitech mouse not connecting error. If you are still facing the same problem, then there is a high chance that your mouse is physically damaged. In that case, take your mouse to a repair shop to check for some professional advice.
Apart from that, if you have any questions or suggestions regarding this post, share them with us in the comments box below.
Snehil Masih is a professional technical writer. He is passionate about new & emerging technology and he keeps abreast with the latest technology trends. When not writing, Snehil is likely to be found listening to music, painting, traveling, or simply excavating into his favourite cuisines.


![How to Update and Reinstall Keyboard Drivers on Windows 10/11 [A Guide]](https://wpcontent.totheverge.com/totheverge/wp-content/uploads/2023/06/05062841/How-to-Update-and-Re-install-Keyyboard-Drivers-on-Windows-10.jpg)
