
If you are facing the Warzone game chat not working error on your Windows PC, then this article will help you with some solutions to get rid of this problem within minutes.
Call of Duty: Warzone is one of the top Battle Royale games played by millions every month. The game is definitely fun, especially when played with friends. But it may also pose some problems, like the one in that the game voice chat not working. Communication is a big part of this game, especially when you’re in the middle of combat. However, many players have recently reported that they are facing the Warzone game chat not working issue.
There are several possible causes for a voice chat issue. These issues could be both hardware or software-related, such as broken earpieces, or connection problems. Many problems can be fixed by making sure you have all the correct settings in place. And occasionally, a software issue will be responsible for your inability to communicate with your teammates. Today, with this write-up we are going to show you different ways through which you can fix the Warzone voice chat not working.
Effective Solutions To Resolve The Warzone Game Chat Not Working Problem
Implement the fixes shared below and get rid of the Warzone microphone not working issue.
Fix1: Give Microphone Access To Warzone
The first and foremost thing you need to do is check that your Warzone game has microphone access. You can allow the apps to access your mic by visiting the Windows Settings tool. Follow the instructions below in order to fix the Warzone voice chat not working issue by allowing Warzone to access your microphone.
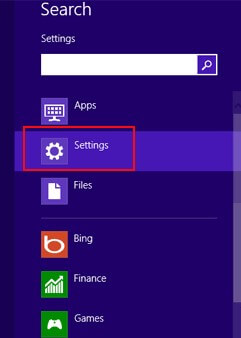
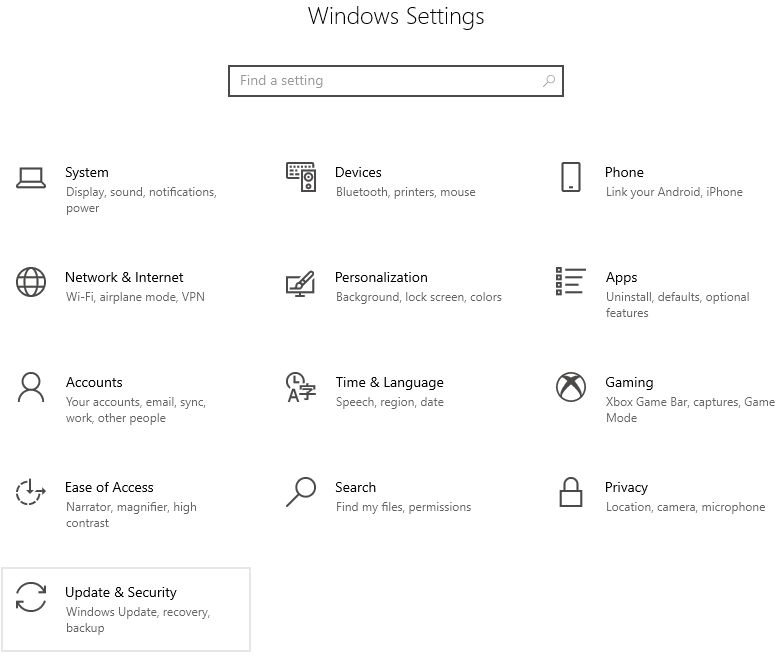
Step1: Open the Windows Settings by clicking on the Windows icon and selecting it from the app drawer.
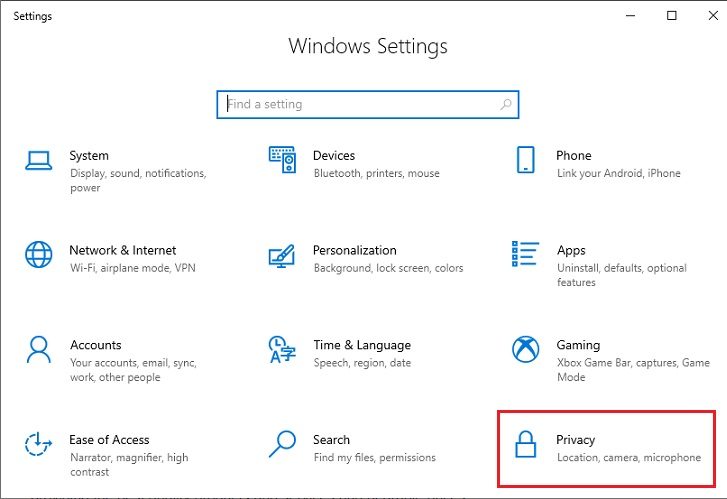
Step2: On the Settings window, select the Privacy settings.
Step3: Now, go to the Microphone tab section by selecting it from the left side.
Step4: Then, turn on the toggle switch for “Allow apps to access your microphone”.
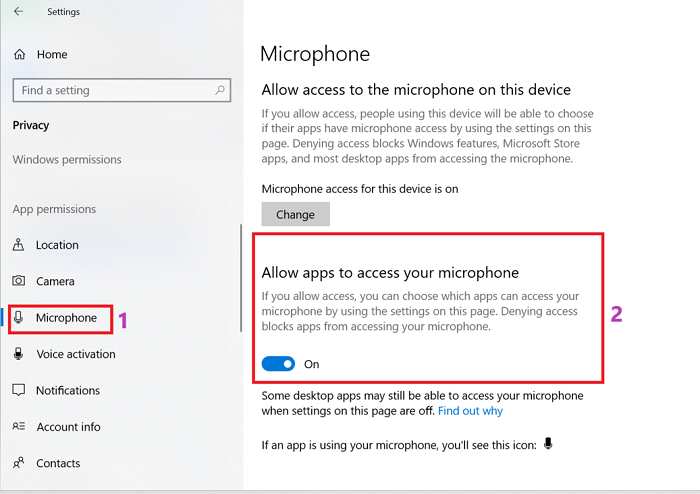
Step5: After that, under the “Choose which Microsoft Store app can access your microphone” heading, scroll down and again enable the toggle switch in front of COD: Warzone.
After turning on both the toggle switches, check to see if the game chat not working Warzone is gone. If not, try setting your mic as default.
Fix2: Set Your Microphone As The Default Communication Device
As it turns out, the Warzone voice chat not working problem is likely to happen if your microphone or the default playback device you are using while playing Warzone are not set as default communication devices. Several users who were also having this problem have confirmed that the issue went away completely when they set both the mic and headphones to the default communication device from the Sound Settings menu. Follow the steps mentioned below and they will help you fix the Warzone game chat not working issue by setting your mic as default.
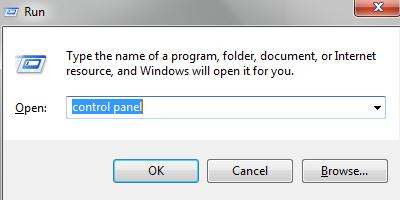
Step1: Open the Run dialog box by pressing the Windows + R keys at the same time on your keyboard.
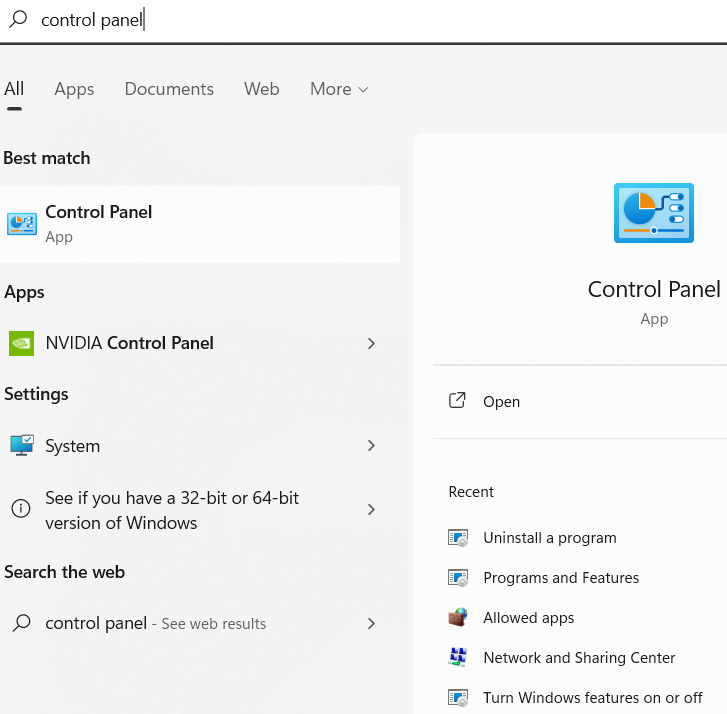
Step2: Type Control Panel in the search bar and press the Enter key to open it.
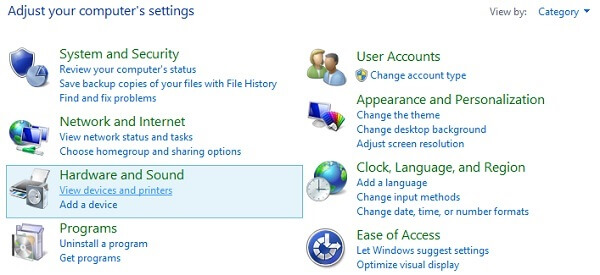
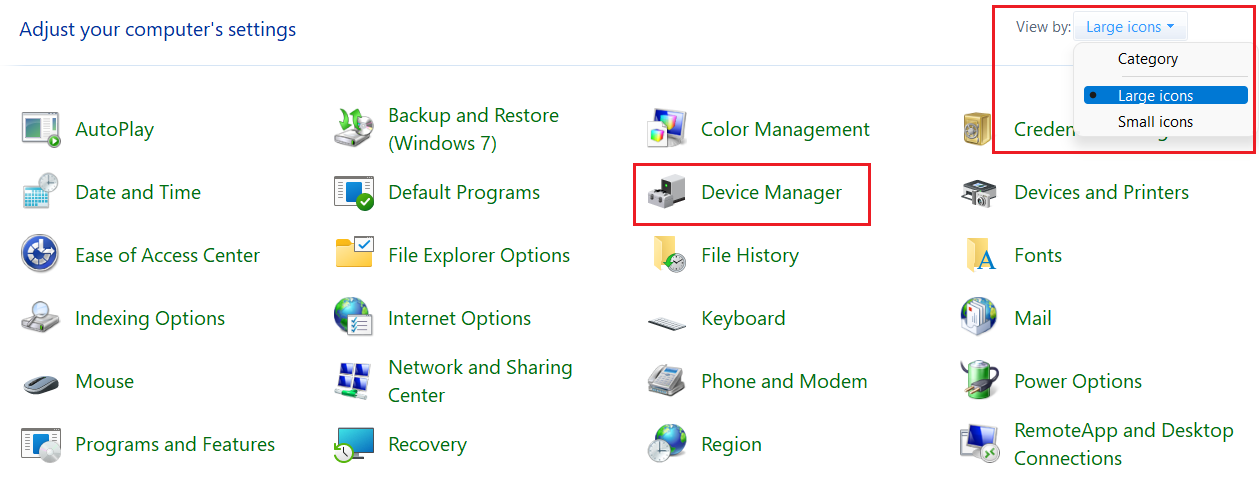
Step3: Expand the “View by” dropdown menu and choose the Category option from the list.
Step4: Go to the Hardware and Sound section and then, again click on the Sound option.
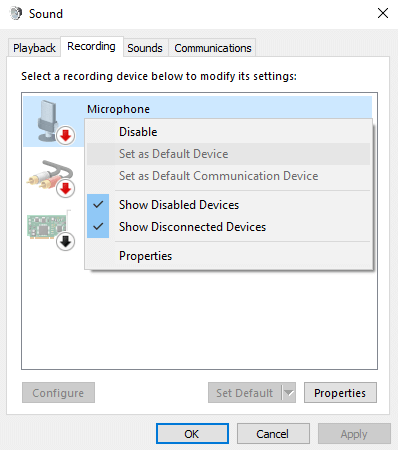
Step5: This will open a new Sound settings window. Over there, select the Recording tab from the top.
Step6: Now, right-click on the headset or mic you are using while playing the game. Then, select the Set as Default Device option from the context menu list.
Once you are done with the process, reboot the Windows device and check if the Warzone game chat not working problem is resolved. If not, try updating your microphone drivers.
Also know: How to Fix Overwatch 2 Not Launching on Windows 11, 1O PC
Fix3: Solve Warzone Game Chat Not Working By Updating Microphone Drivers
One of the most common reasons behind almost all software and hardware-related issues including the Warzon voice chat not working properly. Therefore, we would recommend you always keep your Windows drivers up-to-date. The best way to get the latest drivers onto your computer is by using driver updater software and Bit Driver Updater is one of the best ones out there.
This application protects your computer from various errors and issues by keeping your drivers updated. Because this program is specifically made for Windows devices, you can improve your overall computer’s performance with its help. Moreover, this app is tried and tested by thousands of Windows users, which makes it one of the most trusted apps in the market. Here is a list of features that the Bit Driver Updater has to offer:
- You can schedule the driver-download process
- Only WHQL-certified drivers
- Takes a backup of the outdated drivers before updating them
- Helps your computer to increase the driver-download speed
- Free 24×7 technical assistance will be provided
Steps to fix Warzone game chat not working by using the Bit Driver Updater app:
Follow the steps below in order to download and use the latest version of Bit Driver Updater in order to resolve the Warzone game chat not working.
Step1: Visit the link below to get the most recent version of Bit Driver Updater on your PC.
 Step2: Once you download the app, click on the package file to open it. And then, follow the setup wizard instructions to properly install the program on your computer.
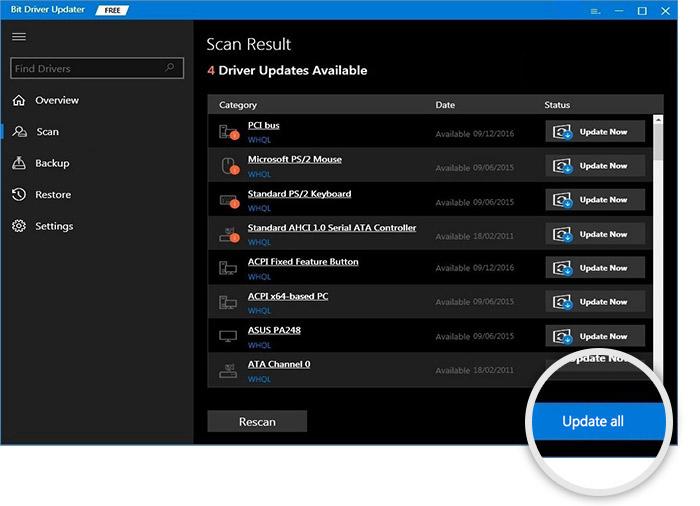
Step3: Now, as soon as you launch the application, it will automatically start scanning your PC to search for any outdated driver available.
Step4: Then, a list of drivers will be displayed on your screen that needs an update. Select the Update All option and this will start the driver-download process.
After completing the task, look for the Warzone mic not working issue. If the issue still persists, try reinstalling the drivers.
Fix4: Reinstall Audio Input Drivers To Fix Warzone Game Chat Not Working
If in case, your microphone drivers are broken or your computer is downloading corrupted drivers again and again, you should try reinstalling the drivers manually. For this procedure, you can take help from one of the Windows-integrated utilities. This tool is known as the Device Manager, which is used by several Windows users to keep their drivers in a manageable condition.
Steps to reinstall drivers using Device Manager to fix the Warzone game chat not working:
Check out the instructions below to fix the Warzone voice chat not working issue with the help of the Device Manager tool.
Step1: Click on the Start menu button and type Control Panel in the search bar, then press the Enter key.
Step2: Go with the Large icons option in the View by dropdown menu.
Step3: Click on the Device Manager tool and it will open a new window displaying all your Windows drivers.
Step4: Single-click on the arrow in front of the Audio inputs and outputs section in order to expand it. Then, double-click on the microphone device you are using to open its Properties.
Step5: Now, go to the Drivers tab section by selecting it from the top.
Step6: Then, choose the Uninstall device option.
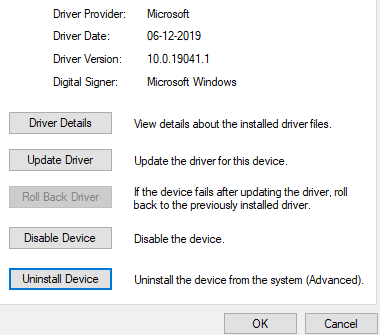
Step7: A small dialog box will appear on your screen, select the Uninstall button on that window.
 Once you are done uninstalling the driver from your computer, restart your computer and then download the latest drivers from the manufacturer’s website. Look if performing this procedure helped you solve the Warzone game chat not working problem. If not, the last option is to use the Windows troubleshooter to find and fix the issue.
Fix5: Run Windows Troubleshooter To Fix Warzone Mic Not Working
If even after performing all the methods mentioned above you are still struggling with the Warzone voice chat not working error, then you need to use the troubleshooting tool. This utility comes with each and every Windows OS, and you can access it from the Windows Settings. Below are some steps that will walk you through the entire process.
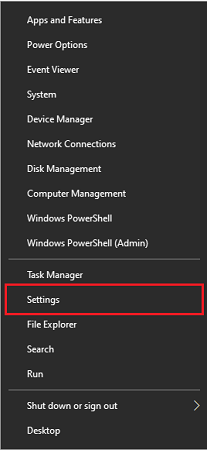
Step1: Tap on the Windows + X button togetherly to open a context menu list.
Step2: Select the Settings option from that list and it will open a new window.
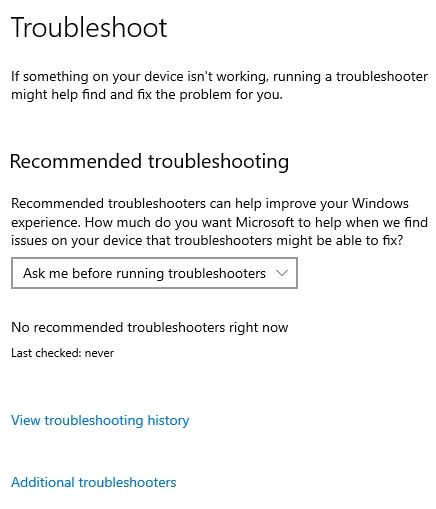
Step3: Go to the Update & Security option among other options on the Settings window.
Step4: Now, click on the Troubleshoot tab section from the left pane.
Step5: Then, on the right pane, select the Additional troubleshooter’s option under the “Recommended troubleshooting” section.
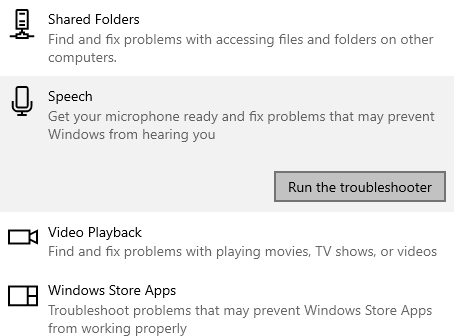
Step6: Scroll down and under the “Find and fix other problems” heading expand the Speech option by clicking on it.
Step7: Click on the Run the troubleshooter button. This will allow your computer to start searching for the issue behind the Warzone game chat not working and a solution for it.
Step8: Wait for some time and then follow the instructions displayed on your screen to fix the problem.
After completing the whole process, restart the computer, and the Warzone mic and the not working problem will be resolved.
Resolved: How To Fix Warzone Game Chat Not Working On Windows PC
We believe that the different solutions mentioned above have helped you with fixing the game chat not working Warzone issue. If not, then there is a high chance that the microphone you are using is physically damaged. Try using a different headset or microphone or take it to a repair shop. You can also contact the Activision Support team for some professional help. Additionally, share your thoughts about this blog post in the comments section below.
Snehil Masih is a professional technical writer. He is passionate about new & emerging technology and he keeps abreast with the latest technology trends. When not writing, Snehil is likely to be found listening to music, painting, traveling, or simply excavating into his favourite cuisines.


![How to Update and Reinstall Keyboard Drivers on Windows 10/11 [A Guide]](https://wpcontent.totheverge.com/totheverge/wp-content/uploads/2023/06/05062841/How-to-Update-and-Re-install-Keyyboard-Drivers-on-Windows-10.jpg)
