
Is your Logitech G533 mic not working on your Windows 10 computer? If yes, then this article will provide you with the best solutions to get rid of this issue within minutes.
Logitech makes microphones, keyboards, headsets, and other computer parts that are of high quality. The G533 is a gaming headset that gives you a lot for your money. It has customizable LED lights, wireless audio, and surround sound. Also, the sound drivers in these headphones are bigger, and the microphone quality has been improved. However, many Logitech users have reported that their Logitech G533 mic stopped working while they were using it.
Users are running into this problem for a number of different reasons. For example, the mic is physically broken, the audio drivers are out of date, access to the mic is limited, etc. But the point is that users can’t use the headphone mic because of these things. We have come up with the most effective ways to fix the problem of the Logitech G533 microphone not working.
Different Methods To Fix The Logitech G533 Mic Not Working Windows 10
Check out the different ways shared below in this article to get a clear view of how to resolve the Logitech G533 mic stopped working.
Solution1: Allow Access To Your Logitech G533 Microphone
If you want your computer to be able to use the Logitech microphone, it needs to have the right permissions. If your Logitech G533 mic not working on your Windows PC, it might be because your PC doesn’t have permission to use these features. Follow the steps below to make sure that the apps can use the microphone.
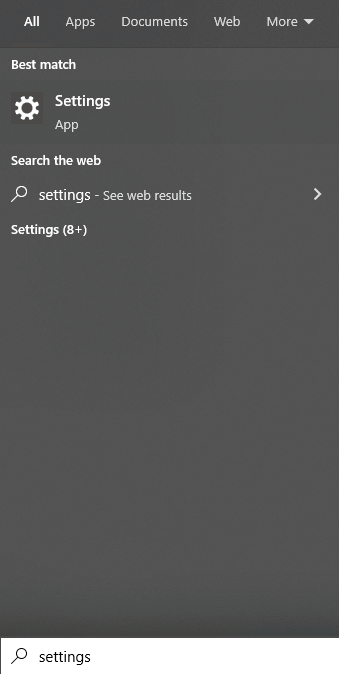
Step1: Click on the Windows icon present in the bottom-left corner of your screen to open the Start menu. Then, type Settings in the search bar and tap on the Enter button on your keyboard.
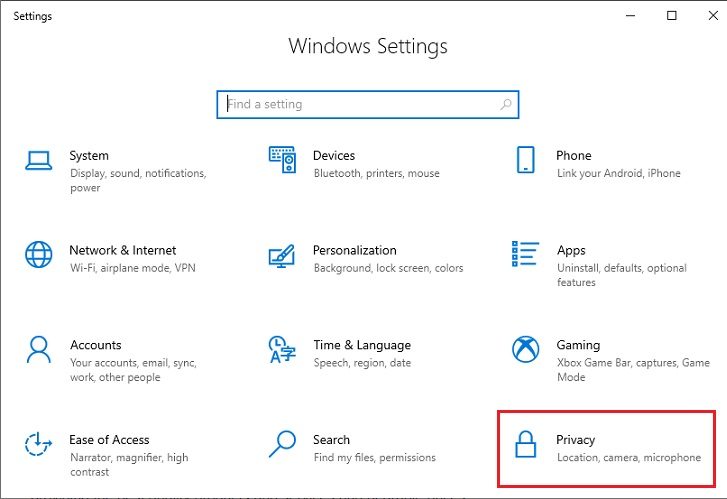
Step2: On the Settings window, go to the Privacy settings by clicking on it.
Step3: Now, from the left-side panel click on the Microphone tab
Step4: Then, click on the Change button under the ‘Allow access to the microphone on this device’ heading. Turn ON the toggle switch for it.
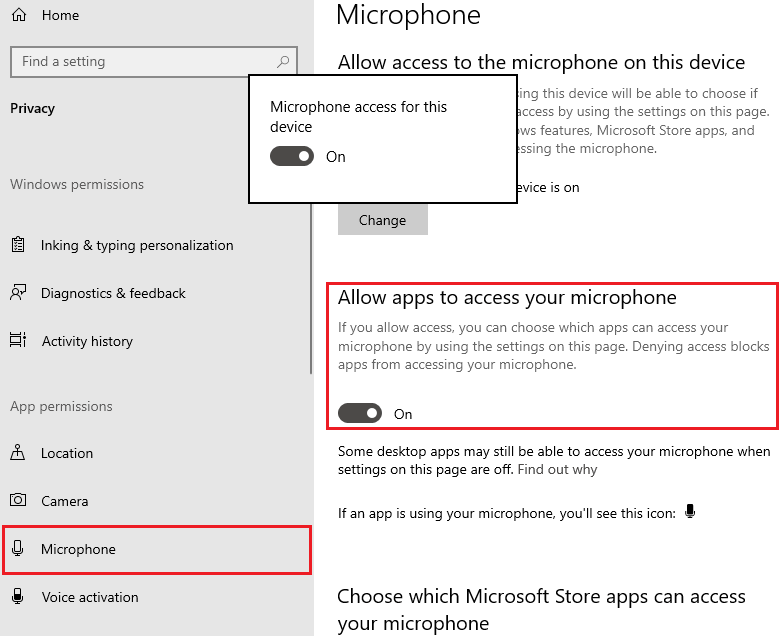
Step5: Again, enable the toggle switch for the ‘Allow apps to access your microphone’ option. Check to see if the above steps fixed the problem with your Logitech G733 mic not working after you are done. If not, try the next solution.
Solution2: Install New Windows On Your Computer
When you download and install the new Windows OS on your computer, you can fix almost all of the big problems. This is the most common way for most users to fix simple errors. Follow the steps below to fix the problem where your Logitech G533 mic not working by updating the Windows OS.
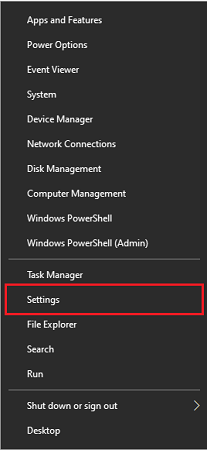
Step1: Press on the Windows + X keys simultaneously to open the Start menu’s context list.
Step2: Select the Settings option from the list and it will open a new window.
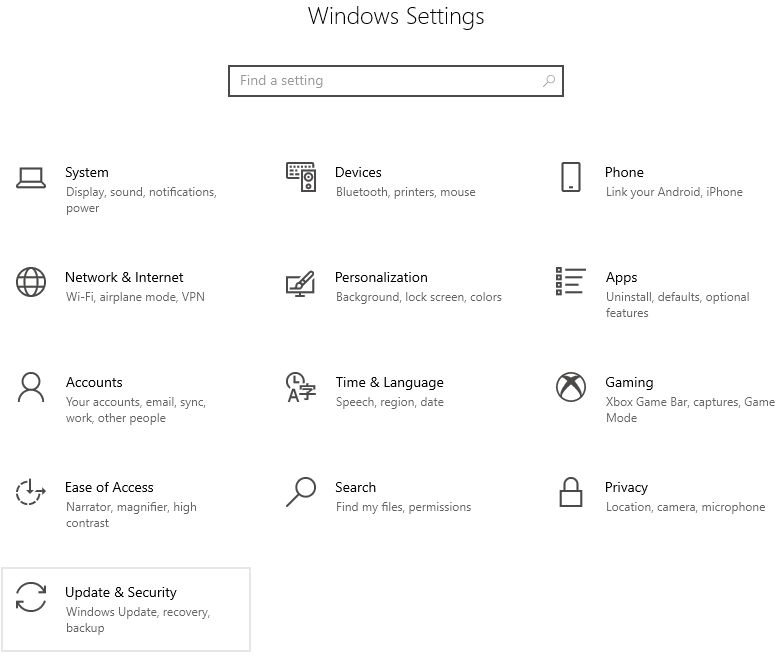
Step3: Now, go to the Update & Security settings section.
Step4: Choose the Windows Update tab from the left-hand side panel.
Step5: Then, choose the Check for Updates option from the right-side panel.
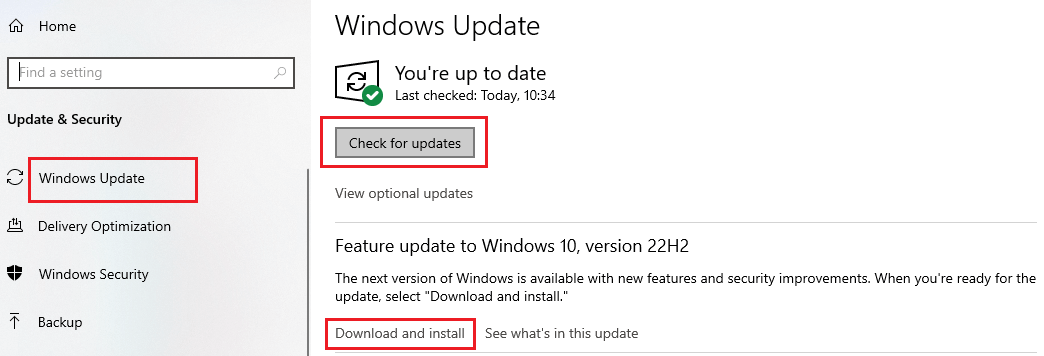
Step6: Give your computer some time to search online for any available Windows updates. Then, it will provide you with a Download and install button, which you can click to get the latest OS version on your PC.
Once the Windows installation process is complete, shut down and then start your PC again to check if the Logitech G533 mic not working issue is gone. If not, then move on to the next solution.
Also know: How to Fix Logitech G Pro X Microphone Not Working?
Solution3: Update The Drivers To Solve The Logitech G533 Microphone Not Working Problem
Many Windows users don’t know that they need to keep their device drivers up to date to avoid problems like when the Logitech G533 mic stopped working. Most of the time, when people update their Windows OS, they think it will also update all of their drivers. This is partly true because only a few drivers will be updated.
In order to update all your drivers you need to get the best driver updater software out there. And the best one in the market is the Bit Driver Updater updater app. Using this app will make the driver updating process so easy that you only need to click once and all your drivers will get updated automatically. Here are some additional features that Bit Driver Updater has to offer:
- Download WHQL tried and tested drivers
- Increases driver downloading speed
- Backup outdated drivers
- Improves your computer’s compatibility with devices
- Scheduling feature to update drivers automatically
Steps to fix the Logitech G533 mic not working issue by using Bit Driver Updater
Now, as you have a look at the different functionalities and features of using this app on your Windows devices, it’s time to download and use this app to update your drivers and resolve the Logitech G35 keeps disconnecting.
Step1: Press on the link below with the help of your mouse and download the latest Bit Driver Updater app from its official website.
 Step2: Type File Explorer in the taskbar’s search box and then hit the Enter button on your keyboard.
Step3: Go to the Downloads folder by selecting it from the left-side pane. And then, double-click on the downloaded setup file. Follow the wizard instructions properly to install the app on your PC.
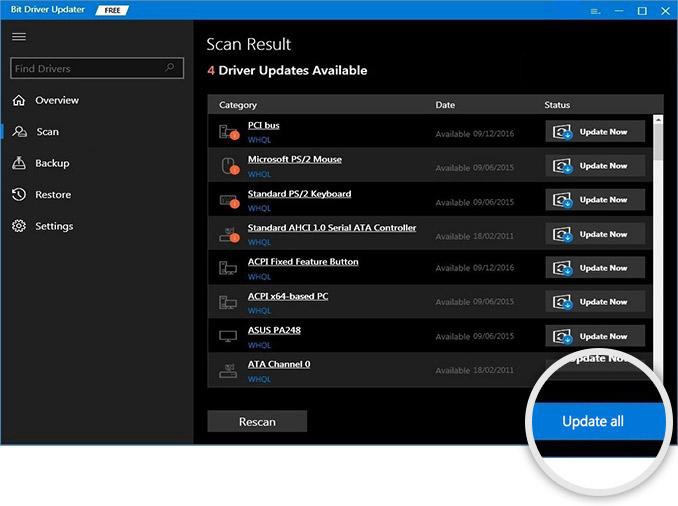
Step4: Launch the application once it is properly installed. Now, it will automatically start searching for drivers that are old or outdated. Then, a list of drivers will be displayed on your screen.
Step5: Choose the Update All option and it will start updating all the drivers one by one.
After finishing the process, the app will ask you to reboot your system. Then, look if the Logitech G533 mic not working error is resolved or not. If not, you need to reinstall the audio drivers manually.
Solution4: Reinstall Audio Drivers Using Windows Utility
As discussed above, if your audio driver is corrupted or broken, then you need to reinstall the driver on your own. To do so, you need to take help from one of the Windows-integrated utilities called the Device Manager. This tool lets users update, reinstall and roll back their Windows drivers manually. Updating your drivers with this tool will also help you fix issues like the Logitech G533 microphone not working. Implement the steps shared below to use the Device Manager in order to update your audio drivers.
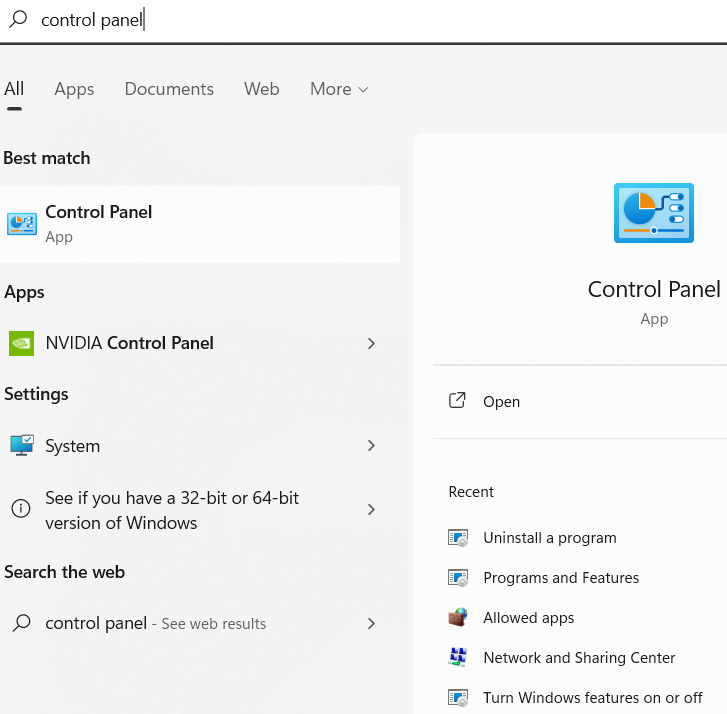
Step1: Press the Windows icon at the bottom-left corner to open the Start menu.
Step2: Type Control Panel in the search bar and then hit the Enter key on your keyboard.
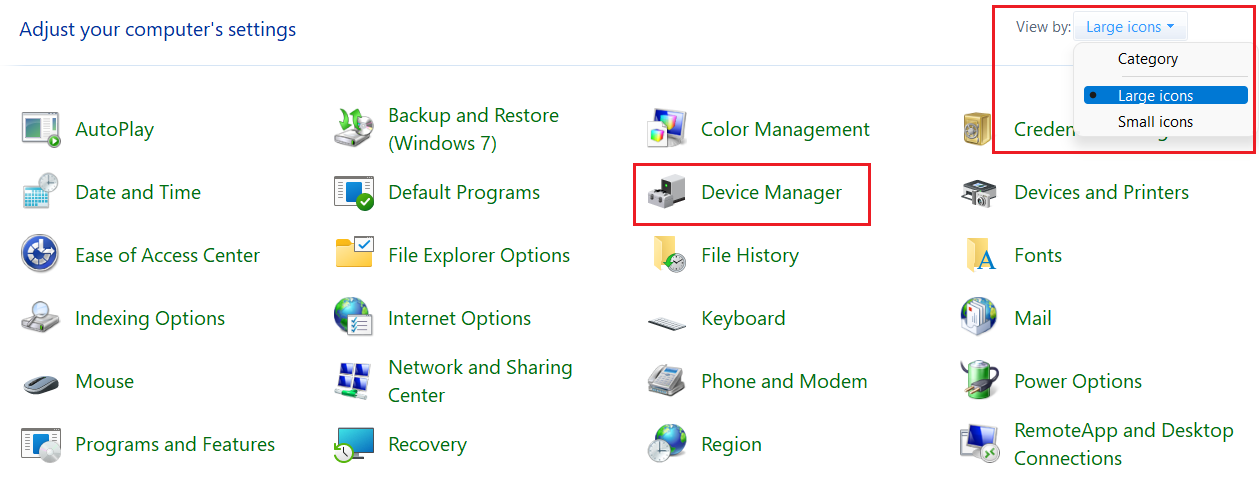
Step3: Now, change the icon’s design to Large icons from the View by dropdown.
Step4: Then, look for the Device Manager tool. This will open a new window showing all your Windows drivers.
Step5: Click twice on the Audio inputs and outputs section to expand it.
Step6: After that, right-click on the Logitech G533 headset and press on the Uninstall device option with your mouse.
Step7: Click on the Uninstall option on the new window that popped up on your screen.
Once the process is finished, restart the device and your PC will automatically download and install the new audio drivers for you. If still the Logitech G533 mic not working issue persists, run the Windows troubleshooter to find and fix the problem.
Solution5: Use Windows Troubleshooter To Fix Logitech G533 Mic Not Working Issue
If none of the above fixes worked to get rid of the Logitech G533 mic stopped-working problem, you should use the Windows troubleshooter tool. This is a tool that comes with Windows and is thought to be one of the best. From Windows Settings, you can get to the troubleshooter. Here are some steps that will show you how to do everything.
Step1: Open the Start menu’s context list by tapping on the Windows + X button at the same time.
Step2: Choose the Settings option with your mouse to open the Settings window.
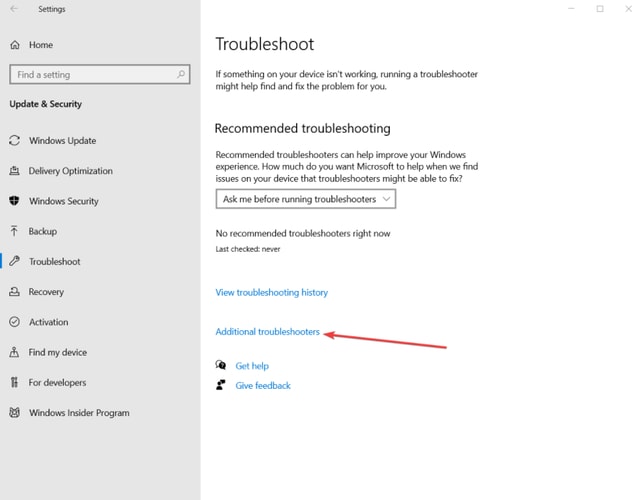
Step3: Click on the Update & Security option on the settings window.
Step4: Now, go with the Troubleshoot tab and then select the Additional troubleshooter button.
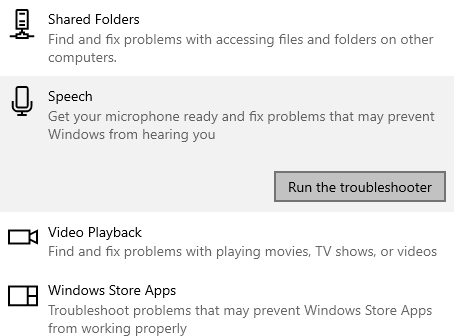
Step5: Then, click on the Speech tab to expand it and then single-click on the Run the troubleshooter button to start the process.
After completing the process, the Logitech G533 mic not working issue will be resolved.
Wrapping Up: How To Fix Logitech G533 Mic Not Working Windows 10 Issue
Hopefully, following the different methods shared in this informative blog helped you resolve the Logitech G533 stopped working problem. If the problem is still troubling, it means your headset is physically broken and you need to purchase a new one. Moreover, share your thoughts about this write-up in the comments section below.
Snehil Masih is a professional technical writer. He is passionate about new & emerging technology and he keeps abreast with the latest technology trends. When not writing, Snehil is likely to be found listening to music, painting, traveling, or simply excavating into his favourite cuisines.


![How to Update and Reinstall Keyboard Drivers on Windows 10/11 [A Guide]](https://wpcontent.totheverge.com/totheverge/wp-content/uploads/2023/06/05062841/How-to-Update-and-Re-install-Keyyboard-Drivers-on-Windows-10.jpg)
