
The ideal portable replacement for desktop computers is a laptop. Smartphones might be competitive, but they must catch up to the convenient, light, and powerful notebooks that can serve as workstations.
Lenovo laptops are no exception to this. For increased productivity, they have a condensed version of everything. The keyboard has fewer keys, and more functions are delegated to a single key, which increases the keyboard’s compactness and mobility. In addition, a touchpad/trackpad is used in place of the standard mouse. So, if your Lenovo touchpad is not working, it is a matter of concern.
More people are experiencing the problem of the Touchpad not working as more people use Lenovo laptops. But if you are a Lenovo user facing this issue, don’t worry. We’ve got your back! This article will guide you on how to fix the Lenovo touchpad not working issue.
What happens is the Touchpad/Trackpad stops functioning, and the moving cursor appears to be as tough as moving rocks. The only choice available at that point is to use the conventional mouse. However, people used to the Touchpad find it difficult to utilize a conventional mouse. And so, the problem with “Lenovo touchpad not working” has become prominent. So, before diving into the solutions, first, understand the causes so you can choose the right method for your problem.
Why is Your Lenovo Touchpad Not Working?
There is no one fixed cause behind this problem. The touchpad frequently stops functioning as a result of unintentional disabling. Fn+F4, Fn+F8, and other key combinations can be used to turn off the Touchpad. These mishaps can become causes behind your Lenovo touchpad not working if they are unintentionally pressed.
Obsolete or damaged device drivers, viruses, complex applications, or hardware issues are other potential causes of the Lenovo laptop touchpad not working. Except for some hardware issues, if any of these scenarios apply, you can fix the problem on your own. That said, let’s move on to the next segment of learning various methods to fix the Lenovo touchpad not working issue.
Methods to Fix Lenovo Touchpad Not Working
First things first, before implementing any solution, remember to use a mouse. If that’s taken care of, then you are good to go to explore the below-given methods that resolve the Lenovo touchpad not working issue.
Method 1: Try Troubleshooting via Touchpad Settings.
Transient system problems can occasionally prevent touchpads from operating properly. A routine restart can fix the Lenovo touchpad not working issue. Make careful to press the touchpad hotkey on the keyboard as well. The touchpad can be used by pressing Fn + F6 or just F6.
Depending on the type of Lenovo laptop you own, the hotkeys could change. A touchpad symbol on the function keys will represent the touchpad hotkeys for turning on and off the touchpad.
Ensure that the touchpad is activated in Windows settings as well. To learn more, follow these instructions.
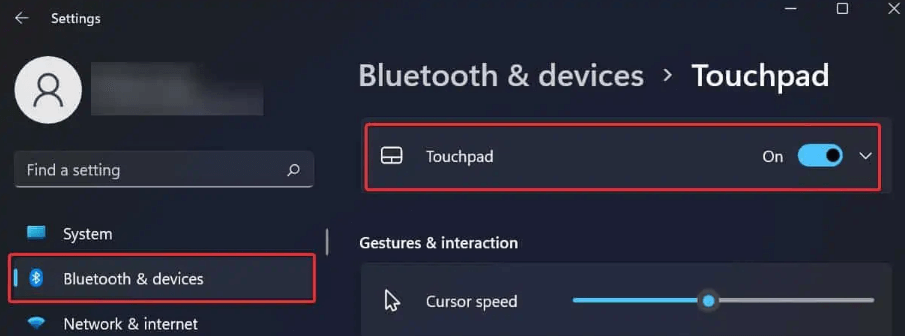
- To access the settings, use the Windows key plus I.
- Select Touchpad under Bluetooth and gadgets.
- Make sure the slider is set to On in the Touchpad area.
Also read: Two Finger Scroll Not Working Windows 11/10? Here’s How to Fix It
Method 2: Access the Control Panel to Enable Touchpad
In some cases, updating the operating system or installing a third-party app will completely disable Windows’ touchpad capability.
Through the control panel, you can easily allow this option in Windows 10 or 11. Follow these steps for implementation and fix the Lenovo laptop touchpad not working issue instantly-
- Open Start and search for “touchpad settings,”
- Press Enter to activate the device through the control panel.
- Toggle the touchpad option in the touchpad window to turn it on
- Finally, check the touchpad.
Method 3: Check for Lenovo Laptop Touchpad Settings in the BIOS/UEFI.
If your Lenovo laptop trackpad is still not working, you can try the several settings managed by your computer’s BIOS or UEFI, which is independent of any operating system. The BIOS may have disabled your touchpad, preventing Windows from using it.
When your PC turns on, you must enter the BIOS by pressing Del, F2, or a similar key. Look for an entry that says Internal Pointing Device, Trackpad, Touchpad, or anything similar. It might be listed under the Advanced section. Verify that it is not disabled. If so, restart it, and Windows ought to be able to identify it.
Method 4: Restore Default Touchpad settings
Restoring the touchpad’s factory settings is another way to fix the Lenovo touchpad not working on Windows 10. Remember, when you restore the touchpad, all the previously configured settings for the trackpad/touchpad get deleted.
Please follow the steps below to return the touchpad to its default settings:
- Enter “touchpad settings” into the Start search box.
- You will then see the trackpad settings.
- Scroll down to the bottom of the settings list, where you’ll find the “Reset your touchpad” option.
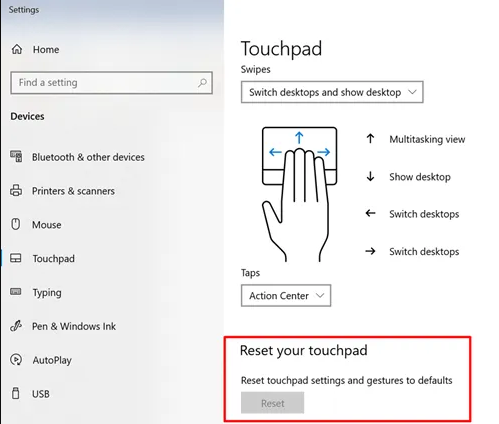
- By pressing the Reset option, you can clear the touchpad presets and any obstacles preventing it from working properly.
Method 5: Update Touchpad Driver
In some cases, you can update Windows 10/11 to the most recent version, but the touchpad drivers may not update in time, becoming a cause behind your Lenovo touchpad not working properly. In this case, getting the most recent touchpad drivers is crucial, as installing them on compatible versions of the operating system.
Go through these steps to update your touchpad drivers:
- First, download Synaptics Touchpad Driver from the official Lenovo Website.
- After that, click to see the search box, then enter “Device Manager” into it.
- You must expand the option for Mice and other pointing devices after the Device Manager has been opened.
- Next, choose Update driver software from the context menu when you right-click on the Lenovo Touchpad or Pointing Device.
- The next step is to choose “Browse my computer for driver software.”
- Your computer’s screen will then display a new window where you must select the option when it offers you options among device drivers for downloading.
- Click the Have Disk button in the next window.
- Install the right touchpad driver on your computer by choosing it from the Lenovo official website.
Also know: Best Free Driver Updater Software for Windows 11, 10, 8, 7
Method 6: Update Lenovo Touchpad Driver With Bit Driver Updater (Recommended)
Downloading, installing, and reinstalling touchpad drivers on Windows takes a lot of effort, perseverance, and computer expertise when using the manual techniques described above. Therefore, it is advised to utilize straightforward and automatic software like Bit Driver Updater to save time and effort.
With just one click, you can easily download and install the touchpad driver on your Windows 10 OS using this finest free driver updater. The software aids in enhancing the system’s performance and stability in addition to replacing out-of-date drivers.
Here’s how to use this fantastic program to download or update your Lenovo touchpad drivers and have them installed automatically.
- Obtain, set up, and launch Bit Driver Updater.
- Choose Scan from the navigation pane on the left to look for obsolete, omitted, and flawed system drivers.
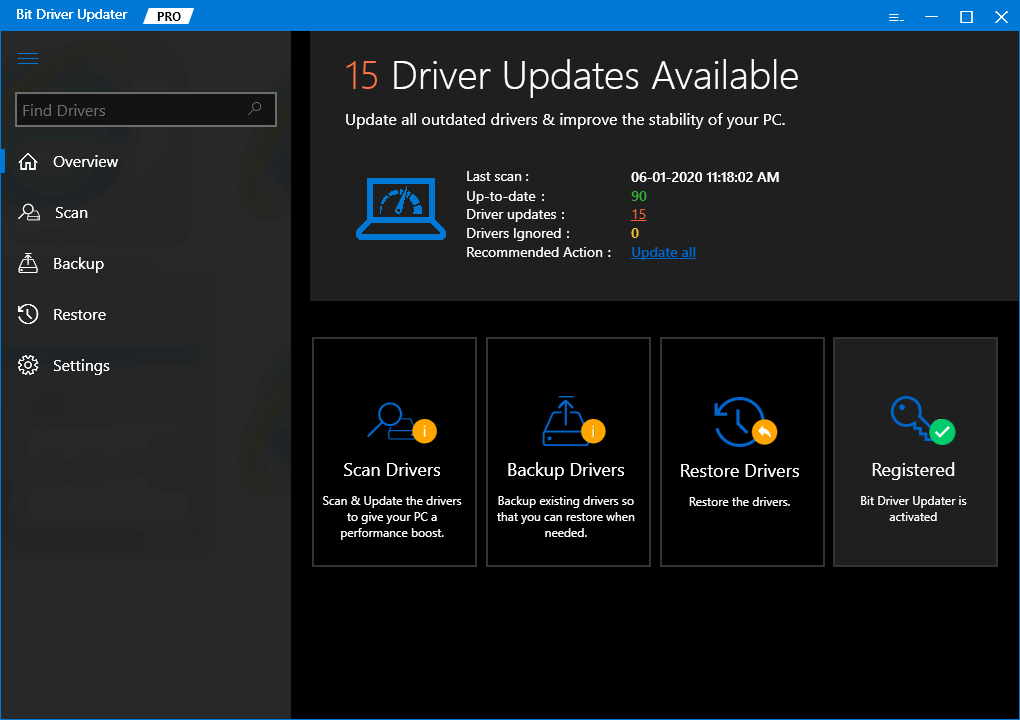
- When the list of driver problems appears on your screen, choose Update Now next to the touchpad driver to download the latest version.

Method 7: Uninstall Windows Updates
You must roll back the most recent Windows update through the control panel if a full patch of a Windows update leads to the trackpad not working on your Lenovo laptop.
- Open Start and then find Update and Security.
- Click enter.
- Select “uninstall updates” from the View update history menu in the next box.
- Options for the latest updates with dates will open
- Choose the most recent updates and remove each of them.
- Restart the computer after the procedure is finished, then test the touchpad’s functionality.
Method 8: Delete, Download and Reinstall Lenovo Touchpad Drivers
Sometimes, the laptop touchpad not working problem may persist even after installing the most recent driver or even after attempting generic drivers. If you are facing such a situation even after installing the drivers timely, sadly, you must uninstall the driver you installed and reset everything back to how it was.
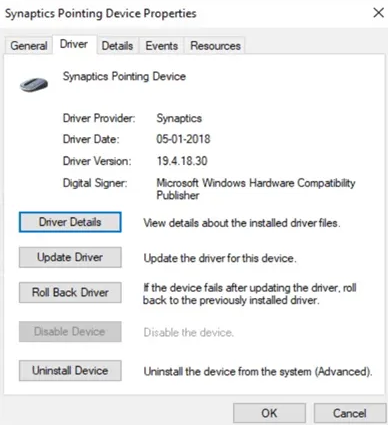
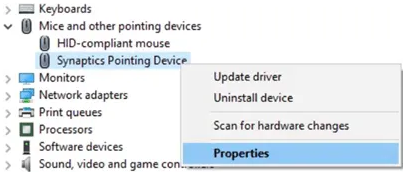
- Open Start and enter “device manager” to begin the process.
- Select the option for Mice and other pointing devices.
- Right-click on “Synaptic Pointing Device” and then select properties.
- Roll back drivers by selecting the “Driver” tab.
- Restart the laptop after finishing, then check.
Method 9: Modify the Power Management Configuration
Lenovo laptop touchpad not working is a problem that particular power management settings may also cause.
Follow these simple steps if this is the right solution for your situation-
- Start > Device Manager > Enter.
- In the Device Manager box, select Mice and other pointing devices.
- Select Properties with a right-click on “Synaptic Pointing Device.”
- Under the “Power Management” tab, do not permit your PC to save power
- Now, reboot your PC and enjoy your perfectly working touchpad.
Conclusion
These days, the Lenovo touchpad not working issue has become widespread among Lenovo users, but we hope these methods will help you resolve it. These are unquestionably the most effective solutions for this complex deadlock. If you have difficulty implementing these issues, you can always contact the official Lenovo website or seek expert help. Let us know which method was the most helpful to you in the comments section below!
Snehil Masih is a professional technical writer. He is passionate about new & emerging technology and he keeps abreast with the latest technology trends. When not writing, Snehil is likely to be found listening to music, painting, traveling, or simply excavating into his favourite cuisines.


![How to Update and Reinstall Keyboard Drivers on Windows 10/11 [A Guide]](https://wpcontent.totheverge.com/totheverge/wp-content/uploads/2023/06/05062841/How-to-Update-and-Re-install-Keyyboard-Drivers-on-Windows-10.jpg)
