

If you are facing the Dell touchpad not working on Windows 10/11 laptops, then read this article and it will provide you with the best solutions to get rid of this issue.
Some Dell laptop users have said that their Dell trackpad not working properly. Most people who are affected by this issue reported that their touchpad stopped working all of a sudden, making it hard to operate their laptops. Some users also experienced that when they connect an external mouse, their touchpad starts to work again.
If you find yourself in a similar situation, the fixes below will help you get your Dell computer’s trackpad to work again. Here is a list of solutions that other people have tried in order to fix this problem. Hence, follow each potential solution to get rid of the Dell touchpad not working problem.
Solutions That Will Help You Fix The Dell Touchpad Not Working On Windows 10/11
Let’s take a look at the different approaches we have shared below in order to fix the Dell laptop touchpad not working issue. Before jumping on to the solutions we would recommend you use an external mouse, as it will be required in some methods.
Fix1: Turn ON The Touchpad On Your Dell Laptop
One of the most common reasons why people face the Dell laptop touchpad not working is that they accidentally turn it off by pressing the Function key. You can find this dedicated key in the function keys row on most laptops.
To ensure that isn’t the reason why you are facing this problem, press the Function (Fn) + F9 key (the one that has the Touchpad icon on it) and see if this fixes the problem. If nothing happens when you press the button, you should move on to the next solution shared below.
Fix2: Turn On The Touchpad Toggle Switch
To try fixing the Dell touchpad not working problem, you can turn on the toggle switch for your mouse from the Windows settings. Here we have listed some instructions that will guide you through the process.
Step1: Hit the Windows + X buttons at the same time to open the Start menu’s context list.
Step2: Open the Settings window by clicking on it. 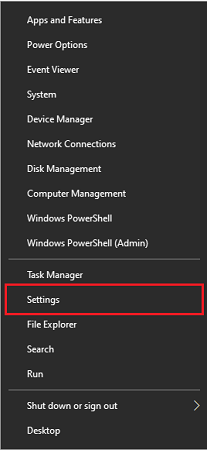 Step3: Visit the Devices section and then choose the Touchpad tab from the left pane.
 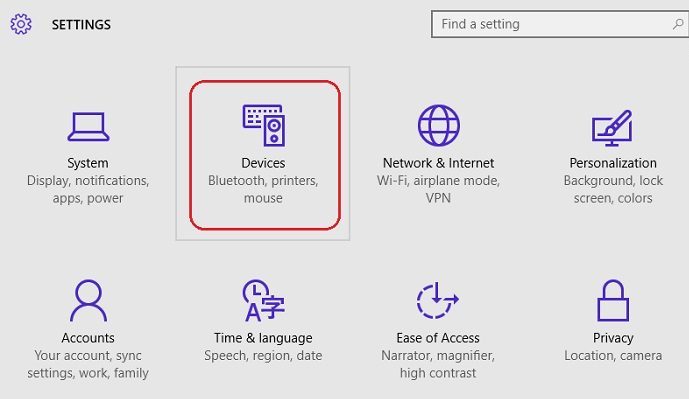 Step4: Then, on the right-hand side, Turn On the Touchpad toggle switch to enable it.
 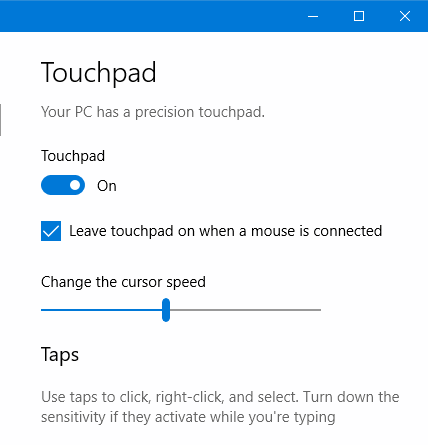 Now, check if performing this procedure has helped you with the Dell laptop touchpad not working issue. If the issue is still there, slide down to the next method.
Also know: Acer Touchpad Driver Download and Update for Windows 10,11 PC
Fix3: Enable Your Touchpad By Using Device Manager
If you are a Windows user, you can access all the connected devices using the Device Manager tool. With the help of this tool, you can also turn on or off some of the devices that are connected to your computer. The steps below will help you fix the dell touchpad not working by enabling it from the device manager.
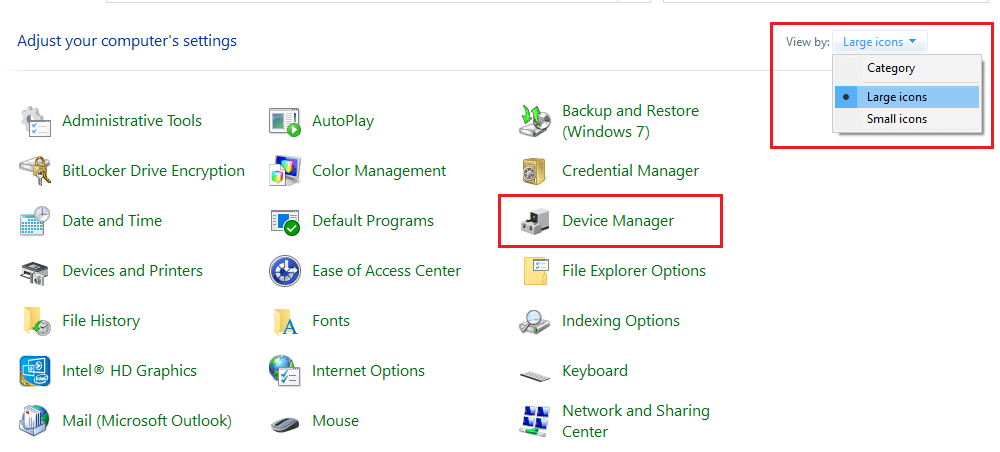
Step1: Type Control Panel in the taskbar’s search box and hit the Enter button on your keyboard.
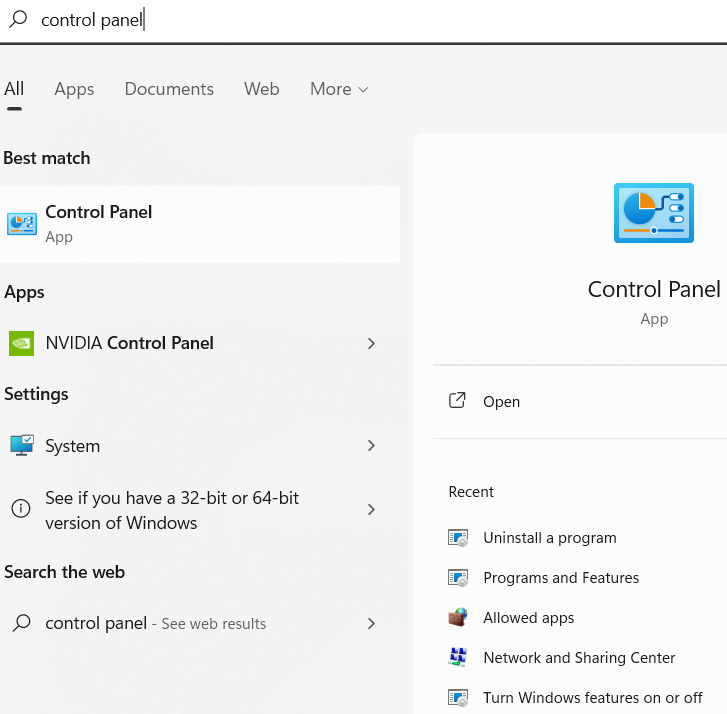
Step2: Select the Large icons option from the View by context list
Step3: Single click on the Device Manager icon and it will open a new window showing all the drivers present on your PC.
Step4: Now, expand the “Mice and other pointing devices” section by clicking on it. Then, choose the Properties option from the list by right-clicking on your Dell touchpad driver.
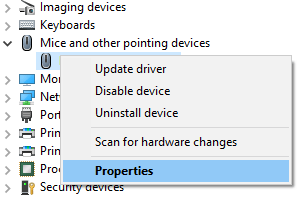
Step5: A new window will open, go to the Driver tab. If the touchpad is disabled, click on the Enable Device button. And if the touchpad is already enabled, restart it by first selecting the Disable Device option and then Enable Device option.
Once the process is complete, check if this method has solved the Dell touchpad not working issue. If not, jump on to the next one.
Fix4: Update Your Dell Touchpad Drivers
Many Windows users don’t know that they have to keep their device drivers updated to avoid issues like the Dell touchpad buttons not working. Generally, people update their Windows OS thinking it will update all the drivers along with it. This is partly true because it will update only a few drivers.
In order to update all your drivers you can either use the Device Manager tool which is a Windows-integrated utility or you can go with the automatic process. Below we have shared both methods to update your mouse drivers and fix the Dell touchpad not working on Windows 11/10.
Steps To Fix Dell Laptop Touchpad Not Working Issue By Updating Drivers Manually
First, we will look at the steps to update mouse drivers manually and resolve the Dell trackpad not working problem.
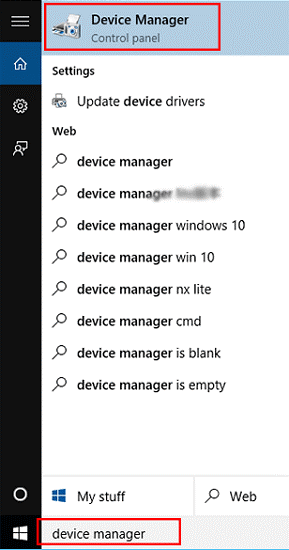
Step1: Click on the Start menu and search for the Device Manager tool
Step2: On the Device Manager window, double-click on the “Mice and other pointing devices” section to expand it.
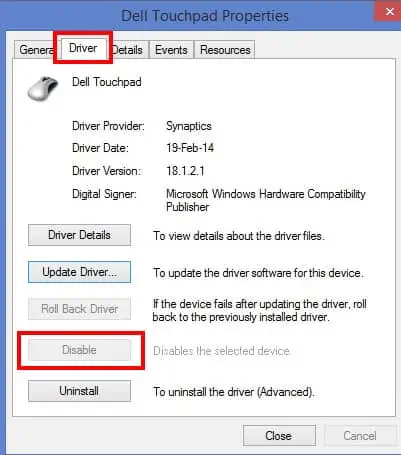
Step3: Now, double-click on the Dell touchpad driver and it will open a new window.
Step4: Go to the Drivers tab by selecting it from the top.
Step5: Select the Update Driver option.
Step6: Click on the “Search automatically for drivers” option on the new window that popped up on your screen.
Step7: Give your computer some time to search for any updated drivers available online. If there are any, it will download them.
Step8: Then, your computer will show you some instructions on your screen that you need to follow to install the new touchpad drivers successfully.
After the installation process is complete, restart your system to implement the new drivers properly. If you feel that fixing the Dell touchpad not working by updating drivers manually is a hard method to follow, try out the automated process shared below.
Steps To Fix Dell Laptop Touchpad Not Working Issue By Updating Drivers Automatically
One of the easiest ways to update your PC drivers and fix problems like the Dell trackpad not working is to use a reliable third-party program. These driver updater apps are known for being able to find compatible drivers and install them automatically.
When looking for a driver updater for your computer, you will find a lot of options online. But we would suggest you use the Bit Driver Updater app instead of anything else. It is the safest and fastest software on the market for updating drivers. It can automatically figure out your device’s operating system and find the most up-to-date WHQL-certified drivers for your computer.
This app also enhances your computer’s processing speed by making sure your Windows drivers are always up to date. Moreover, it creates a backup for your outdated drivers before updating them, in case you need to roll them back. The steps below will help you download and use the Bit Driver Updater to solve the Dell touchpad not working Windows 10/11 issue by updating the driver automatically.
Steps to update drivers automatically:
Step1: Download the most recent version of the Bit Driver Updater app from the link given below:

Step2: Open the downloaded setup file in the Downloads folder and follow the on-screen instructions to install it.
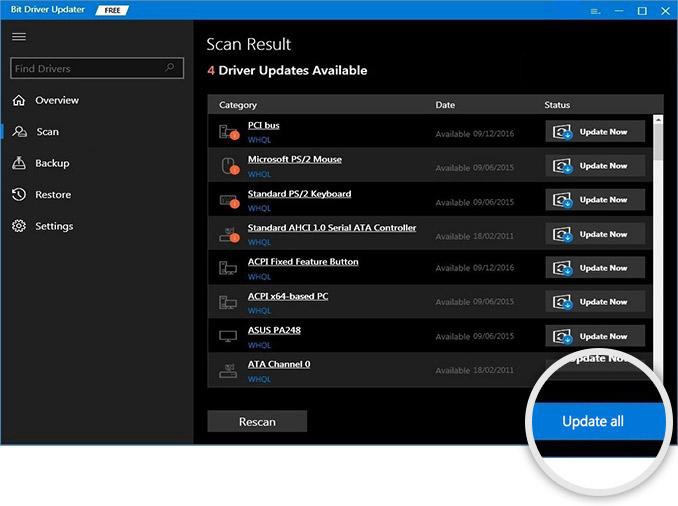
Step3: Run the application and it will automatically start scanning for all the outdated or corrupted drivers on your PC.
Step4: Now, a list of drivers will be displayed to you that need an update, click on the Update All option to proceed further. Wait for some time and then the app will automatically download and install the latest drivers on your PC.
Once you are done with the process, Restart the computer and check for the Dell touchpad buttons not working issue. If the issue still persists, it is time to troubleshoot the problem using Windows tools.
Fix5: Run The Windows Troubleshooter
If even after performing all the methods above the Dell touchpad not working issue is still bothering you, use the Windows troubleshooter to eliminate the problem. This tool is an in-built Windows utility that helps users to fix issues like this.
You can perform the troubleshooting by using the tool from Windows Settings. The steps below will help you use the Windows troubleshooter tool to resolve the touchpad and the two-finger scroll not working issue.
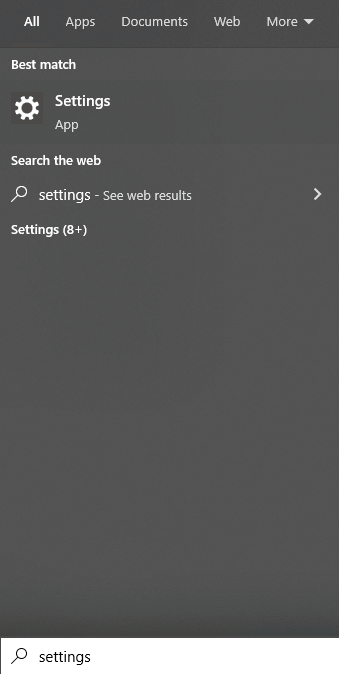
Step1: Type Settings in the search box present on the taskbar and hit Enter.
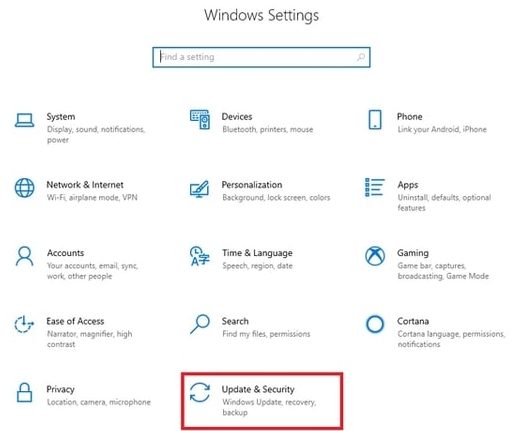
Step2: Open the Update & Security section and from the left pane, select the Troubleshooter tab.
Step3: Now, on the right-hand side pane, choose the Additional troubleshooters option.
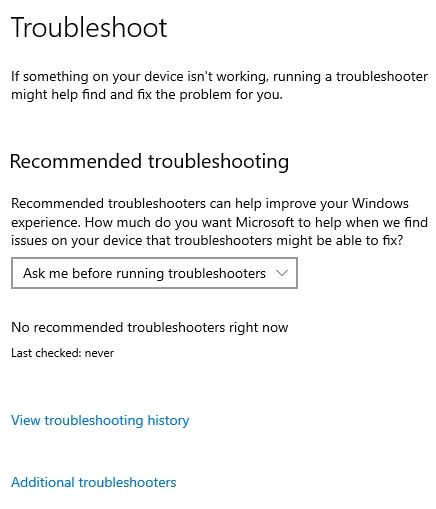
Step4: Then, select the Run the troubleshooter option by expanding the Hardware and Devices option.
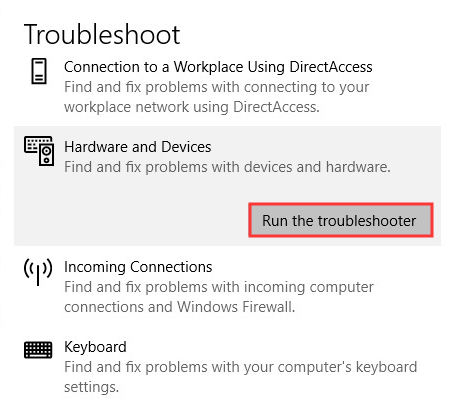
Step5: Give your computer some time to figure out what is the reason behind the Dell touchpad not working issue. Then, follow the on-screen steps to fix the issue.
Once you are done with the troubleshooting process, restart your computer, and the Dell touchpad not working issue will be resolved.
Resolved: How To Fix Dell Touchpad Not Working On Windows 11/10 PC
We hope one of the solutions that we have shared will help you fix the Dell touchpad not working issue. However, if you are still facing the same issue, there is a chance that your touchpad is physically damaged. Hence, you need to take your laptop to a nearby repair shop or contact the manufacturer. Also, share your thoughts about this write-up in the comment box below.
Snehil Masih is a professional technical writer. He is passionate about new & emerging technology and he keeps abreast with the latest technology trends. When not writing, Snehil is likely to be found listening to music, painting, traveling, or simply excavating into his favourite cuisines.


![How to Update and Reinstall Keyboard Drivers on Windows 10/11 [A Guide]](https://wpcontent.totheverge.com/totheverge/wp-content/uploads/2023/06/05062841/How-to-Update-and-Re-install-Keyyboard-Drivers-on-Windows-10.jpg)
